跳转到主内容

Yoga Tab 3 Pro Battery Replacement

你所需要的

  1. Yoga Tab 3 Pro Battery Replacement, Preparation: 步骤 1 中的图像 1,3 Yoga Tab 3 Pro Battery Replacement, Preparation: 步骤 1 中的图像 2,3 Yoga Tab 3 Pro Battery Replacement, Preparation: 步骤 1 中的图像 3,3
    • Flip the tablet with the rear panel facing up.

    • Push the central button to lift the support.

    • Open the support entirely, using your hands.

    • Remember to turn off the device before doing any repair.

  2. Yoga Tab 3 Pro Battery Replacement, Unscrew the rear shell: 步骤 2 中的图像 1,3 Yoga Tab 3 Pro Battery Replacement, Unscrew the rear shell: 步骤 2 中的图像 2,3 Yoga Tab 3 Pro Battery Replacement, Unscrew the rear shell: 步骤 2 中的图像 3,3
    • You'll need to remove the adesive on the back plate before removing the screws.

    • Remove the sticker using the plastic spudger by lifting it up from one side, then you can remove it entirely by using your fingers.

    • Use the Philips #0 screwriver to remove the three screws.

  3. Yoga Tab 3 Pro Battery Replacement, Separate the two halfs: 步骤 3 中的图像 1,3 Yoga Tab 3 Pro Battery Replacement, Separate the two halfs: 步骤 3 中的图像 2,3 Yoga Tab 3 Pro Battery Replacement, Separate the two halfs: 步骤 3 中的图像 3,3
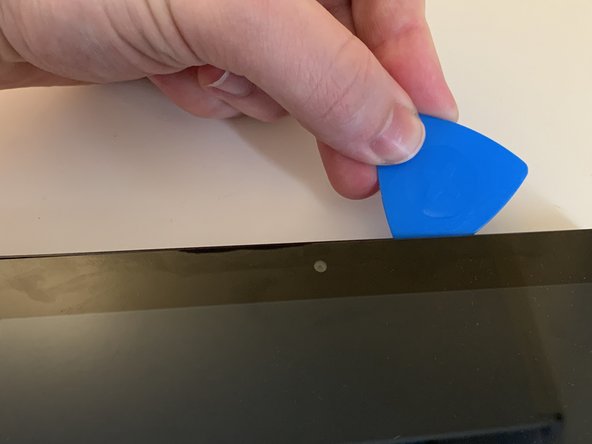
    • Divide the two halfs by inserting the spudger in the gap between the front shell and the rear one. To help you out with this job you can also use some guitar picks.

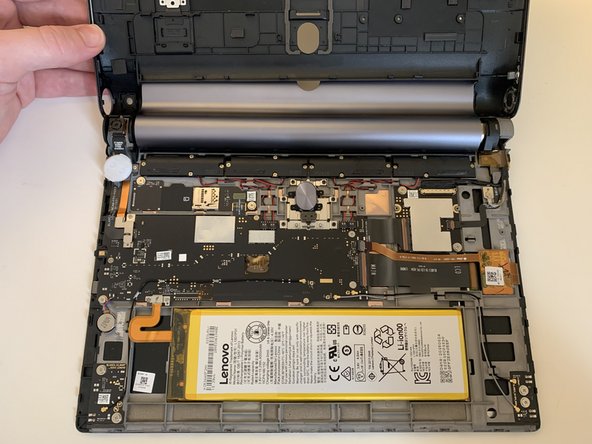
    • Do the same procedure on all three visible sides, including the two round side parts.

    • Be careful not to insert the spudger too deep into the device, to not damage the internal component.

    • You could use a little bit of force since the half is also hooked in the central portion on the tablet.

    • Important: the rear shell is the one that you remove from the front one; the internal component including the display, will stay attached to the front panel.

  4. Yoga Tab 3 Pro Battery Replacement, Separation: 步骤 4 中的图像 1,3 Yoga Tab 3 Pro Battery Replacement, Separation: 步骤 4 中的图像 2,3 Yoga Tab 3 Pro Battery Replacement, Separation: 步骤 4 中的图像 3,3
    • Once you unhook all the internal clips you can easily remove the rear panel.

    • Watch out at the two side keys and at the central one, since they'll detach form the rear shell. and You'll need to put them back during the reassembly.

  5. Yoga Tab 3 Pro Battery Replacement, Remove the plate for the battery connector: 步骤 5 中的图像 1,2 Yoga Tab 3 Pro Battery Replacement, Remove the plate for the battery connector: 步骤 5 中的图像 2,2
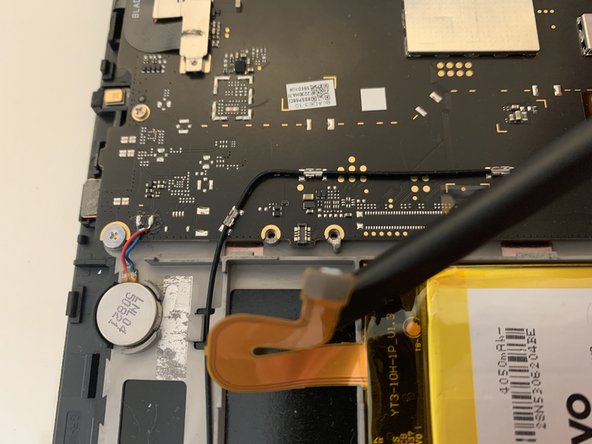
    • Remove the two screws that hold the plate for the battery connector, by using a Philips #00 screwdriver.

    • Remove the plate by using tweezers.

  6. Yoga Tab 3 Pro Battery Replacement, Unplug the battery: 步骤 6 中的图像 1,2 Yoga Tab 3 Pro Battery Replacement, Unplug the battery: 步骤 6 中的图像 2,2
    • Use the flat portion of a spudger to unplug the battery from the motherboard.

    • Pull the connector away from the motherboard.

  7. Yoga Tab 3 Pro Battery Replacement, Remove the adhesive pull tabs: 步骤 7 中的图像 1,3 Yoga Tab 3 Pro Battery Replacement, Remove the adhesive pull tabs: 步骤 7 中的图像 2,3 Yoga Tab 3 Pro Battery Replacement, Remove the adhesive pull tabs: 步骤 7 中的图像 3,3
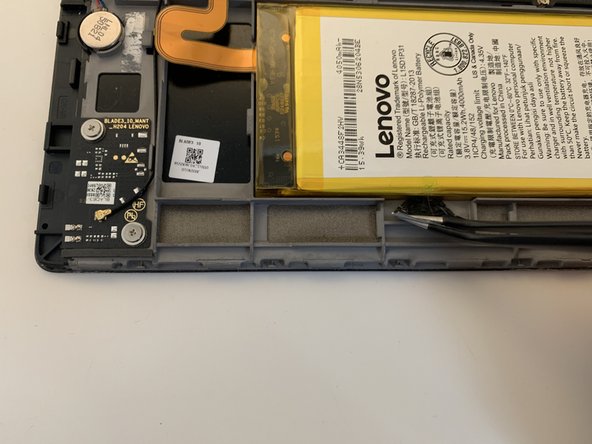
    • Use the tweezers to lift up the adhesive pull tabs.

    • Use your fingers to lift up the adhesive pull tabs to

    • Insert translation here

    • Insert translation here

  8. Yoga Tab 3 Pro Battery Replacement: 步骤 8 中的图像 1,1
    • Do the same procedure on the second adhesive pull tabs to remove it entirely.

    • If the adhesive pull tabs broke try to recover it by using flat point tweezers or your fingers.

    • Never force the battery and don't pierce it. Doing so can cause leak of liquid chemical or flame.

  9. Yoga Tab 3 Pro Battery Replacement, Alternative way to remove the battery: 步骤 9 中的图像 1,1
    • If one or both the adhesive pull tabs break, you can use a small amount of isopropyl alcol ( in a solution concentrated > 90%)

    • Insert the alcool near the adhesive pull tabs and let it

    • Insert translation here

    • Insert translation here

  10. Yoga Tab 3 Pro Battery Replacement, Remove the Battery: 步骤 10 中的图像 1,1
    • Now that you've completely removed the double-sided tape, you can remove the battery very easily.

结论

To reassemble the device, folllow these instruction in reverse order.

另外一个人完成了本指南。

由衷感谢以下译者:

it en

100%

这些译者帮助我们修补全世界! 您也想加入吗?
开始翻译 ›

jacopo

于03/25/14注册

4,382 声望

创作了3篇指南

团队

JappoTech JappoTech 的会员

Business

1 名成员

创作了7篇指南

0条评论

添加评论

浏览统计数据:

过去 24 小时: 1

过去 7 天: 19

过去 30 天: 54

总计 890