跳转到主内容

Whirlpool Dryer Drum Light Replacement

你所需要的

  1. Whirlpool Dryer Drum Light Replacement, Safety Precautions: 步骤 1 中的图像 1,1
    • Before you begin your repair, unplug your dryer.

    • Your power cord may have four prongs rather than three. The additional prong is a ground connection.

  2. Whirlpool Dryer Drum Light Replacement, Unfasten the top panel: 步骤 2 中的图像 1,3 Whirlpool Dryer Drum Light Replacement, Unfasten the top panel: 步骤 2 中的图像 2,3 Whirlpool Dryer Drum Light Replacement, Unfasten the top panel: 步骤 2 中的图像 3,3
    在这个步骤中使用的工具:
    FixMat
    $36.95
    购买
    • Throughout this guide, keep track of each screw and reinstall it exactly where it came from.

    • Use a nut driver to remove the screws securing the top panel to the rear panel bracket.

  3. Whirlpool Dryer Drum Light Replacement, Remove the top panel: 步骤 3 中的图像 1,2 Whirlpool Dryer Drum Light Replacement, Remove the top panel: 步骤 3 中的图像 2,2
    • Grasp the top and slide it 1/2 to 1 inch toward the rear of the machine.

  4. Whirlpool Dryer Drum Light Replacement: 步骤 4 中的图像 1,2 Whirlpool Dryer Drum Light Replacement: 步骤 4 中的图像 2,2
    • Lift the top panel upward to separate it from the chassis.

    • Remove the top panel from the machine.

  5. Whirlpool Dryer Drum Light Replacement, Disconnect the control panel: 步骤 5 中的图像 1,2 Whirlpool Dryer Drum Light Replacement, Disconnect the control panel: 步骤 5 中的图像 2,2
    • Disconnect the control panel cable from the main board.

  6. Whirlpool Dryer Drum Light Replacement: 步骤 6 中的图像 1,2 Whirlpool Dryer Drum Light Replacement: 步骤 6 中的图像 2,2
    • Disconnect the drum light connector.

  7. Whirlpool Dryer Drum Light Replacement, Unfasten the control panel: 步骤 7 中的图像 1,2 Whirlpool Dryer Drum Light Replacement, Unfasten the control panel: 步骤 7 中的图像 2,2
    • Remove the screws securing the control panel.

  8. Whirlpool Dryer Drum Light Replacement, Remove the control panel: 步骤 8 中的图像 1,3 Whirlpool Dryer Drum Light Replacement, Remove the control panel: 步骤 8 中的图像 2,3 Whirlpool Dryer Drum Light Replacement, Remove the control panel: 步骤 8 中的图像 3,3
    • Lift the control panel up and tilt it away from the chassis to remove it.

    • Make sure to thread the cable through the hole in the chassis.

    • During reassembly, thread the cable through its proper hole before reinstalling the control panel.

  9. Whirlpool Dryer Drum Light Replacement, Disconnect the door switch: 步骤 9 中的图像 1,3 Whirlpool Dryer Drum Light Replacement, Disconnect the door switch: 步骤 9 中的图像 2,3 Whirlpool Dryer Drum Light Replacement, Disconnect the door switch: 步骤 9 中的图像 3,3
    • Use a small flat blade screwdriver or a spudger to unlatch both sides of the door switch connector.

    • Unplug the connector.

  10. Whirlpool Dryer Drum Light Replacement, Unfasten the front panel: 步骤 10 中的图像 1,2 Whirlpool Dryer Drum Light Replacement, Unfasten the front panel: 步骤 10 中的图像 2,2
    • Remove the upper front panel sheet metal screws.

    • Tilt the machine backwards and prop it securely, or have a friend hold it.

    • Remove the sheet metal screws on the bottom edge of the panel.

  11. Whirlpool Dryer Drum Light Replacement: 步骤 11 中的图像 1,1
    • Remove the screws inside the door area below the drum opening.

  12. Whirlpool Dryer Drum Light Replacement, Remove the front panel: 步骤 12 中的图像 1,3 Whirlpool Dryer Drum Light Replacement, Remove the front panel: 步骤 12 中的图像 2,3 Whirlpool Dryer Drum Light Replacement, Remove the front panel: 步骤 12 中的图像 3,3
    • The panel is heavy and awkward. You may want to have a friend help you with this step.

    • Pull the bottom of the panel away from the chassis about two to three inches.

    • Lift the front panel off the small tabs on the chassis near the top of the panel and remove it.

    • Make sure you don't snag the door switch wire harness as you remove the panel.

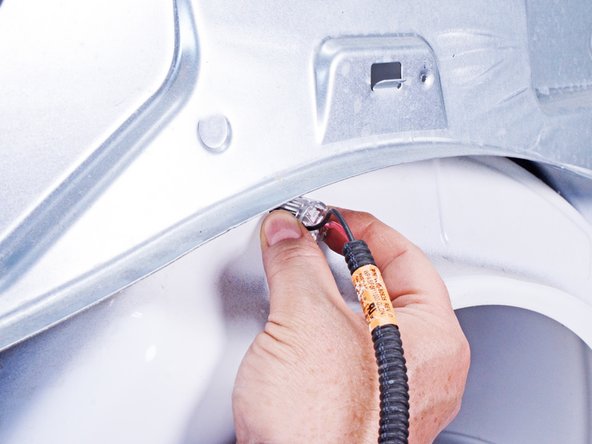
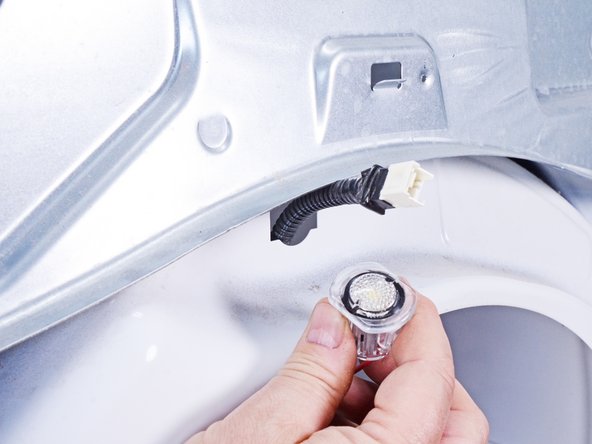
  13. Whirlpool Dryer Drum Light Replacement, Remove the drum light: 步骤 13 中的图像 1,3 Whirlpool Dryer Drum Light Replacement, Remove the drum light: 步骤 13 中的图像 2,3 Whirlpool Dryer Drum Light Replacement, Remove the drum light: 步骤 13 中的图像 3,3
    • Release the drum light module by pressing in on the tabs on the side of the module.

    • Push the module through the mounting hole in the front bulkhead and into the drum.

    • Feed the wiring harness through the mounting hole and remove the module and harness from the dryer.

结论

To reassemble your device, follow these instructions in reverse order.

Repair didn’t go as planned? Ask our Answers community for help.

Bill Gilbert

于06/30/22注册

30,088 声望

创作了213篇指南

团队

iFixit iFixit 的会员

Staff

136 名成员

创作了17,410篇指南

0条评论

添加评论

浏览统计数据:

过去 24 小时: 0

过去 7 天: 2

过去 30 天: 14

总计 159