跳转到主内容

Wexford CT-166TF Plastic Casing Replacement

你所需要的

  1. Wexford CT-166TF Plastic Casing  Replacement, Settings Knob: 步骤 1 中的图像 1,1
    • Locate the knob at the top of the fan.

  2. Wexford CT-166TF Plastic Casing  Replacement: 步骤 2 中的图像 1,1
    • Remove the knob by gripping it and pulling straight up. Use a spudger if it is difficult to grip.

    • When reassembling, be sure to align the bottom of the new knob and the turning mechanism in the fan before pushing down.

  3. Wexford CT-166TF Plastic Casing  Replacement, Plastic Casing: 步骤 3 中的图像 1,1
    • Using the plastic opening tool, turn the device over and remove the black plastic covers over the four screw holes.

  4. Wexford CT-166TF Plastic Casing  Replacement: 步骤 4 中的图像 1,2 Wexford CT-166TF Plastic Casing  Replacement: 步骤 4 中的图像 2,2
    • Remove the four screws underneath the plastic covers.

  5. Wexford CT-166TF Plastic Casing  Replacement: 步骤 5 中的图像 1,2 Wexford CT-166TF Plastic Casing  Replacement: 步骤 5 中的图像 2,2
    • Remove 5 smaller screws visible through small holes between the base and the casing.

  6. Wexford CT-166TF Plastic Casing  Replacement: 步骤 6 中的图像 1,2 Wexford CT-166TF Plastic Casing  Replacement: 步骤 6 中的图像 2,2
    • Remove four screws on the back, two near the top and two near the bottom.

  7. Wexford CT-166TF Plastic Casing  Replacement: 步骤 7 中的图像 1,1
    • Pull off the back casing.

  8. Wexford CT-166TF Plastic Casing  Replacement: 步骤 8 中的图像 1,2 Wexford CT-166TF Plastic Casing  Replacement: 步骤 8 中的图像 2,2
    • Remove the 2 screws that attach the front part of the casing to the motor.

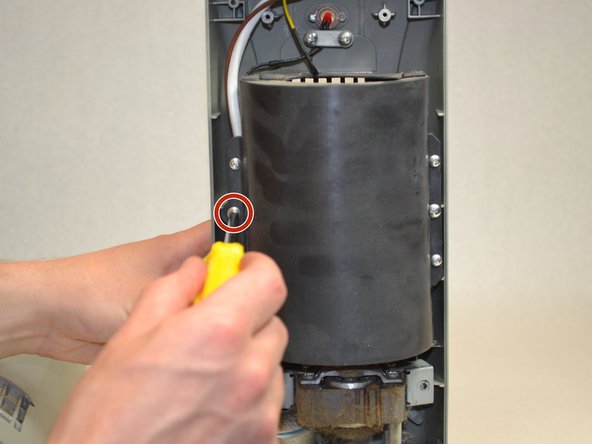
  9. Wexford CT-166TF Plastic Casing  Replacement: 步骤 9 中的图像 1,2 Wexford CT-166TF Plastic Casing  Replacement: 步骤 9 中的图像 2,2
    • Remove the two middle screws attaching the black plastic cover to the front .

  10. Wexford CT-166TF Plastic Casing  Replacement: 步骤 10 中的图像 1,1
    • Remove the two screws attached to the white bar near the red light on the top of the front casing.

  11. Wexford CT-166TF Plastic Casing  Replacement: 步骤 11 中的图像 1,1
    • Remove the two screws keeping the button attached to the top of the casing.

结论

To reassemble your device, follow these instructions in reverse order.

另外一个人完成了本指南。

团队

UW Tacoma, Team S3-G4, Liner Spring 2017 UW Tacoma, Team S3-G4, Liner Spring 2017 的会员

UWT-LINER-S17S3G4

4 名成员

创作了3篇指南

0条评论

添加评论

浏览统计数据:

过去 24 小时: 0

过去 7 天: 1

过去 30 天: 5

总计 331