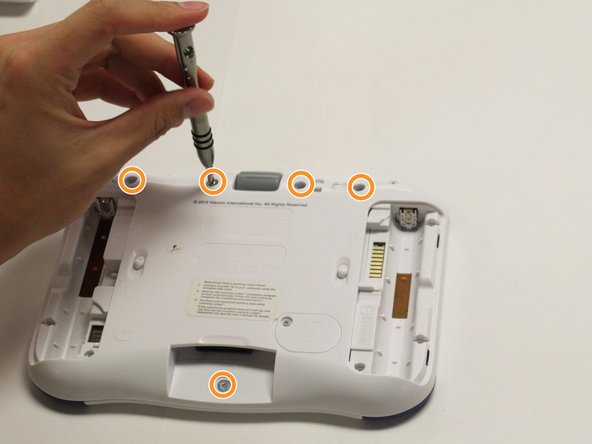
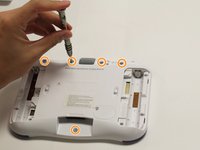
跳转到主内容

Vtech InnoTab 3S Rear Panel Replacement

你所需要的

  1. Vtech InnoTab 3S Rear Panel Replacement, Rear Panel: 步骤 1 中的图像 1,3 Vtech InnoTab 3S Rear Panel Replacement, Rear Panel: 步骤 1 中的图像 2,3 Vtech InnoTab 3S Rear Panel Replacement, Rear Panel: 步骤 1 中的图像 3,3
    • While holding the battery compartment locks down, slide the two battery doors outwards from the sides of the device.

    • Remove the batteries from the device.

  2. Vtech InnoTab 3S Rear Panel Replacement: 步骤 2 中的图像 1,2 Vtech InnoTab 3S Rear Panel Replacement: 步骤 2 中的图像 2,2
    • Remove six 7 mm screws from the interior of the battery compartment using a Phillips #1 screwdriver.

  3. Vtech InnoTab 3S Rear Panel Replacement: 步骤 3 中的图像 1,3 Vtech InnoTab 3S Rear Panel Replacement: 步骤 3 中的图像 2,3 Vtech InnoTab 3S Rear Panel Replacement: 步骤 3 中的图像 3,3
    • Using a nylon spudger, remove the five caps that hide the screws.

    • Potential for device damage: Be careful not to scrape the plastic from the device using the spudger.

    • When removing the caps, hold the spudger vertical to the board to make removal easier. Also try to push in with your spudger pointing towards the bottom of the device.

    • Remove the five 5 mm Phillips #1 screws from the rear panel of the device.

  4. Vtech InnoTab 3S Rear Panel Replacement: 步骤 4 中的图像 1,1
    • Carefully remove the rear panel from the front panel of the device.

    • Once the rear panel is removed, you'll be able to see the motherboard and other components within the Vtech InnoTab 3s.

结论

To reassemble your device, follow these instructions in reverse order.

Karina Garcia

于08/30/15注册

824 声望

创作了6篇指南

团队

USF Tampa, Team 8-2, Eyestone Fall 2015 USF Tampa, Team 8-2, Eyestone Fall 2015 的会员

USFT-EYESTONE-F15S8G2

4 名成员

创作了9篇指南

一条评论

too dumb i tryed 7 times it didnt work i reat this 1000000-/10

Kyron Ostrander - 回复

添加评论

浏览统计数据:

过去 24 小时: 0

过去 7 天: 1

过去 30 天: 10

总计 622