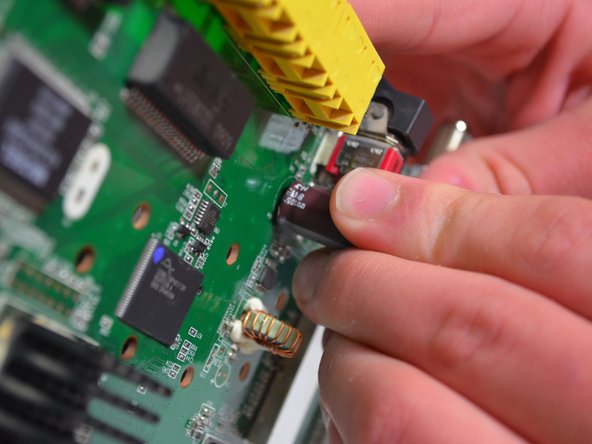
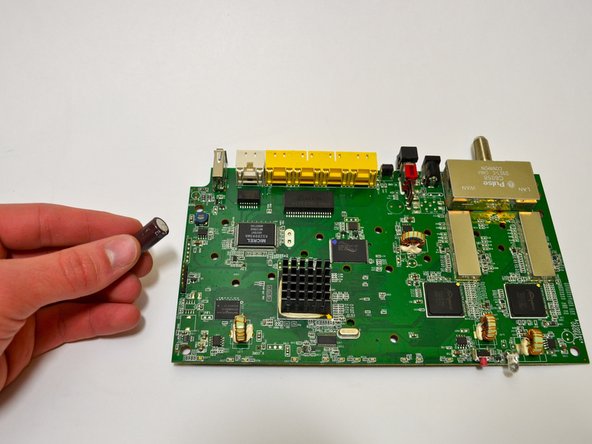
跳转到主内容

Verizon M1424WR Capacitor Replacement

你所需要的

  1. Verizon M1424WR Capacitor Replacement, Motherboard: 步骤 1 中的图像 1,1
    • Flip the device so that the bottom is facing up.

  2. Verizon M1424WR Capacitor Replacement: 步骤 2 中的图像 1,3 Verizon M1424WR Capacitor Replacement: 步骤 2 中的图像 2,3 Verizon M1424WR Capacitor Replacement: 步骤 2 中的图像 3,3
    • Warning: The design and location of the plastic clips holding this shroud make it extremely difficult to release. Take your time and use a second pry tool if necessary.

    • Insert the plastic-opening tool under the silver labeled casing.

    • Carefully pry at different intervals around the silver labeled casing to separate the silver casing from the top and bottom casing.

  3. Verizon M1424WR Capacitor Replacement: 步骤 3 中的图像 1,2 Verizon M1424WR Capacitor Replacement: 步骤 3 中的图像 2,2
    • Unscrew the five 10-mm screws on the bottom of the router using a Phillips #0 screwdriver.

  4. Verizon M1424WR Capacitor Replacement: 步骤 4 中的图像 1,2 Verizon M1424WR Capacitor Replacement: 步骤 4 中的图像 2,2
    • Use a plastic-opening tool and pry the top casing from the bottom casing to expose the circuit board in the bottom half of the device.

  5. Verizon M1424WR Capacitor Replacement: 步骤 5 中的图像 1,3 Verizon M1424WR Capacitor Replacement: 步骤 5 中的图像 2,3 Verizon M1424WR Capacitor Replacement: 步骤 5 中的图像 3,3
    • Locate the two 10-mm screws on either side of the circuit board.

    • Unscrew the two 10-mm screws using a Phillips #0 screwdriver.

    • Keep track of the red rubber washer you remove from underneath one of the screws.

  6. Verizon M1424WR Capacitor Replacement: 步骤 6 中的图像 1,1
    • Lift the front of the circuit board up from the bottom casing.

  7. Verizon M1424WR Capacitor Replacement: 步骤 7 中的图像 1,1
    • Pull the circuit board towards you until it is separate from the bottom casing.

  8. Verizon M1424WR Capacitor Replacement, Capacitor: 步骤 8 中的图像 1,1
    • Locate the capacitor.

  9. Verizon M1424WR Capacitor Replacement: 步骤 9 中的图像 1,1
    • Flip the circuit board over.

    • Locate the two prongs on the flip side that are attached to the capacitor on the top side.

  10. Verizon M1424WR Capacitor Replacement: 步骤 10 中的图像 1,3 Verizon M1424WR Capacitor Replacement: 步骤 10 中的图像 2,3 Verizon M1424WR Capacitor Replacement: 步骤 10 中的图像 3,3
    • Touch the hot soldering iron to each prong in order to melt the solder around them.

    • Flip the circuit board and pull out the capacitor from its place while the solder is still hot.

    • For help with soldering techniques, click here.

  11. Verizon M1424WR Capacitor Replacement, Reassembly: 步骤 11 中的图像 1,3 Verizon M1424WR Capacitor Replacement, Reassembly: 步骤 11 中的图像 2,3 Verizon M1424WR Capacitor Replacement, Reassembly: 步骤 11 中的图像 3,3
    • Insert the new capacitor through the circuit board so that the prongs are exposed on the flip side.

    • Heat the prongs up with the soldering iron and touch a soldering wire to the hot prongs to attach the capacitor to the board.

结论

To reassemble your device, follow Steps 1-7 in reverse order.

0条评论

添加评论

浏览统计数据:

过去 24 小时: 0

过去 7 天: 0

过去 30 天: 1

总计 556