跳转到主内容

VTech Safe and Sound DM111-2 Parent Unit Motherboard Replacement

你所需要的

  1. VTech Safe and Sound DM111-2 Parent Unit Motherboard Replacement, Battery: 步骤 1 中的图像 1,1
    • Expose the battery compartment by removing the lower back cover of the device.

    • Do this by holding the back side of the device upside down in your hands and applying pressure to the indented portion with both thumbs.

  2. VTech Safe and Sound DM111-2 Parent Unit Motherboard Replacement: 步骤 2 中的图像 1,1
    • Once the batteries are exposed, use your index finger to push the battery against the spring and pull up to dislodge the battery.

    • Make sure to check for battery acid or other corrosive substances before touching the battery. If needed, use latex gloves to avoid skin irritation from battery acid.

  3. VTech Safe and Sound DM111-2 Parent Unit Motherboard Replacement, Parent Unit Motherboard: 步骤 3 中的图像 1,3 VTech Safe and Sound DM111-2 Parent Unit Motherboard Replacement, Parent Unit Motherboard: 步骤 3 中的图像 2,3 VTech Safe and Sound DM111-2 Parent Unit Motherboard Replacement, Parent Unit Motherboard: 步骤 3 中的图像 3,3
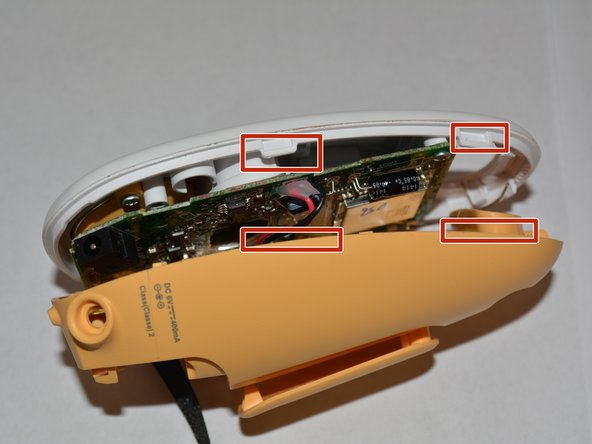
    • Use a plastic opening tool to gently pry along the middle of the 2 sections of the plastic housing in order to release plastic latches on the inside of the housing.

    • Do not take apart briskly or separate the two units completely as they are connected by thin wires.

  4. VTech Safe and Sound DM111-2 Parent Unit Motherboard Replacement: 步骤 4 中的图像 1,2 VTech Safe and Sound DM111-2 Parent Unit Motherboard Replacement: 步骤 4 中的图像 2,2
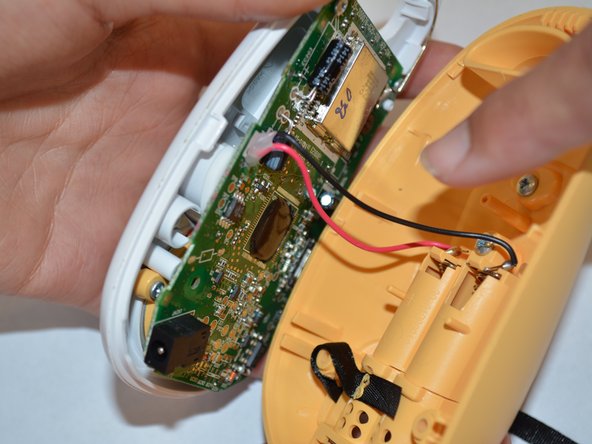
    • Gently pull apart the two housing component taking care not to damage the wire connecting them.

    • Check the wire connections from the battery compartment to the motherboard for any cuts, burn marks, or loose wires.

    • Likewise check the soldering joints for the antenna, and the power jack, and speakers, in order to make surethe issue is with the motherboard and not the wires or other components.

  5. VTech Safe and Sound DM111-2 Parent Unit Motherboard Replacement: 步骤 5 中的图像 1,2 VTech Safe and Sound DM111-2 Parent Unit Motherboard Replacement: 步骤 5 中的图像 2,2
    • Free the motherboard by unscrewing the two 4mm phillips head screws at the top of the motherboard

    • Flip over the motherboard and de-solder the wires connecting the speaker to the motherboard

结论

To reassemble your device, follow these instructions in reverse order.

Jean Carlos

于08/31/15注册

201 声望

创作了2篇指南

团队

USF Tampa, Team 6-3, Remmell Fall 2015 USF Tampa, Team 6-3, Remmell Fall 2015 的会员

USFT-REMMELL-F15S6G3

4 名成员

创作了7篇指南

一条评论

After changing the motherboard I can no longer get the device to link to the baby monitor

Hyrum Clark - 回复

添加评论

浏览统计数据:

过去 24 小时: 0

过去 7 天: 0

过去 30 天: 1

总计 1,311