跳转到主内容

VTech Kidizoom Camera Connect Motherboard Replacement

你所需要的

  1. VTech Kidizoom Camera Connect Motherboard Replacement, Front Case: 步骤 1 中的图像 1,2 VTech Kidizoom Camera Connect Motherboard Replacement, Front Case: 步骤 1 中的图像 2,2
    • Remove batteries and SD card before beginning disassembly!

    • Locate the four plastic screw covers denoted by the markers and gently pry them up with the metal spudger.

  2. VTech Kidizoom Camera Connect Motherboard Replacement: 步骤 2 中的图像 1,2 VTech Kidizoom Camera Connect Motherboard Replacement: 步骤 2 中的图像 2,2
    • Remove all four (11mm) screws with the Philips #0 screwdriver.

  3. VTech Kidizoom Camera Connect Motherboard Replacement: 步骤 3 中的图像 1,3 VTech Kidizoom Camera Connect Motherboard Replacement: 步骤 3 中的图像 2,3 VTech Kidizoom Camera Connect Motherboard Replacement: 步骤 3 中的图像 3,3
    • Remove the two battery cartridges located on the underside of the camera.

    • Once cartridges are removed, use the metal spudger to pry open the top, bottom, and both sides of the camera.

  4. VTech Kidizoom Camera Connect Motherboard Replacement: 步骤 4 中的图像 1,1
    • Beware of the two black viewfinder lens falling out as you pry open the device!

    • The device should now be open and ready for further repair and/or replacement parts.

  5. VTech Kidizoom Camera Connect Motherboard Replacement, Motherboard: 步骤 5 中的图像 1,1
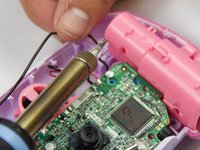
    • Locate and remove the screws circled in the provided image with a Philips #0 screwdriver.

  6. VTech Kidizoom Camera Connect Motherboard Replacement: 步骤 6 中的图像 1,2 VTech Kidizoom Camera Connect Motherboard Replacement: 步骤 6 中的图像 2,2
    • Unsolder the connection points on the motherboard.

  7. VTech Kidizoom Camera Connect Motherboard Replacement: 步骤 7 中的图像 1,3 VTech Kidizoom Camera Connect Motherboard Replacement: 步骤 7 中的图像 2,3 VTech Kidizoom Camera Connect Motherboard Replacement: 步骤 7 中的图像 3,3
    • Unsolder the connections to the right battery terminal. Removing the terminal allows easier access to the motherboard.

  8. VTech Kidizoom Camera Connect Motherboard Replacement: 步骤 8 中的图像 1,3 VTech Kidizoom Camera Connect Motherboard Replacement: 步骤 8 中的图像 2,3 VTech Kidizoom Camera Connect Motherboard Replacement: 步骤 8 中的图像 3,3
    • Carefully pull up on the motherboard and pink plastic underneath the motherboard. The pink plastic contains the display and is connected to the motherboard.

结论

To reassemble your device, follow these instructions in reverse order.

5等其他人完成本指南。

Justin Sanchez

于02/08/16注册

520 声望

创作了4篇指南

团队

USF Tampa, Team 6-4, Eyestone Spring 2016 USF Tampa, Team 6-4, Eyestone Spring 2016 的会员

USFT-EYESTONE-S16S6G4

4 名成员

创作了5篇指南

一条评论

Do you know what the replacement mic is? My girls mic has stopped working. Sound still plays, but can’t record voice or sound for video making. Thanks Tim

Timothy GRAHAM - 回复

添加评论

浏览统计数据:

过去 24 小时: 0

过去 7 天: 3

过去 30 天: 13

总计 2,294