跳转到主内容

当前版本的文档还未经巡查,您可以查看最新的已查核版本

你所需要的

视频概述

  1. 这个步骤还没有翻译 帮忙翻译一下

    : 步骤 1 中的图像 1,2 : 步骤 1 中的图像 2,2
    • Remove the damaged string and the small plastic bead completely, using scissors if necessary.

    • If knots have come undone, but the string is intact, follow the knot tying instructions under step 5.

  2. 这个步骤还没有翻译 帮忙翻译一下

    : 步骤 2 中的图像 1,1
    • Place the body of the kendama face down.

    • The big cup should be on the right-hand side.

  3. 这个步骤还没有翻译 帮忙翻译一下

    : 步骤 3 中的图像 1,1
    • Begin by inserting one end of the new string straight through the hole at the crosspiece.

    • The official minimum kendama string length is 38 cm or about 15 inches. Longer strings provide players with more of a challenge.

  4. 这个步骤还没有翻译 帮忙翻译一下

    : 步骤 4 中的图像 1,2 : 步骤 4 中的图像 2,2
    • Flip the kendama over to the other side, so that the big cup is now on the left-hand side.

    • Pull the end of the string until it extends about an inch out of the hole. This will be used to tie the knot.

  5. 这个步骤还没有翻译 帮忙翻译一下

    : 步骤 5 中的图像 1,3 : 步骤 5 中的图像 2,3 : 步骤 5 中的图像 3,3
    • To tie the knot, begin by taking the inch of extended string and making a small loop.

    • Put the tip of the string through the loop.

    • Put the tip of the string through the loop a second time to strengthen the knot. Pull the knot tight.

  6. 这个步骤还没有翻译 帮忙翻译一下

    : 步骤 6 中的图像 1,3 : 步骤 6 中的图像 2,3 : 步骤 6 中的图像 3,3
    • Now, we will attach the ball.

    • Begin by placing the ball upright, with the small hole on top.

    • Insert the free end of the string through the small hole, and continue pushing it through until it comes out the big hole on the bottom.

    • Wetting the string or dipping it in glue will make the string straighter and easier to thread through the ball.

  7. 这个步骤还没有翻译 帮忙翻译一下

    : 步骤 7 中的图像 1,3 : 步骤 7 中的图像 2,3 : 步骤 7 中的图像 3,3
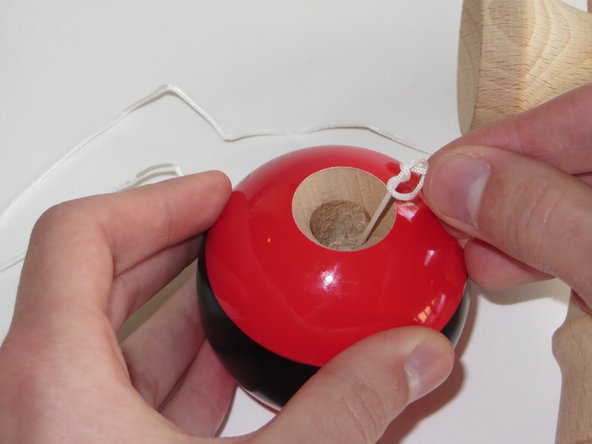
    • Thread the free end of the string through a small plastic bead, and allow the bead to slide down into the ball.

    • Now, with about an inch of string extending out from the big hole, we will tie a knot on the free end of the string, just like what was done in step 5.

    • Adjust the two knots to reach your preferred string length.

    • The kendama is ready to go!

终点

Andrew Melrose

于04/09/15注册

101 声望

撰写一个指南

团队

Cal Poly, Team 28-3, Green Spring 2015 Cal Poly, Team 28-3, Green Spring 2015 的会员

CPSU-GREEN-S15S28G3

4 名成员

创作了9篇指南

一条评论

This tutorial is awesome, waiting for the next tutorial on how to be 99 parsing warlock.

Brite Cloud - 回复

添加评论

浏览统计数据:

过去 24 小时: 0

过去 7 天: 2

过去 30 天: 31

总计 9,044