跳转到主内容

Toshiba Satellite U405D-S2902 Faceplate Replacement

你所需要的

  1. Toshiba Satellite U405D-S2902 Faceplate Replacement, Battery: 步骤 1 中的图像 1,1
    • Make sure that the laptop is off and unplugged.

    • Turn the laptop over.

    • Slide back the left lock, and you should hear a click when it is successfully locked back in.

  2. Toshiba Satellite U405D-S2902 Faceplate Replacement: 步骤 2 中的图像 1,1
    • Rotate the laptop 180 degrees so that the battery is near you.

    • Hold back the spring slide and pull the battery out.

  3. Toshiba Satellite U405D-S2902 Faceplate Replacement, Keyboard: 步骤 3 中的图像 1,3 Toshiba Satellite U405D-S2902 Faceplate Replacement, Keyboard: 步骤 3 中的图像 2,3 Toshiba Satellite U405D-S2902 Faceplate Replacement, Keyboard: 步骤 3 中的图像 3,3
    • Situate the laptop so that it is open and the display is facing you.

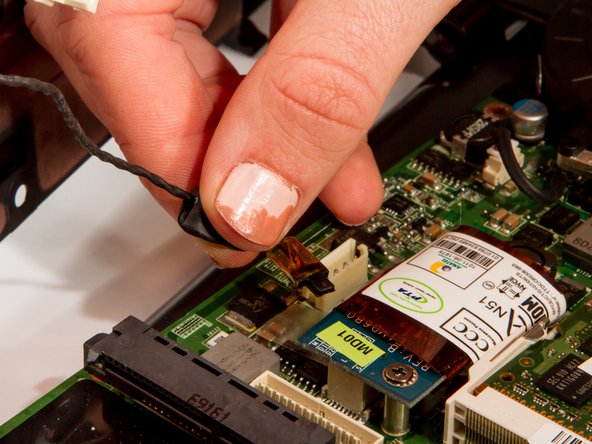
    • Use the plastic opening tool to pry the black plastic insert upward. The insert can be found at the top of the keyboard.

    • Once the insert is loose, carefully remove it from the device.

  4. Toshiba Satellite U405D-S2902 Faceplate Replacement: 步骤 4 中的图像 1,2 Toshiba Satellite U405D-S2902 Faceplate Replacement: 步骤 4 中的图像 2,2
    • Using #1 Phillips Screwdriver, remove both of the 5 mm screws that are located beneath the insert.

  5. Toshiba Satellite U405D-S2902 Faceplate Replacement: 步骤 5 中的图像 1,2 Toshiba Satellite U405D-S2902 Faceplate Replacement: 步骤 5 中的图像 2,2
    • Use the plastic opening tool to begin removing the keys off of the device.

    • Once the keys are off, gently remove the keyboard. Be careful of the ribbon cable that still connects the keyboard to motherboard.

  6. Toshiba Satellite U405D-S2902 Faceplate Replacement: 步骤 6 中的图像 1,2 Toshiba Satellite U405D-S2902 Faceplate Replacement: 步骤 6 中的图像 2,2
    • Lift up the gate on the ZIF socket to release the ribbon.

    • Ease the ribbon connecting the keyboard to the motherboard out of the ZIF socket.

  7. Toshiba Satellite U405D-S2902 Faceplate Replacement, Faceplate: 步骤 7 中的图像 1,2 Toshiba Satellite U405D-S2902 Faceplate Replacement, Faceplate: 步骤 7 中的图像 2,2
    • With the keyboard removed, locate the marked screws.

    • Remove the marked, 5mm screws using the #1 Phillips Screwdriver.

  8. Toshiba Satellite U405D-S2902 Faceplate Replacement: 步骤 8 中的图像 1,2 Toshiba Satellite U405D-S2902 Faceplate Replacement: 步骤 8 中的图像 2,2
    • In the opening above the mouse pad, use the plastic opening tool to push up the black gate of the ZIF socket.

    • Remove the ribbon from the ZIF socket.

  9. Toshiba Satellite U405D-S2902 Faceplate Replacement: 步骤 9 中的图像 1,3 Toshiba Satellite U405D-S2902 Faceplate Replacement: 步骤 9 中的图像 2,3 Toshiba Satellite U405D-S2902 Faceplate Replacement: 步骤 9 中的图像 3,3
    • Locate the wide opening at the top near the screen.

    • Use the plastic opening tool to open the black ZIF socket.

    • Remove the blue ribbon.

  10. Toshiba Satellite U405D-S2902 Faceplate Replacement: 步骤 10 中的图像 1,2 Toshiba Satellite U405D-S2902 Faceplate Replacement: 步骤 10 中的图像 2,2
    • After removing the screw in step 3, carefully close the laptop and put it face down. Locate the center panel.

    • Remove the three, 3 mm screws using the #1 Phillips Screwdriver.

  11. Toshiba Satellite U405D-S2902 Faceplate Replacement: 步骤 11 中的图像 1,2 Toshiba Satellite U405D-S2902 Faceplate Replacement: 步骤 11 中的图像 2,2
    • Grasp the power cable with your tweezers and remove it from the wireless antenna.

  12. Toshiba Satellite U405D-S2902 Faceplate Replacement: 步骤 12 中的图像 1,2 Toshiba Satellite U405D-S2902 Faceplate Replacement: 步骤 12 中的图像 2,2
    • Locate and remove both the white and black antenna leads with the tweezers.

  13. Toshiba Satellite U405D-S2902 Faceplate Replacement: 步骤 13 中的图像 1,3 Toshiba Satellite U405D-S2902 Faceplate Replacement: 步骤 13 中的图像 2,3 Toshiba Satellite U405D-S2902 Faceplate Replacement: 步骤 13 中的图像 3,3
    • Remove screws for back assembly.

    • 11 x F5 (5 mm #1 Phillips)

    • 6 x F2 (2 mm #0 Phillips)

    • 4 x F8 (8 mm #1 Phillips)

    • 1 x F3 (3 mm #1 Phillips

  14. Toshiba Satellite U405D-S2902 Faceplate Replacement: 步骤 14 中的图像 1,1
    • Use the plastic opening tool to release the back panel from the laptop.

    • If all of the screws are removed it should come off with very little effort. Do not force it. If it still feels attached, check that you didn't miss a screw or two.

  15. Toshiba Satellite U405D-S2902 Faceplate Replacement: 步骤 15 中的图像 1,2 Toshiba Satellite U405D-S2902 Faceplate Replacement: 步骤 15 中的图像 2,2
    • Use the plastic opening tool to separate the top faceplate.

    • The faceplate is the plastic surface and the metal piece under the keyboard.

    • Carefully lift the faceplate off of the base by sliding the plastic opening tool around the outside of the device. You'll hear clicks as you do this.

    • Prying apart the faceplate will be a little hard, but try not to bend it too much - you do not want to crack it.

  16. Toshiba Satellite U405D-S2902 Faceplate Replacement: 步骤 16 中的图像 1,1
    • Lift the back panel and carefully disconnect the main power cable.

  17. Toshiba Satellite U405D-S2902 Faceplate Replacement: 步骤 17 中的图像 1,2 Toshiba Satellite U405D-S2902 Faceplate Replacement: 步骤 17 中的图像 2,2
    • Remove the black signal cable attached at the blue circuit board.

  18. Toshiba Satellite U405D-S2902 Faceplate Replacement: 步骤 18 中的图像 1,2 Toshiba Satellite U405D-S2902 Faceplate Replacement: 步骤 18 中的图像 2,2
    • Remove auxiliary power cable attached to the blue board at the back of the laptop.

结论

To reassemble your device, follow these instructions in reverse order.

另外一个人完成了本指南。

Brandon Kirklen

于01/11/13注册

311 声望

创作了8篇指南

团队

Cal Poly, Team 7-8, Maness Winter 2013 Cal Poly, Team 7-8, Maness Winter 2013 的会员

CPSU-MANESS-W13S7G8

4 名成员

创作了8篇指南

0条评论

添加评论

浏览统计数据:

过去 24 小时: 0

过去 7 天: 0

过去 30 天: 0

总计 903