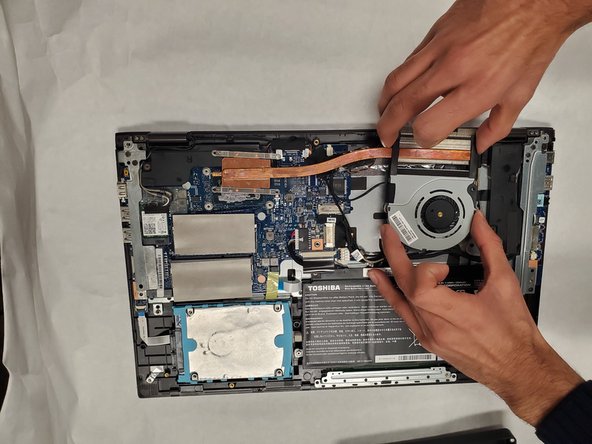
跳转到主内容

Toshiba Satellite P55W-C5316 Fan Replacement

你所需要的

  1. Toshiba Satellite P55W-C5316 Fan Replacement, Back Panel: 步骤 1 中的图像 1,2 Toshiba Satellite P55W-C5316 Fan Replacement, Back Panel: 步骤 1 中的图像 2,2
    • To prevent injury, ensure the laptop is powered off before starting your work.

    • Unscrew the .3mm Phillips head screws on the back panel using the PH1 screwdriver.

  2. Toshiba Satellite P55W-C5316 Fan Replacement: 步骤 2 中的图像 1,3 Toshiba Satellite P55W-C5316 Fan Replacement: 步骤 2 中的图像 2,3 Toshiba Satellite P55W-C5316 Fan Replacement: 步骤 2 中的图像 3,3
    • Be careful to not crack the panel where the USB and power cord ports are.

    • Insert the opening tool in between the back panel and the laptop to pry it open.

    • The back panel is magnetically attached at the front of the laptop so you may have to move the opening tool along the length of the panel.

    • Lift the panel from the front off of the laptop.

  3. Toshiba Satellite P55W-C5316 Fan Replacement, Fan: 步骤 3 中的图像 1,1
    • Remove both screws from the fan.

  4. Toshiba Satellite P55W-C5316 Fan Replacement: 步骤 4 中的图像 1,2 Toshiba Satellite P55W-C5316 Fan Replacement: 步骤 4 中的图像 2,2
    • Remove the screws securing the 4 corners of the heatsink.

    • Gently remove the heatsink. Keep in mind thermal paste is used and it may be slightly difficult to remove.

  5. Toshiba Satellite P55W-C5316 Fan Replacement: 步骤 5 中的图像 1,3 Toshiba Satellite P55W-C5316 Fan Replacement: 步骤 5 中的图像 2,3 Toshiba Satellite P55W-C5316 Fan Replacement: 步骤 5 中的图像 3,3
    • Remove the small, beige colored connector securing the fan to the laptop and remove the fan and heatsink assembly from the laptop.

结论

To reassemble your device, follow these instructions in reverse order.

Zeyad Ali

于11/07/19注册

349 声望

创作了2篇指南

团队

IUPUI, Team S2-G1, Harley Fall 2019 IUPUI, Team S2-G1, Harley Fall 2019 的会员

IUPUI-HARLEY-F19S2G1

3 名成员

创作了3篇指南

0条评论

添加评论

浏览统计数据:

过去 24 小时: 1

过去 7 天: 6

过去 30 天: 8

总计 378