跳转到主内容

当前版本的文档还未经巡查,您可以查看最新的已查核版本

你所需要的

  1. 这个步骤还没有翻译 帮忙翻译一下

    : 步骤 1 中的图像 1,2 : 步骤 1 中的图像 2,2
    • Flip the laptop over so the bottom is facing upward and the battery is on top.

    • Slide the tab below the battery to the left.

  2. 这个步骤还没有翻译 帮忙翻译一下

    : 步骤 2 中的图像 1,2 : 步骤 2 中的图像 2,2
    • Slide and hold the tab on the right side of the battery to the right.

    • While holding the right tab, slide the battery upward and out its socket.

  3. 这个步骤还没有翻译 帮忙翻译一下

    : 步骤 3 中的图像 1,2 : 步骤 3 中的图像 2,2
    • Place the head of a plastic opening tool underneath the plastic strip lining the top of the keyboard, right above the "PGUP" button.

    • Next, pull the strip up using a plastic opening tool with a light force, until it pops off.

  4. 这个步骤还没有翻译 帮忙翻译一下

    : 步骤 4 中的图像 1,1
    • Lightly lift from the side that was popped up earlier in order to pop the rest of the strip off of the laptop.

  5. 这个步骤还没有翻译 帮忙翻译一下

    : 步骤 5 中的图像 1,2 : 步骤 5 中的图像 2,2
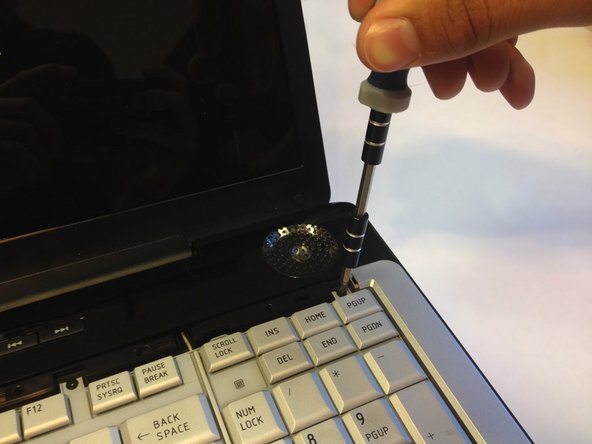
    • Use a #1 Phillips screwdriver to take out the four 4mm Phillips #1 screws that were underneath the plastic strip.

  6. 这个步骤还没有翻译 帮忙翻译一下

    : 步骤 6 中的图像 1,3 : 步骤 6 中的图像 2,3 : 步骤 6 中的图像 3,3
    • Be careful to not lift up on the keyboard too quickly or harshly; there is a ribbon cable connecting the keyboard and the base which may be breakable.

    • Lightly lift up on the keyboard from one of its top corners and pull it towards the screen so you can safely remove the ribbon cable.

    • At the base of the ribbon cable, there is a tiny tab that runs across the width of the connector. Flip it up. You can now pull the ribbon cable free with no resistance towards the monitor.

    • With the cable unplugged, the keyboard can be lifted away from the laptop.

  7. 这个步骤还没有翻译 帮忙翻译一下

    : 步骤 7 中的图像 1,2 : 步骤 7 中的图像 2,2
    • Unscrew the 4mm Phillips #1 screw holding the hard drive cover on.

    • Place one finger underneath the tab of the hard drive cover and lift it up with medium force to take it off.

  8. 这个步骤还没有翻译 帮忙翻译一下

    : 步骤 8 中的图像 1,2 : 步骤 8 中的图像 2,2
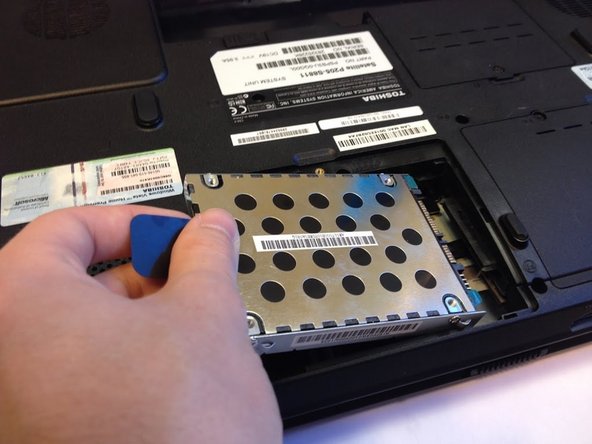
    • Grab the black tab attached to the hard drive and pull it to the left with a medium force until it pops out of its socket.

  9. 这个步骤还没有翻译 帮忙翻译一下

    : 步骤 9 中的图像 1,1
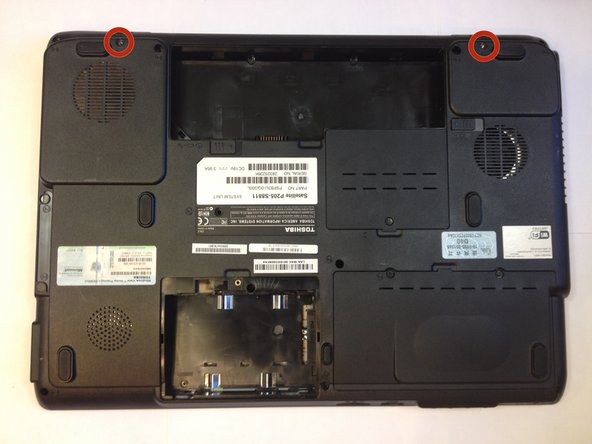
    • Remove the two 8mm Phillips #1 screws from the back side of the laptop.

  10. 这个步骤还没有翻译 帮忙翻译一下

    : 步骤 10 中的图像 1,1
    • Remove the four 8mm Phillips #1 screws located on the corners below the monitor.

  11. 这个步骤还没有翻译 帮忙翻译一下

    : 步骤 11 中的图像 1,1
    • Remove the two 4mm Phillips #1 screws located between the screws removed in the last step.

  12. 这个步骤还没有翻译 帮忙翻译一下

    : 步骤 12 中的图像 1,2 : 步骤 12 中的图像 2,2
    • Unplug the black wire connecting the monitor to the motherboard by pulling it lightly towards you.

    • Unplug the black/red wire that also connects the monitor to the motherboard by pulling lightly away from you.

  13. 这个步骤还没有翻译 帮忙翻译一下

    : 步骤 13 中的图像 1,3 : 步骤 13 中的图像 2,3 : 步骤 13 中的图像 3,3
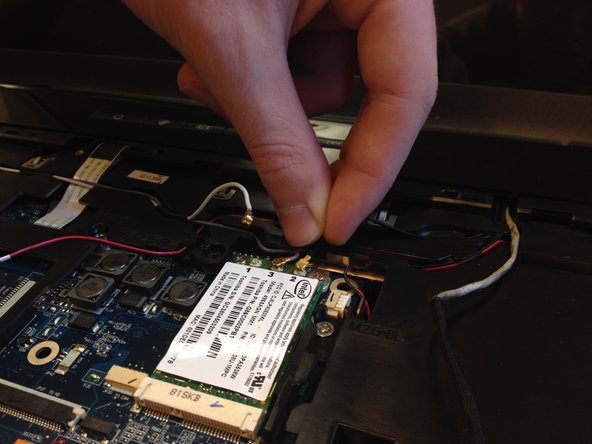
    • Remove the three colored wires (white, grey, and black) that are all connected beside each other by pulling them up lightly.

  14. 这个步骤还没有翻译 帮忙翻译一下

    : 步骤 14 中的图像 1,1
    • Gently pull out the wide, white wire coming from the monitor.

  15. 这个步骤还没有翻译 帮忙翻译一下

    : 步骤 15 中的图像 1,2 : 步骤 15 中的图像 2,2
    • Use a plastic opening tool to loosen the top panel by placing the tool underneath the panel at several points and then lifting upwards with a medium force. You will know it is loose if it makes a loud clicking noise.

    • Place your fingers on the side of the panel closest to the monitor. Lift up on that side of the panel with a large amount of force in order to pry it off.

  16. 这个步骤还没有翻译 帮忙翻译一下

    : 步骤 16 中的图像 1,3 : 步骤 16 中的图像 2,3 : 步骤 16 中的图像 3,3
    • Remove the 8mm Phillips #1 screw located just below the large gray wire.

    • Remove the 8mm Phillips #1 screw located to the right of the left-hand speaker.

    • Remove the 4mm Phillips #1 screw located above the fan and next to the large gray wire.

  17. 这个步骤还没有翻译 帮忙翻译一下

    : 步骤 17 中的图像 1,2 : 步骤 17 中的图像 2,2
    • Remove the large gray wire that is connected to the motherboard to the right of the fan.

    • Remove the small white/grey wire that is connected at the top of the fan.

  18. 这个步骤还没有翻译 帮忙翻译一下

    : 步骤 18 中的图像 1,1
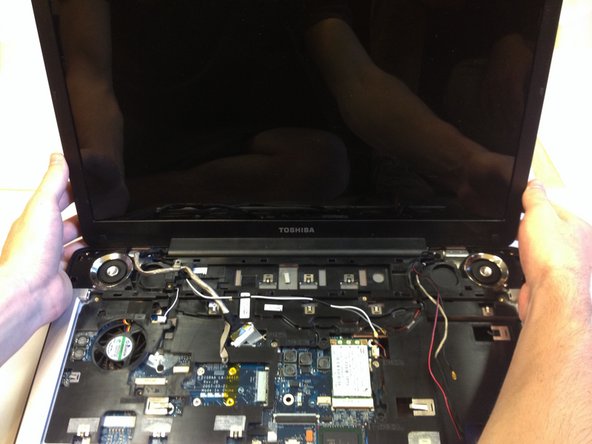
    • Grabbing both sides of the monitor, gently lift the it out of place and set it aside.

终点

Bradley Johnson

于02/02/14注册

214 声望

创作了2篇指南

团队

Cal Poly, Team 2-8, Amido Winter 2014 Cal Poly, Team 2-8, Amido Winter 2014 的会员

CPSU-AMIDO-W14S2G8

4 名成员

创作了7篇指南

0条评论

添加评论

浏览统计数据:

过去 24 小时: 0

过去 7 天: 6

过去 30 天: 6

总计 890