跳转到主内容

Toshiba Satellite L505 Laptop Power Jack Replacement

你所需要的

  1. Toshiba Satellite L505 Laptop Power Jack Replacement, Keyboard: 步骤 1 中的图像 1,3 Toshiba Satellite L505 Laptop Power Jack Replacement, Keyboard: 步骤 1 中的图像 2,3 Toshiba Satellite L505 Laptop Power Jack Replacement, Keyboard: 步骤 1 中的图像 3,3
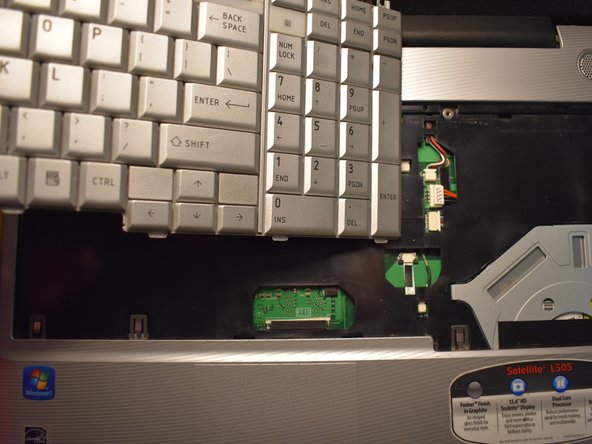
    • Open the laptop and locate the plastic strip just above the keyboard.

    • With care, slide the prying tool into an end and lift it up until you hear an audible click, meaning it has separated.

    • Slowly slide a finger or the prying tool under and follow the strip to the opposite end, completely detaching the strip.

  2. Toshiba Satellite L505 Laptop Power Jack Replacement: 步骤 2 中的图像 1,2 Toshiba Satellite L505 Laptop Power Jack Replacement: 步骤 2 中的图像 2,2
    • Remove the four screws using the Phillips #1 screwdriver.

  3. Toshiba Satellite L505 Laptop Power Jack Replacement: 步骤 3 中的图像 1,2 Toshiba Satellite L505 Laptop Power Jack Replacement: 步骤 3 中的图像 2,2
    • Gently push the clip back as you lift the top of the keyboard towards you.

    • There is a cable connecting the keyboard to the motherboard so do not lift the keyboard all the way out yet.

  4. Toshiba Satellite L505 Laptop Power Jack Replacement: 步骤 4 中的图像 1,3 Toshiba Satellite L505 Laptop Power Jack Replacement: 步骤 4 中的图像 2,3 Toshiba Satellite L505 Laptop Power Jack Replacement: 步骤 4 中的图像 3,3
    • Gently disconnect the connector strip by pushing the white clips forward.

    • Carefully pull the strip out of its port.

    • Remove the keyboard from the device.

  5. Toshiba Satellite L505 Laptop Power Jack Replacement, Optical Drive: 步骤 5 中的图像 1,2 Toshiba Satellite L505 Laptop Power Jack Replacement, Optical Drive: 步骤 5 中的图像 2,2
    • Turn the laptop upside down.

    • Remove the screw labeled F4 using the Phillips #1 screwdriver.

    • There are 2 screws labeled F4, the correct screw is the one closer to the hard drive.

  6. Toshiba Satellite L505 Laptop Power Jack Replacement: 步骤 6 中的图像 1,2 Toshiba Satellite L505 Laptop Power Jack Replacement: 步骤 6 中的图像 2,2
    • Gently slide the optical drive out of the device.

  7. Toshiba Satellite L505 Laptop Power Jack Replacement, Battery: 步骤 7 中的图像 1,1
    • Turn your laptop upside down, at the bottom of the laptop, slide the right sliding lock to the unlocked position.

    • Slide the left sliding lock to the left and hold it. Using your fingers lift the battery out.

  8. Toshiba Satellite L505 Laptop Power Jack Replacement, Palm Rest Assembly: 步骤 8 中的图像 1,3 Toshiba Satellite L505 Laptop Power Jack Replacement, Palm Rest Assembly: 步骤 8 中的图像 2,3 Toshiba Satellite L505 Laptop Power Jack Replacement, Palm Rest Assembly: 步骤 8 中的图像 3,3
    • Unscrew all of the screws marked on the underside of the laptop.

    • Remove the screw marked in the second photo by lifting up the lid and unscrewing using a Phillips #1 screwdriver.

    • Remove the three flat screws in the port where the Optical drive is housed in.

  9. Toshiba Satellite L505 Laptop Power Jack Replacement: 步骤 9 中的图像 1,2 Toshiba Satellite L505 Laptop Power Jack Replacement: 步骤 9 中的图像 2,2
    • Remove the keyboard and once that has been done, remove the screw marked "16."

    • Disconnect all of the cables with a blue circle.

  10. Toshiba Satellite L505 Laptop Power Jack Replacement: 步骤 10 中的图像 1,3 Toshiba Satellite L505 Laptop Power Jack Replacement: 步骤 10 中的图像 2,3 Toshiba Satellite L505 Laptop Power Jack Replacement: 步骤 10 中的图像 3,3
    • Using the opening tool, carefully go around the edge and loosen the palm-rest assembly, until you can comfortably and easily lift it off.

  11. Toshiba Satellite L505 Laptop Power Jack Replacement, Power Jack: 步骤 11 中的图像 1,2 Toshiba Satellite L505 Laptop Power Jack Replacement, Power Jack: 步骤 11 中的图像 2,2
    • Once the motherboard is exposed, gently unplug the power cord from the motherboard.

  12. Toshiba Satellite L505 Laptop Power Jack Replacement: 步骤 12 中的图像 1,1
    • Follow the cable to the power jack port and carefully lift up to remove it from the laptop.

结论

To reassemble your device, follow these instructions in reverse order.

0条评论

添加评论

浏览统计数据:

过去 24 小时: 0

过去 7 天: 4

过去 30 天: 9

总计 911