跳转到主内容

本指南有最近更改,您可查看未经巡查的最新版本

Toshiba Satellite L305-S5875 Speakers Replacement

你所需要的

  1. Toshiba Satellite L305-S5875 Speakers Replacement, Battery: 步骤 1 中的图像 1,1
    • Close the laptop lid and flip the laptop over.

    • Switch the lock button on the left to the unlock position. (The unlock position is to the left side.)

  2. Toshiba Satellite L305-S5875 Speakers Replacement: 步骤 2 中的图像 1,3 Toshiba Satellite L305-S5875 Speakers Replacement: 步骤 2 中的图像 2,3 Toshiba Satellite L305-S5875 Speakers Replacement: 步骤 2 中的图像 3,3
    • Push the release button to the right.

    • Hold the release button to the right and lift the battery out of its housing.

  3. Toshiba Satellite L305-S5875 Speakers Replacement, Keyboard: 步骤 3 中的图像 1,3 Toshiba Satellite L305-S5875 Speakers Replacement, Keyboard: 步骤 3 中的图像 2,3 Toshiba Satellite L305-S5875 Speakers Replacement, Keyboard: 步骤 3 中的图像 3,3
    • Open the laptop so the keyboard is facing you.

    • Using your fingers, remove the thin plastic cover above the keyboard.

    • Potential for device damage: Do not apply too much force when removing the cover piece as it can break.

  4. Toshiba Satellite L305-S5875 Speakers Replacement: 步骤 4 中的图像 1,1
    • Remove the two 4.8 mm screws from underneath the plastic cover piece using a Phillips #00 screwdriver.

  5. Toshiba Satellite L305-S5875 Speakers Replacement: 步骤 5 中的图像 1,2 Toshiba Satellite L305-S5875 Speakers Replacement: 步骤 5 中的图像 2,2
    • Starting at the top, gently raise the keyboard enough to remove it from the socket.

    • Potential for device damage: DO NOT pull out the keyboard after it's out of its socket. The keyboard is connected to the hard drive through a data cable and removing forcefully could damage the cable and laptop.

  6. Toshiba Satellite L305-S5875 Speakers Replacement: 步骤 6 中的图像 1,2 Toshiba Satellite L305-S5875 Speakers Replacement: 步骤 6 中的图像 2,2
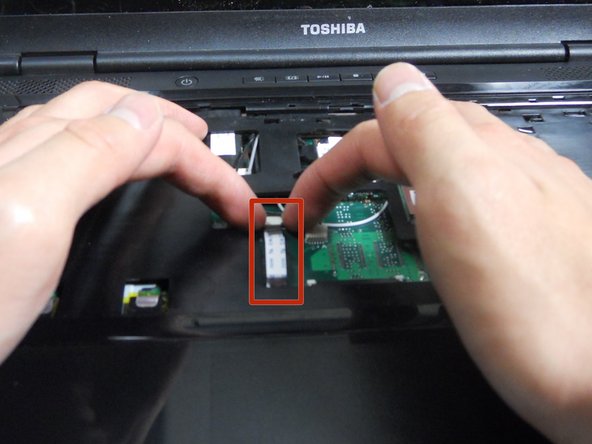
    • Locate the data cable that is connected to the motherboard.

    • Pull the white ZIF connector towards the screen to remove it.

    • Pull the black ribbon cable away from the screen.

  7. Toshiba Satellite L305-S5875 Speakers Replacement: 步骤 7 中的图像 1,1
    • With the black ribbon cable now disconnected, remove the keyboard from its housing.

  8. Toshiba Satellite L305-S5875 Speakers Replacement, Speakers: 步骤 8 中的图像 1,1
    • Close the laptop and flip it over.

    • Remove all the 6.6 mm type-00 Phillips head screws along the perimeter and in the center of the laptop.

  9. Toshiba Satellite L305-S5875 Speakers Replacement: 步骤 9 中的图像 1,1
    • Remove the three 3.7 mm type-00 Phillips head screws located in the battery compartment.

  10. Toshiba Satellite L305-S5875 Speakers Replacement: 步骤 10 中的图像 1,2 Toshiba Satellite L305-S5875 Speakers Replacement: 步骤 10 中的图像 2,2
    • Flip the laptop over and open the screen as far back as it can go.

  11. Toshiba Satellite L305-S5875 Speakers Replacement: 步骤 11 中的图像 1,2 Toshiba Satellite L305-S5875 Speakers Replacement: 步骤 11 中的图像 2,2
    • Using your fingers, slide the black ZIF connector out.

    • Once the ZIF connector has been moved, the white ribbon cable can be removed.

  12. Toshiba Satellite L305-S5875 Speakers Replacement: 步骤 12 中的图像 1,2 Toshiba Satellite L305-S5875 Speakers Replacement: 步骤 12 中的图像 2,2
    • Using your fingers, remove the white plastic connector located to the right of the ribbon connector.

  13. Toshiba Satellite L305-S5875 Speakers Replacement: 步骤 13 中的图像 1,3 Toshiba Satellite L305-S5875 Speakers Replacement: 步骤 13 中的图像 2,3 Toshiba Satellite L305-S5875 Speakers Replacement: 步骤 13 中的图像 3,3
    • Use the blue plastic opening tool to begin removing the cover.

    • After creating enough space, you can use your hands to completely open the cover.

    • Make sure all the screws have been removed before attempting to open the cover.

  14. Toshiba Satellite L305-S5875 Speakers Replacement: 步骤 14 中的图像 1,2 Toshiba Satellite L305-S5875 Speakers Replacement: 步骤 14 中的图像 2,2
    • Put the laptop aside and locate the speakers attached to the cover.

    • Remove the two 3.6 mm type-00 Phillips head screws from each speaker.

结论

To reassemble your device, follow these instructions in reverse order.

Juan

于01/11/13注册

109 声望

创作了3篇指南

团队

Cal Poly, Team 20-5, Maness Winter 2013 Cal Poly, Team 20-5, Maness Winter 2013 的会员

CPSU-MANESS-W13S20G5

4 名成员

创作了10篇指南

0条评论

添加评论

浏览统计数据:

过去 24 小时: 0

过去 7 天: 1

过去 30 天: 13

总计 1,883