当前版本的文档还未经巡查,您可以查看最新的已查核版本。
-
-
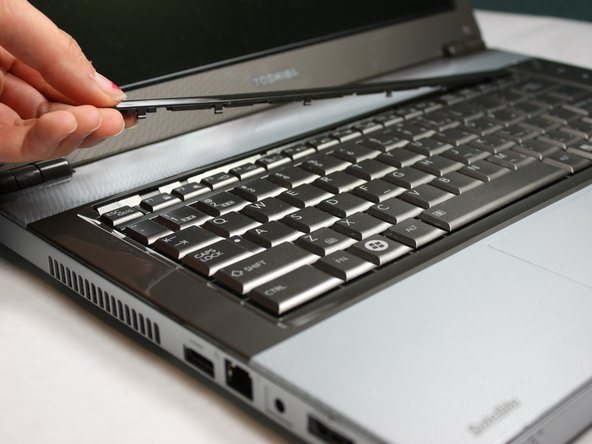
Flip the computer over and insert the plastic opening tool under the plastic strip at the top of the keyboard.
-
Pry the top plastic strip from the top of the keyboard.
-
Peel the strip completely away from the keyboard.
-
-
-
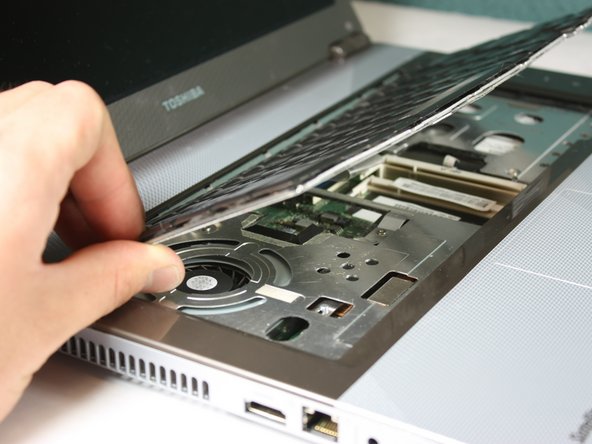
When removing the keyboard, be careful not to rip the ribbon cable connecting the keyboard to the computer, to avoid damaging it.
-
Flip the keyboard up from the bottom in order to see the two ribbons connecting it to the motherboard.
-
-
-
-
-
Completely remove the keyboard from the laptop by lifting up the part closest to the screen, and then gently pulling out the bottom half.
-
Keep the keyboard safe by storing it on a flat, non-metallic surface until needed.
-
-
Locate the four silver screws on the front panel.
-
Using the Phillips #0, unscrew to remove all four 2.95mm silver screws.
-
-
-
-
Rotate the laptop so the back faces you.
-
Locate the two black Philips #00 7.65 screws, one by each hinge, and remove.
-
-
Use the plastic opening tool to pry the top panel up from the base of the computer.
-
Slowly work your way around the computer with the plastic removing tool to make it easier to lift the top panel away from the base.
-
Carefully lift the top panel no more than six inches, as there are ribbon cables connecting the two pieces.
-
Disconnect ribbons, and slowly lift the top panel up, away from the base.
-
-
Locate the ribbon cable from the motherboard.
-
Using plastic removing tools, pop the ribbon base from the motherboard.
-
-
Locate the two plugs from the motherboard.
-
Using plastic opening tools, remove each plug from the motherboard.
-
-
Locate the ribbon cable partially hidden under the front panel.
-
Using plastic opening tools, pop out the ribbon cable from the motherboard.
-
-
Make sure that all wires have been disconnected before proceeding to avoid damaging components.
-
Slowly lift the top panel away from the base of the computer.
-
Place the top panel away from the computer and keep in a flat non-metallic surface until needed.
-
-
-
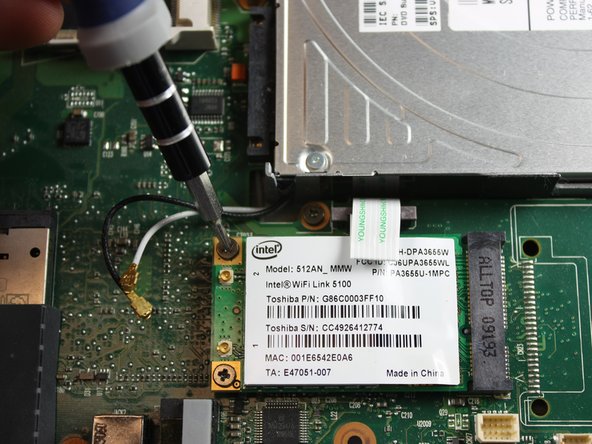
Locate the black wire and white wire connected to the WiFi card.
-
Using a pair of tweezers remove the wires by lifting them straight up away from the board.
-
For reassembly, note that the black wire connects to the top port, and the white wire to the bottom part.
-
-
-
Be careful not to pull the WiFi card straight up, as you might damage components on the motherboard.
-
Grip the sides of the WiFi card and lift it up partially.
-
Gently pull the WiFi card away from the black plastic base to remove.
嵌入本指南
选择一个尺寸并复制下面的代码,将本指南作为一个小插件嵌入到你的网站/论坛中。
预览