跳转到主内容

当前版本的文档还未经巡查,您可以查看最新的已查核版本

你所需要的

  1. 这个步骤还没有翻译 帮忙翻译一下

    : 步骤 1 中的图像 1,1
    • Placing your finger on the raised grip, push the battery casing to the right. It will slide over.

  2. 这个步骤还没有翻译 帮忙翻译一下

    : 步骤 2 中的图像 1,1
    • Pull the battery casing gently out toward yourself, until you hear a clicking sound.

    • The battery should pull out to about 2 inches.

  3. 这个步骤还没有翻译 帮忙翻译一下

    : 步骤 3 中的图像 1,1
    • Lift the battery casing out of the laptop.

  4. 这个步骤还没有翻译 帮忙翻译一下

    : 步骤 4 中的图像 1,2 : 步骤 4 中的图像 2,2
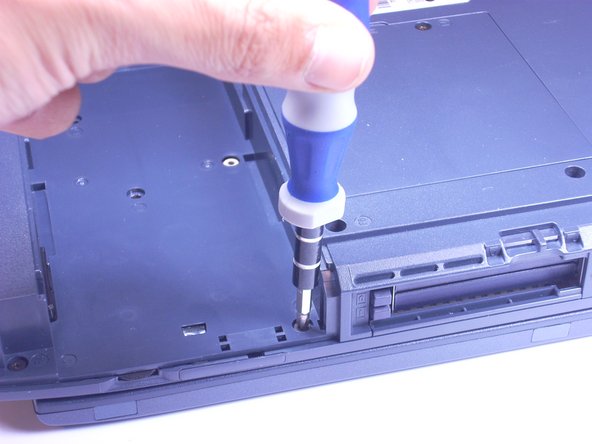
    • Look at the bottom of the laptop. Using a Phillips screwdriver, unscrew and remove the screw labeled F4, located on the cover of the hard drive.

    • The hard drive is located next to the CD drive.

  5. 这个步骤还没有翻译 帮忙翻译一下

    : 步骤 5 中的图像 1,1
    • Placing your finger on the raised grip, push up on the hard drive cover. This will remove the hard drive cover from the laptop.

  6. 这个步骤还没有翻译 帮忙翻译一下

    : 步骤 6 中的图像 1,2 : 步骤 6 中的图像 2,2
    • Using a Phillips screwdriver, unscrew and remove the screw surrounded by the white plastic.

  7. 这个步骤还没有翻译 帮忙翻译一下

    : 步骤 7 中的图像 1,1
    • Pull the white plastic out toward you. This should remove the hard drive tray from the laptop.

    • This laptop does not have a hard drive, so the tray is empty. On your computer, the hard drive should be in the tray.

  8. 这个步骤还没有翻译 帮忙翻译一下

    : 步骤 8 中的图像 1,2 : 步骤 8 中的图像 2,2
    • Stick a spudger in one of the sides of the top panel. Lift slowly from one side to the other and it will pop off.

  9. 这个步骤还没有翻译 帮忙翻译一下

    : 步骤 9 中的图像 1,3 : 步骤 9 中的图像 2,3 : 步骤 9 中的图像 3,3
    • Using an Phillips screwdriver, unscrew and remove two screws labeled B2.6.

  10. 这个步骤还没有翻译 帮忙翻译一下

    : 步骤 10 中的图像 1,1
    • Using your hands, lift keyboard up toward you, starting from the edge closest to the screen.

    • The keyboard is still connected to the laptop by a ribbon. Place the keyboard gently on top of the trackpad, keys side down.

  11. 这个步骤还没有翻译 帮忙翻译一下

    : 步骤 11 中的图像 1,2 : 步骤 11 中的图像 2,2
    • Find the white ribbon connector (where the keyboard is still attached to the rest of the laptop).

    • Slide the white ribbon connector up and lift the ribbon out of it.

  12. 这个步骤还没有翻译 帮忙翻译一下

    : 步骤 12 中的图像 1,1
    • Using a Phillips Screwdriver, unscrew and remove the one F4 screw closest to the center of the laptop.

    • This screw is underneath the battery casing, located on the bottom of the laptop directly under the trackpad.

  13. 这个步骤还没有翻译 帮忙翻译一下

    : 步骤 13 中的图像 1,1
    • Using your finger, lift off the plastic covering the trackpad by putting your finger underneath the plastic and pulling towards you. The plastic should just pop off.

  14. 这个步骤还没有翻译 帮忙翻译一下

    : 步骤 14 中的图像 1,2 : 步骤 14 中的图像 2,2
    • Remove the left, brown ribbon by pinching the part of the ribbon connected to the computer and lifting towards you.

  15. 这个步骤还没有翻译 帮忙翻译一下

    : 步骤 15 中的图像 1,2 : 步骤 15 中的图像 2,2
    • Remove the white ribbon on the right by pinching the part connected to the laptop with your fingers and pulling towards you.

  16. 这个步骤还没有翻译 帮忙翻译一下

    : 步骤 16 中的图像 1,1
    • Lift the track pad gently towards you, using your fingers.

  17. 这个步骤还没有翻译 帮忙翻译一下

    : 步骤 17 中的图像 1,2 : 步骤 17 中的图像 2,2
    • Using a Phillips screwdriver, unscrew and remove 5 screws labeled F6, located on the metal piece on the left side of the keyboard area.

  18. 这个步骤还没有翻译 帮忙翻译一下

    : 步骤 18 中的图像 1,1
    • Using your fingers, pinch and lift metal piece away from the laptop and set aside.

  19. 这个步骤还没有翻译 帮忙翻译一下

    : 步骤 19 中的图像 1,2 : 步骤 19 中的图像 2,2
    • Using a Phillips screwdriver, unscrew and remove two screws labeled B25 located closest to the screen.

  20. 这个步骤还没有翻译 帮忙翻译一下

    : 步骤 20 中的图像 1,3 : 步骤 20 中的图像 2,3 : 步骤 20 中的图像 3,3
    • Using a Phillips screwdriver, unscrew and remove two screws labeled B5.5, located to the right of where the metal piece was.

    • These screws are silver, where all the other screws have been black.

  21. 这个步骤还没有翻译 帮忙翻译一下

    : 步骤 21 中的图像 1,3 : 步骤 21 中的图像 2,3 : 步骤 21 中的图像 3,3
    • Using a Phillips screwdriver, unscrew and remove two black screws from the back side of the laptop.

    • These screws are not labeled.

  22. 这个步骤还没有翻译 帮忙翻译一下

    : 步骤 22 中的图像 1,1
    • Using a Phillips screwdriver, unscrew and remove F4 screw from plastic covering on the bottom of the laptop that only has one screw.

  23. 这个步骤还没有翻译 帮忙翻译一下

    : 步骤 23 中的图像 1,2 : 步骤 23 中的图像 2,2
    • Using fingers,pinch and lift plastic covering up, away from the laptop and set aside.

  24. 这个步骤还没有翻译 帮忙翻译一下

    : 步骤 24 中的图像 1,2 : 步骤 24 中的图像 2,2
    • Using your fingers, pinch the black modem piece, lift and slide the modem up and move it aside.

    • The modem is connected to a red and black wire.

  25. 这个步骤还没有翻译 帮忙翻译一下

    : 步骤 25 中的图像 1,1
    • Using a Phillips screwdriver, unscrew and remove one F6 screw from beneath the modem.

  26. 这个步骤还没有翻译 帮忙翻译一下

    : 步骤 26 中的图像 1,3 : 步骤 26 中的图像 2,3 : 步骤 26 中的图像 3,3
    • Using a Phillips screwdriver, unscrew and remove 5 B20 screws, located along the corners of the bottom of the laptop.

  27. 这个步骤还没有翻译 帮忙翻译一下

    : 步骤 27 中的图像 1,3 : 步骤 27 中的图像 2,3 : 步骤 27 中的图像 3,3
    • Using a Phillips screwdriver, unscrew and remove 3 B25 screws from the bottom of the laptop.

  28. 这个步骤还没有翻译 帮忙翻译一下

    : 步骤 28 中的图像 1,3 : 步骤 28 中的图像 2,3 : 步骤 28 中的图像 3,3
    • Using a Phillips screwdriver, unscrew and remove 3 F6 screws from the bottom of the laptop.

  29. 这个步骤还没有翻译 帮忙翻译一下

    : 步骤 29 中的图像 1,3 : 步骤 29 中的图像 2,3 : 步骤 29 中的图像 3,3
    • Using a Phillips screwdriver, unscrew and remove 3 F4 screws from the battery area of the laptop.

  30. 这个步骤还没有翻译 帮忙翻译一下

    : 步骤 30 中的图像 1,2 : 步骤 30 中的图像 2,2
    • Lift open the screen of the laptop and, using your fingers and the guides on the side of the laptop, push up on the top plastic covering of the laptop, moving from one side of the laptop to the other.

  31. 这个步骤还没有翻译 帮忙翻译一下

    : 步骤 31 中的图像 1,2 : 步骤 31 中的图像 2,2
    • Setting screen next to the base of the laptop, pinch the connecting cable with your fingers and gently pull connecting cable from monitor.

终点

2等其他人完成本指南。

Hannah

于06/24/10注册

227 声望

创作了7篇指南

团队

Cal Poly, Team 3-5, Johann Summer 2010 Cal Poly, Team 3-5, Johann Summer 2010 的会员

CPSU-JOHANN-R10S3G5

4 名成员

创作了24篇指南

0条评论

添加评论

浏览统计数据:

过去 24 小时: 0

过去 7 天: 9

过去 30 天: 13

总计 3,180