跳转到主内容

Toshiba Encore WT8-A Tablet Audio Jack Replacement

你所需要的

  1. Toshiba Encore WT8-A Tablet Audio Jack Replacement, Battery: 步骤 1 中的图像 1,1
    • Use the metal spudger to create a gap between the back cover and the device.

    • Be gentle when using the metal spudger so that the casing is not damaged.

  2. Toshiba Encore WT8-A Tablet Audio Jack Replacement: 步骤 2 中的图像 1,2 Toshiba Encore WT8-A Tablet Audio Jack Replacement: 步骤 2 中的图像 2,2
    • Use the nylon spudger to completely separate the back of the device.

    • Take the nylon spudger around the outside of the device cover until it comes free.

  3. Toshiba Encore WT8-A Tablet Audio Jack Replacement: 步骤 3 中的图像 1,2 Toshiba Encore WT8-A Tablet Audio Jack Replacement: 步骤 3 中的图像 2,2
    • Use the Phillips head PH0 to remove the 7 battery screws.

    • The 5 side screws measure 3.5mm.

    • The 2 top and bottom screws measure 4.5 mm.

  4. Toshiba Encore WT8-A Tablet Audio Jack Replacement: 步骤 4 中的图像 1,2 Toshiba Encore WT8-A Tablet Audio Jack Replacement: 步骤 4 中的图像 2,2
    在这个步骤中使用的工具:
    Tweezers
    $4.99
    购买
    • To disconnect the cable, use the fine tweezers to flip up the small retaining flap. Then, you can safely pull the ribbon cable out.

    • Be sure you are prying up on the hinged retaining flap, not the connector itself.

    • The zero insertion force (ZIF) connector is used to secure delicate ribbon cables, such as this trackpad cable.

  5. Toshiba Encore WT8-A Tablet Audio Jack Replacement: 步骤 5 中的图像 1,1
    • Remove the colored power cable from its connector.

    • To disconnect it safely, use the pointed tip of a spudger to carefully push on each side of the connector.

    • Alternating from one side to the other, gently “walk” the connector out of its socket.

    • Be sure to be very gentle when prying colored wires from motherboard to ensure that there is no damage.

  6. Toshiba Encore WT8-A Tablet Audio Jack Replacement: 步骤 6 中的图像 1,1
    • Battery will lift out of the device.

  7. Toshiba Encore WT8-A Tablet Audio Jack Replacement, Motherboard: 步骤 7 中的图像 1,1
    • Remove the 4 – 4.5 mm screws from the motherboard assembly.

  8. Toshiba Encore WT8-A Tablet Audio Jack Replacement: 步骤 8 中的图像 1,1
    • Remove the 2 – 3.5 mm screws from the motherboard assembly.

  9. Toshiba Encore WT8-A Tablet Audio Jack Replacement: 步骤 9 中的图像 1,1
    • The motherboard should come free at this point.

  10. Toshiba Encore WT8-A Tablet Audio Jack Replacement, Audio Jack: 步骤 10 中的图像 1,1
    • Prepare soldering iron to heat the connections to the motherboard.

    • Soldering irons are very hot, use caution as not to burn yourself, or other parts of the motherboard.

  11. Toshiba Encore WT8-A Tablet Audio Jack Replacement: 步骤 11 中的图像 1,3 Toshiba Encore WT8-A Tablet Audio Jack Replacement: 步骤 11 中的图像 2,3 Toshiba Encore WT8-A Tablet Audio Jack Replacement: 步骤 11 中的图像 3,3
    在这个步骤中使用的工具:
    Tweezers
    $4.99
    购买
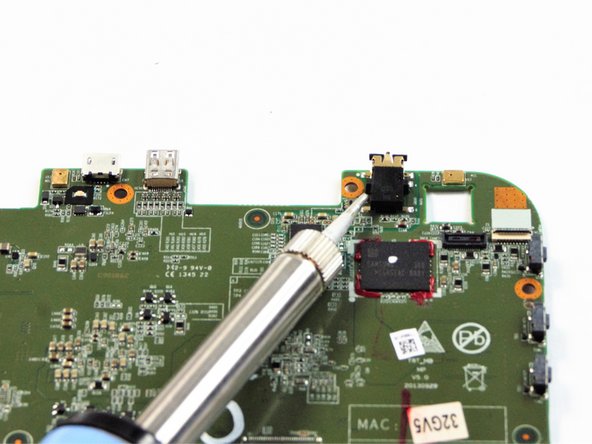
    • Use the soldering iron to melt the metal connection from the motherboard to the audio jack.

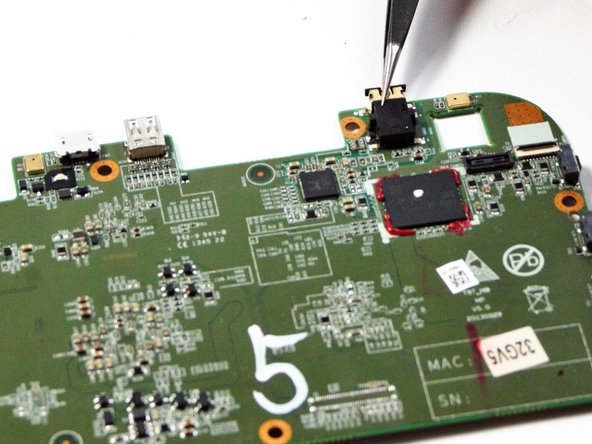
    • Use the fine pointed tweezers to pull the audio jack away from the motherboard.

    • Do not touch the audio jack or surrounding area with your hands, melted metal is very hot.

    • The solder cools quickly so you will have to be quick and precise.

  12. Toshiba Encore WT8-A Tablet Audio Jack Replacement: 步骤 12 中的图像 1,1
    • Upon acquiring a new audio jack, use the soldering iron to solder the six connection ports into the motherboard.

结论

To reassemble your device, follow these instructions in reverse order.

另外一个人完成了本指南。

Zack Smith

于09/20/16注册

119 声望

撰写一个指南

团队

USF Tampa, Team 17-4, Blackwell Fall 2016 USF Tampa, Team 17-4, Blackwell Fall 2016 的会员

USFT-BLACKWELL-F16S17G4

3 名成员

创作了8篇指南

0条评论

添加评论

浏览统计数据:

过去 24 小时: 1

过去 7 天: 2

过去 30 天: 9

总计 535