你所需要的
-
-
Open your TomTom in the way shown in other guides on www.ifixit.com. Mine (TomTom XL Live) opens by peeling of the label at the bottom, taking out the front outside the silver lining, like the repair guide of the TomTom XXL 540. Release the cables from the battery, speaker and screen and unscrew the motherboard (again: see other guide).
-
The pink square element in the front of the first picture is the GPS module. Time to remove it.
-
-
-
The GPS module is screwed (one screw) and soldered to the motherboard. Unscrew it and remove the solder so you can take out the GPS element.
-
It seems that one of the three soldered connections only has the purpose of stability and is not used for electrical reasons.
-
-
-
-
In this step connect the GPS element by a cable to the motherboard.
-
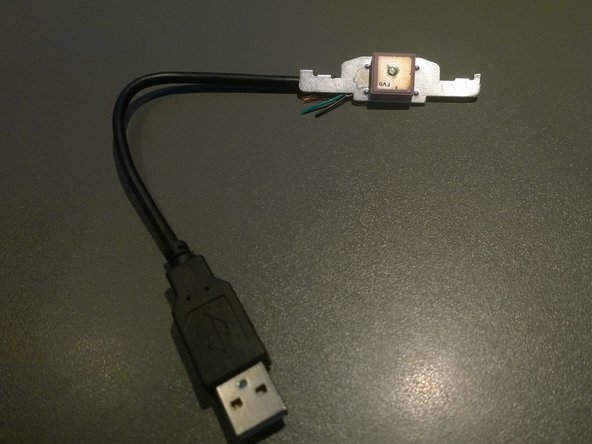
You can use any cable with two threads. I used a USB extension cable so I can easily (un)plug the GPS element to the TomTom. I cut the cable in half and soldered two ( I used the white and red) threads to the two connectors of the GPS element in the middle on the back.
-
I soldered the same colored threads of the other half of the USB cable to the connectors on the motherboard. Be sure to solder the GPS-element in the right way to the threats, as it was originally soldered onto the motherboard. It might not work the other way around.
-
-
-
Make a hole on the side of your TomTom. Find the place where you can lead the cable out without damaging other electrical elements and without making the connection fragile.
-
This is the way it looks at the moment. It works. Insert another USB extension cable and you can put the GPS element wherever the reception is best.
-
Of course a little box to put the GPS antenna in makes it all the more aesthetic and robust. I simply glued the cable to the metal of the GPS element and will probably stick it to the window with a two sided tape.
-
I guess the antenna works best with the purple element directed to the sky.
-


To reassemble your device, follow these instructions in reverse order.
To reassemble your device, follow these instructions in reverse order.
另外一个人完成了本指南。