简介
This provides the steps to replace the internal battery in the JAH-A10A (5.5 cup) Tiger Rice cooker. These steps are likely to apply similarly to other Tiger Rice cookers.
你所需要的
-
-
Unplug the rice cooker!
-
Place a soft item on the bench, to prevent scratching the lid
-
Remove the four screws from the base. Take note - each screw has a black washer, but the rear two screws also include a white spacer.
-
-
-
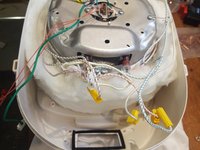
Lift the lid off carefully (rotate it from the front to the back). It is attached electrical via cords - treat it very carefully.
-
Take note of the connections onto the main board of the rice cooker. Suggest you photograph these connections before you remove any of them!
-
-
-
-
Remove the two phillips head screws holding the main electronic board in place. The arrows indicate location of the two screws (but they are at the back of the board)
-
Once the board is removed, disconnect all the electronic cords connecting the board to the rice cooker. As mentioned before, ensure you take a photo of the location of the connectors before removing!
-
With the board removed, the LCD panel is exposed. Take care of this and the cavity (as any dirt falling in will cover the LCD panel when re-installed)
-
-
-
With the screws removed, the main board assembly can be lifted out. It is connected to the LCD panel and buttons by flexible cable, so be careful working on the board.
-
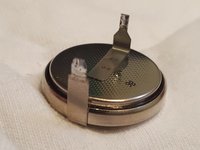
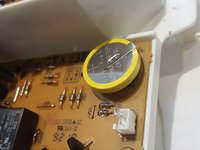
The battery to be replaced is shown in the picture. As indicated, it is soldered onto the board.
-
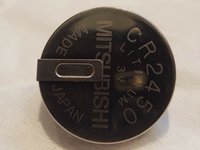
The battery removed from the board is shown for reference.
-
-
-
The board must be removed from the assembly.
-
Screws are indicated in the picture.
-
-
-
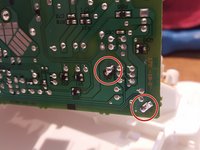
The battery must be removed by desoldering the two positions shown. Take note of the polarity of the battery before removal.
-
Desolder the points and remove the battery.
-
Solder the new battery in place, maintaining polarity.
-
New battery installed here - the new battery had a plastic ring around it. The tabs may be in slightly different positions and may require manipulation to fit into the existing location
-
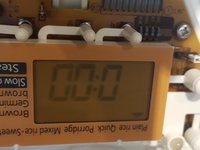
Once the battery has been connected, check the display panel to see if the clock is flashing - this will indicate the battery is connected.
-


To reassemble your device, follow these instructions in reverse order.
10等其他人完成本指南。
15指南评论
Pro tip, order a CR2450 battery holder with 20mm pin spacing and solder that in instead. Costs $1. Then use a normal CR2450 button battery, they are cheaper and can be replaced easily next time.
My model was slightly different JBA-T10A.
After removing the 4 base screws I had to lever the base off with a flat screw driver.
No need to disconnect the power wires, the power socket slides out from the plastic base.
3 screws hold the circuit board.
Colin Berg - 回复 分享
Thanks for the suggestion about the battery holder. I’ve just replaced the original battery in our ~6 year of rice cooker. I was able to just reflow the existing solder so it was an easy swap. One resistor ended up slightly under the battery holder so the holder is slightly canted, but that won’t be a problem.