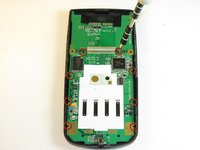
跳转到主内容

Texas Instruments TI-83 Plus Motherboard & Screen Replacement

你所需要的

  1. Texas Instruments TI-83 Plus Motherboard & Screen Replacement, Backup Battery: 步骤 1 中的图像 1,2 Texas Instruments TI-83 Plus Motherboard & Screen Replacement, Backup Battery: 步骤 1 中的图像 2,2
    • Remove the battery cover.

    • Remove the AAA batteries from the calculator.

  2. Texas Instruments TI-83 Plus Motherboard & Screen Replacement: 步骤 2 中的图像 1,1
    • Remove the 5mm Philips #00 screw holding backup battery cover.

    • Remove the backup battery cover.

  3. Texas Instruments TI-83 Plus Motherboard & Screen Replacement: 步骤 3 中的图像 1,1
    • Use plastic opening tool to remove the backup battery. Place the tool in the small cut-out next to the battery and pry the battery out.

    • Be careful, the backup battery is spring loaded and may shoot up when you remove it.

  4. Texas Instruments TI-83 Plus Motherboard & Screen Replacement, Back Case: 步骤 4 中的图像 1,1
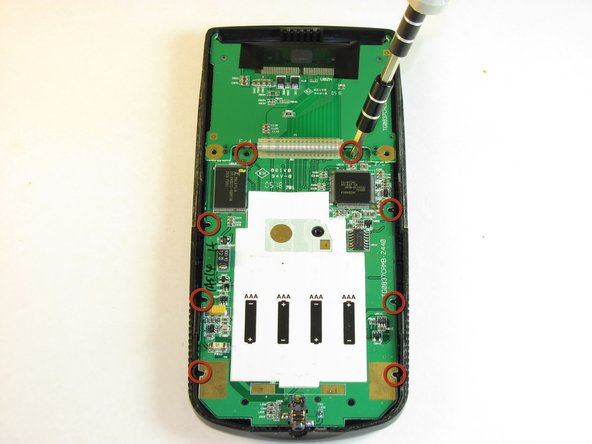
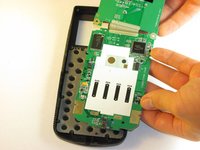
    • Unscrew the six 7.5mm T6 screws on the back case. You will need to use a screwdriver with a long and skinny head.

  5. Texas Instruments TI-83 Plus Motherboard & Screen Replacement: 步骤 5 中的图像 1,2 Texas Instruments TI-83 Plus Motherboard & Screen Replacement: 步骤 5 中的图像 2,2
    • Pry back case off. Insert the plastic opening tool in the track for the protective cover and pry the halves of the case apart.

  6. Texas Instruments TI-83 Plus Motherboard & Screen Replacement, Motherboard & Screen: 步骤 6 中的图像 1,2 Texas Instruments TI-83 Plus Motherboard & Screen Replacement, Motherboard & Screen: 步骤 6 中的图像 2,2
    • Keep the screen face-down during this step. Only the motherboard is attached to the face-plate and the screen may fall out.

    • Remove the eight (8) 5mm Philips #00 screws on the motherboard.

  7. Texas Instruments TI-83 Plus Motherboard & Screen Replacement: 步骤 7 中的图像 1,2 Texas Instruments TI-83 Plus Motherboard & Screen Replacement: 步骤 7 中的图像 2,2
    • Carefully remove the motherboard and screen. Grab the board by its side with one hand and the screen with the other. Carefully lift the two parts up.

    • Keep the face-plate face-down to prevent the keys from falling out.

结论

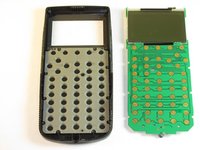
To reassemble your device, follow these instructions in reverse order.

20等其他人完成本指南。

Kevin

于10/02/12注册

479 声望

撰写一个指南

团队

Cal Poly, Team 18-37, Regan Fall 2012 Cal Poly, Team 18-37, Regan Fall 2012 的会员

CPSU-REGAN-F12S18G37

5 名成员

创作了5篇指南

15条评论

Does anyone have any advice on acquiring replacement screens for the TI series? I was considering buying broken TIs on e-bay, but that may be unreliable.

Neil Cammardella - 回复

Fixing TI83+'s is becoming addictive. Google Cemetech Forum on the net and see how he removes the screen from the Mother Board and solders wires permanently. I might add that he tests for resistance (ohms) first to determine if in fact that is where the problems exist. If I read between the lines, he tends to think that the screen/mother board ribbon cable is the primary culprit behind problems with the TI83's

shrinertom@yahoo.com

shrinertom -

My TI-83 Plus, the screen has turned Black, like to know where to send it to have it repaired e-mail address, (BagManOne@ecite.com)

Richard Brown - 回复

Nothing is broken, the screen has turned Black, need to send it off and have it fixed, I can not do it my self because of the condition of my hands

Richard Brown -

It may not be broken. Try adjusting the screen contrast down.

Matthew Johnson -

添加评论

浏览统计数据:

过去 24 小时: 3

过去 7 天: 21

过去 30 天: 82

总计 49,118