跳转到主内容

Texas Instruments TI-5130 Power Cord Replacement

你所需要的

  1. Texas Instruments TI-5130 Power Cord Replacement, Power Cord: 步骤 1 中的图像 1,2 Texas Instruments TI-5130 Power Cord Replacement, Power Cord: 步骤 1 中的图像 2,2
    • Flip the calculator over and remove the 4 main 10mm screws with a PH1 screwdriver.

  2. Texas Instruments TI-5130 Power Cord Replacement: 步骤 2 中的图像 1,2 Texas Instruments TI-5130 Power Cord Replacement: 步骤 2 中的图像 2,2
    • Remove the top cover.

    • Gently pull up on the power cord to remove it from the back cover.

  3. Texas Instruments TI-5130 Power Cord Replacement: 步骤 3 中的图像 1,2 Texas Instruments TI-5130 Power Cord Replacement: 步骤 3 中的图像 2,2
    • This step is optional; however it makes it easier to work.

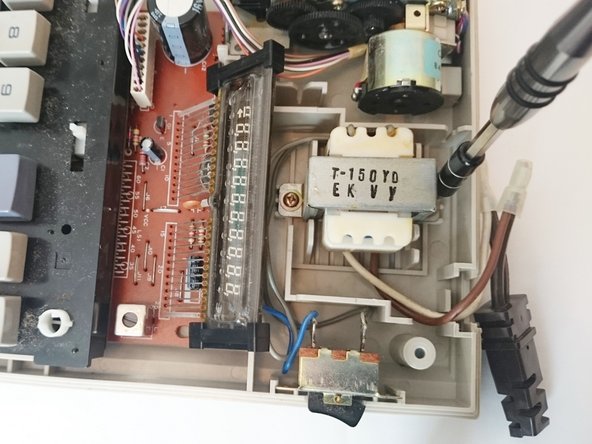
    • Using a PH1 screwdriver remove the two 10mm screws that hold down the transformer.

    • Gently remove the transformer.

    • Make sure that the calculator is not plugged in.

  4. Texas Instruments TI-5130 Power Cord Replacement: 步骤 4 中的图像 1,2 Texas Instruments TI-5130 Power Cord Replacement: 步骤 4 中的图像 2,2
    • Use a wire cutter to cut off the white cap and expose the wires. Try to cut close to the tip of the white cap - to leave as much wire as possible.

    • Note that there are 2 sets of wires connected to the power cord. Do each set of wires separately.

  5. Texas Instruments TI-5130 Power Cord Replacement: 步骤 5 中的图像 1,2 Texas Instruments TI-5130 Power Cord Replacement: 步骤 5 中的图像 2,2
    • Use a wire stripper to remove 1/2” of the protective covering on each of the wires.

  6. Texas Instruments TI-5130 Power Cord Replacement: 步骤 6 中的图像 1,2 Texas Instruments TI-5130 Power Cord Replacement: 步骤 6 中的图像 2,2
    • Twist the exposed section of the 2 wires together.

    • Twist a new cap over the exposed wires. Make sure that the cap covers all of the exposed wire.

    • Repeat steps 4-6 for the second set of wires.

  7. Texas Instruments TI-5130 Power Cord Replacement: 步骤 7 中的图像 1,1
    • Replace the transformer and ensure that the new wire caps fit in the space shown.

    • Plug in the new power cord and test the calculator before replacing the top cover.

结论

To reassemble your device, follow these instructions in reverse order.

另外一个人完成了本指南。

Shannon Perkins

于09/17/15注册

652 声望

创作了3篇指南

团队

0条评论

添加评论

浏览统计数据:

过去 24 小时: 0

过去 7 天: 1

过去 30 天: 12

总计 499