跳转到主内容

TI-84 Plus Silver Edition Individual Key Replacement

你所需要的

  1. TI-84 Plus Silver Edition Individual Key Replacement, Faceplate: 步骤 1 中的图像 1,1
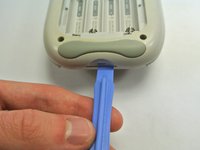
    • Insert your index finger in the open slot below the keys.

    • Be careful to not bend the plate too much because it is very thin and might break.

    • Apply a firm upward force until the bottom two tabs located near the bottom of the plate come off.

  2. TI-84 Plus Silver Edition Individual Key Replacement: 步骤 2 中的图像 1,1
    • Grab the face plate on each side near the middle and apply a gentle upward force on each side until the middle tabs come off.

    • A tab is located in the center of the face plate. If it is still attached, then continue to apply a gentle upward force until the center tab comes off.

    • Lift the face plate upward until the top three tabs come off and the face plate is completely detached.

  3. TI-84 Plus Silver Edition Individual Key Replacement, Main Battery: 步骤 3 中的图像 1,3 TI-84 Plus Silver Edition Individual Key Replacement, Main Battery: 步骤 3 中的图像 2,3 TI-84 Plus Silver Edition Individual Key Replacement, Main Battery: 步骤 3 中的图像 3,3
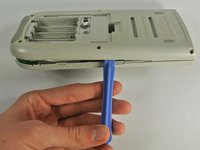
    • Push firmly down on the tab located on the back of the calculator near the center.

    • Pull the tab up, lifting it off of the calculator and exposing the batteries.

  4. TI-84 Plus Silver Edition Individual Key Replacement: 步骤 4 中的图像 1,1
    • Removing the AAAs and the back up battery will clear the calculator's memory. Make sure you have backed up any important data prior to performing this step.

    • Push the positive (+) side of the batteries to remove them

  5. TI-84 Plus Silver Edition Individual Key Replacement, Backup Battery: 步骤 5 中的图像 1,1
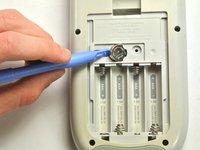
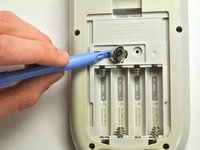
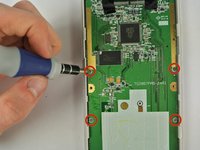
    • Using the Phillips #00 Screwdriver, unscrew the 15 mm screw holding the backup battery cover, located above the main battery area.

  6. TI-84 Plus Silver Edition Individual Key Replacement: 步骤 6 中的图像 1,1
    • Grab the plate and lift gently upward, to remove the backup battery cover.

  7. TI-84 Plus Silver Edition Individual Key Replacement: 步骤 7 中的图像 1,2 TI-84 Plus Silver Edition Individual Key Replacement: 步骤 7 中的图像 2,2
    • Wedge the small plastic opening tool under the backup battery in the gap to the left of the backup battery.

    • The backup battery is an SR44SW coin cell battery. You can also replace it with a size 357/303 or LR44 battery.

    • Push gently downward until the backup battery pops out.

  8. TI-84 Plus Silver Edition Individual Key Replacement, Motherboard and Screen: 步骤 8 中的图像 1,2 TI-84 Plus Silver Edition Individual Key Replacement, Motherboard and Screen: 步骤 8 中的图像 2,2
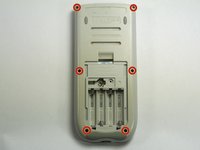
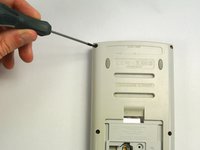
    • Unscrew the six 8.5 mm screws located on the perimeter of the back cover using the Precision T6 Torx Screwdriver.

  9. TI-84 Plus Silver Edition Individual Key Replacement: 步骤 9 中的图像 1,3 TI-84 Plus Silver Edition Individual Key Replacement: 步骤 9 中的图像 2,3 TI-84 Plus Silver Edition Individual Key Replacement: 步骤 9 中的图像 3,3
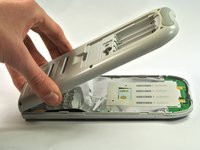
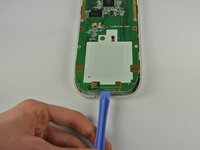
    • Wedge the large plastic opening tool in the gap at the bottom between the top and bottom covers.

    • Apply a gentle downward force to separate the top cover from the bottom cover.

    • Wedge the large plastic opening tool in the gaps along each side to unhook the side clips.

    • There are clips located at the bottom of the calculator, on the sides of the calculator (both near the bottom and near the top), and at the top of the calculator.

    • Pull the bottom cover apart from the top cover.

  10. TI-84 Plus Silver Edition Individual Key Replacement: 步骤 10 中的图像 1,2 TI-84 Plus Silver Edition Individual Key Replacement: 步骤 10 中的图像 2,2
    • Unscrew the two 5 mm screws at the bottom of the silver sheet using the Phillips #00 Screwdriver.

    • Pull up on the silver sheet from the top to remove it from the calculator.

  11. TI-84 Plus Silver Edition Individual Key Replacement: 步骤 11 中的图像 1,2 TI-84 Plus Silver Edition Individual Key Replacement: 步骤 11 中的图像 2,2
    • Unscrew the four 5 mm screws on the sides of the mother board Phillips #00 Screwdriver.

    • Pry the motherboard out from the bottom of the front casing using the large plastic opening tool.

  12. TI-84 Plus Silver Edition Individual Key Replacement, Keyboard Mat: 步骤 12 中的图像 1,3 TI-84 Plus Silver Edition Individual Key Replacement, Keyboard Mat: 步骤 12 中的图像 2,3 TI-84 Plus Silver Edition Individual Key Replacement, Keyboard Mat: 步骤 12 中的图像 3,3
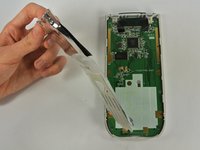
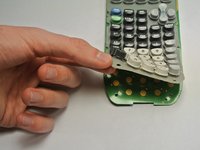
    • Flip over the motherboard to reveal the keys

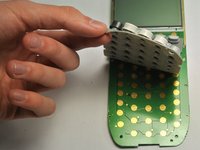
    • Carefully peal the mat from the motherboard.
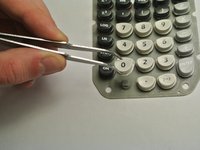
    • Do not invert the mat as the keys may fall off.

  13. TI-84 Plus Silver Edition Individual Key Replacement, Individual Key: 步骤 13 中的图像 1,2 TI-84 Plus Silver Edition Individual Key Replacement, Individual Key: 步骤 13 中的图像 2,2
    • Place the tweezers around the key.

    • Lift the tweezers to remove the individual key.

结论

To reassemble your device, follow these instructions in reverse order.

5等其他人完成本指南。

Kale McKinney

于10/20/13注册

885 声望

创作了3篇指南

团队

Cal Poly, Team 11-34, Amido Fall 2013 Cal Poly, Team 11-34, Amido Fall 2013 的会员

CPSU-AMIDO-F13S11G34

4 名成员

创作了6篇指南

4条评论

My X key does not work. How will this solve my problem. Thank you.

lclenard - 回复

We used this guide to perform a key transplant between a Ti 84 Plus Silver (purchased broken from eBay) and a Ti 84 Plus C Silver. The printing on many of the keys had worn off of the Plus C. Disassembling the Plus C was similar to the Plus. On the Plus C you have to disconnect the rechargeable battery before removing back cover and there is no back-up cell battery to remove. This guide made the repair possible, and our thanks to the author.

colorado27 - 回复

My Enter button does not work...all other buttons are working.....TI-84 Silver Edition

margiecor56 - 回复

Same here, margiecor56! Were you able to replace it and did it work?

Eric Fingerman -

添加评论

浏览统计数据:

过去 24 小时: 6

过去 7 天: 7

过去 30 天: 39

总计 11,466