跳转到主内容

Sungale Cyberus ID707WTA Screen Replacement

你所需要的

  1. Sungale Cyberus ID707WTA Screen Replacement, Battery: 步骤 1 中的图像 1,1
    • Press firmly on lower portion of the back cover and slide the cover towards the bottom to remove cover.

  2. Sungale Cyberus ID707WTA Screen Replacement: 步骤 2 中的图像 1,1
    • Pull on the plug carefully until it releases from the port and simply pull the battery out after.

  3. Sungale Cyberus ID707WTA Screen Replacement, Screen: 步骤 3 中的图像 1,1
    • Unscrew the six 6.01mm Phillips one screws that hold the casing together.

  4. Sungale Cyberus ID707WTA Screen Replacement: 步骤 4 中的图像 1,2 Sungale Cyberus ID707WTA Screen Replacement: 步骤 4 中的图像 2,2
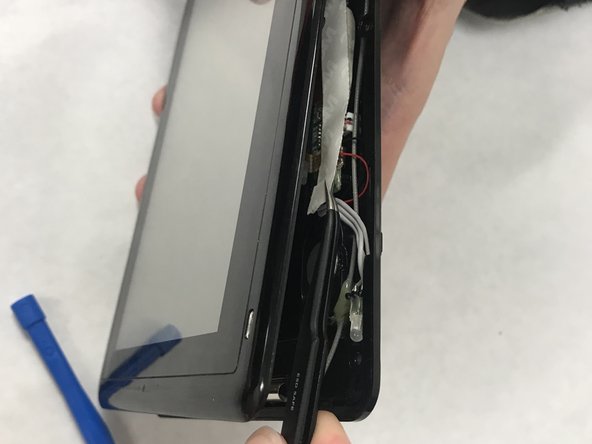
    • Pry open the casing with a plastic opening tool. You will want to use a thin blue plastic opening tool to get in between the creases of the casing.

  5. Sungale Cyberus ID707WTA Screen Replacement: 步骤 5 中的图像 1,1
    • Unscrew the five 4.47mm Phillips one screws that must be taken out to detach the motherboard from the casing.

  6. Sungale Cyberus ID707WTA Screen Replacement: 步骤 6 中的图像 1,1
    • Detach the motherboard from the screen by taking out the input on the left marked in red as well as carefully detaching the ribbon from the screen which is also marked in red in the middle.

  7. Sungale Cyberus ID707WTA Screen Replacement: 步骤 7 中的图像 1,1
    • Separate the touch screen (the grey and white specs) from the metal casing it is enclosed in by bending the casing outward.

    • Again this can be done with the plastic opening tool. You will want to do this around the entire casing before trying to pry it out which is the next step.

    • This is the most tedious and time consuming step.

  8. Sungale Cyberus ID707WTA Screen Replacement: 步骤 8 中的图像 1,2 Sungale Cyberus ID707WTA Screen Replacement: 步骤 8 中的图像 2,2
    • Pry the screen open with the blue plastic opening tools while using another plastic opening tool as a jack to remain in place while you pry around the entire screen.

  9. Sungale Cyberus ID707WTA Screen Replacement: 步骤 9 中的图像 1,1
    • Lift the screen away from the case. Be careful, the screen shown lifted here is actually put together in multiple layers so you'll want to be careful not to separate them.

结论

To reassemble your device, follow these instructions in reverse order.

Austin_Parkes

于03/21/18注册

337 声望

创作了3篇指南

团队

IUPUI, Team S4-G4, Baechle Spring 2018 IUPUI, Team S4-G4, Baechle Spring 2018 的会员

IUPUI-BAECHLE-S18S4G4

4 名成员

创作了6篇指南

0条评论

添加评论

浏览统计数据:

过去 24 小时: 0

过去 7 天: 0

过去 30 天: 1

总计 120