跳转到主内容

SteelSeries Stratus Duo Thumbsticks Replacement

你所需要的

  1. SteelSeries Stratus Duo Thumbsticks Replacement, Remove the sticker: 步骤 1 中的图像 1,2 SteelSeries Stratus Duo Thumbsticks Replacement, Remove the sticker: 步骤 1 中的图像 2,2
    • Use your fingers to remove the sticker located on the back cover of the Stratus Duo.

    • If you have trouble removing the sticker, heat an iOpener and apply it to the rear case for two minutes to loosen the adhesive underneath. You can also use a hair dryer to soften the adhesive.

  2. SteelSeries Stratus Duo Thumbsticks Replacement, Unscrew the back cover: 步骤 2 中的图像 1,1
    • Use a Y0 Tri-point screwdriver to remove the five 9.3 mm-long screws securing the back cover.

  3. SteelSeries Stratus Duo Thumbsticks Replacement, Reposition the back cover assembly: 步骤 3 中的图像 1,3 SteelSeries Stratus Duo Thumbsticks Replacement, Reposition the back cover assembly: 步骤 3 中的图像 2,3 SteelSeries Stratus Duo Thumbsticks Replacement, Reposition the back cover assembly: 步骤 3 中的图像 3,3
    • Don't try to remove the back cover assembly all the way yet, as it's still connected to the mainboard.

    • Carefully lift the back cover assembly away from the frame and move it downward to uncover the battery cable and the interconnect cable at the top of the motherboard.

  4. SteelSeries Stratus Duo Thumbsticks Replacement, Disconnect the interconnect cable: 步骤 4 中的图像 1,3 SteelSeries Stratus Duo Thumbsticks Replacement, Disconnect the interconnect cable: 步骤 4 中的图像 2,3 SteelSeries Stratus Duo Thumbsticks Replacement, Disconnect the interconnect cable: 步骤 4 中的图像 3,3
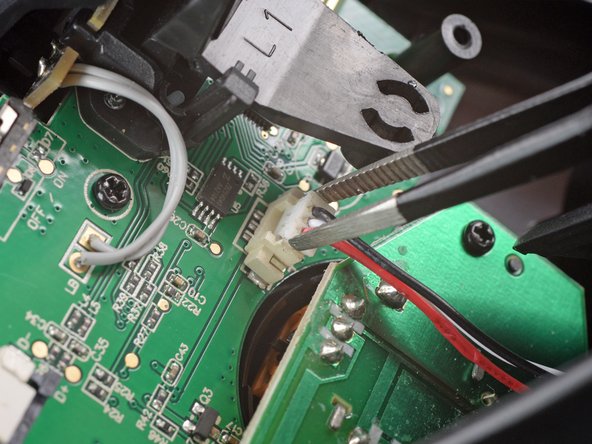
    • Using the pointed end of a spudger, push the grey tabs on the interconnect socket away from the socket, parallel to the interconnect cable, to release the cable.

  5. SteelSeries Stratus Duo Thumbsticks Replacement: 步骤 5 中的图像 1,2 SteelSeries Stratus Duo Thumbsticks Replacement: 步骤 5 中的图像 2,2
    • Use a pair of blunt nosed tweezers or your fingers to pull the cable out of the socket.

  6. SteelSeries Stratus Duo Thumbsticks Replacement, Disconnect the battery cable: 步骤 6 中的图像 1,3 SteelSeries Stratus Duo Thumbsticks Replacement, Disconnect the battery cable: 步骤 6 中的图像 2,3 SteelSeries Stratus Duo Thumbsticks Replacement, Disconnect the battery cable: 步骤 6 中的图像 3,3
    • Use a pair of blunt nose tweezers to grab and lift the connector away from the motherboard.

  7. SteelSeries Stratus Duo Thumbsticks Replacement, Remove the back cover assembly: 步骤 7 中的图像 1,1
    • Remove the back cover assembly.

  8. SteelSeries Stratus Duo Thumbsticks Replacement, Unscrew the thumbsticks board: 步骤 8 中的图像 1,1
    • Use a Phillips screwdriver to remove the two 6.8 mm-long screws securing the thumbsticks board.

  9. SteelSeries Stratus Duo Thumbsticks Replacement, Disconnect the thumbsticks board: 步骤 9 中的图像 1,3 SteelSeries Stratus Duo Thumbsticks Replacement, Disconnect the thumbsticks board: 步骤 9 中的图像 2,3 SteelSeries Stratus Duo Thumbsticks Replacement, Disconnect the thumbsticks board: 步骤 9 中的图像 3,3
    • Grab the thumbsticks board with your hand and disconnect it by pulling it straight up and out of its socket on the mainboard.

    • Remove the thumbsticks board.

    • For reassembly make sure to correctly align the ten pins with their socket on the mainboard.

结论

To reassemble your device, follow these instructions in reverse order.

Take your e-waste to an R2 or e-Stewards certified recycler.

Repair didn’t go as planned? Check our Answers community for help.

另外一个人完成了本指南。

Adriana Zwink

于12/18/19注册

48,554 声望

创作了167篇指南

团队

iFixit iFixit 的会员

Staff

135 名成员

创作了17,198篇指南

4条评论

where do i buy the thumbsticks board

Juan Ureña - 回复

Does anyone know where to source the thumbstick daughter board? I tried talking to steelseries direct and they will not sell it as a replacement. I love this controller, but these failed about 9 months ago and haven't as yet been able to justify replacing the whole controller with this being the only defect. It seems convenient for this part to be a "swappable" type - yet there are NO replacement parts our there in the wild that i've been able to locate. I've been using a xbox core controller ever since. Please advise.

Christopher Claspille - 回复

In case it helps anyone, I had an issue when multiple solder joints had broken away from the board, in the y-axis of my left thumbstick was no longer working as expected. Whenever I applied pressure, it would zero out (i.e., go "all the way up").

If you can find the joints that have broken, it's possible to work around with some bypass cables. Some photos here: https://hachyderm.io/@erichdongubler/110...

Erich Gubler - 回复

Thanks for the guide. My thumbstick button didn't work. I found bad solder joints/damaged traces at the pushbutton pins. I scraped off some of the solder mask on the trace next to the pins and resoldered them. Success!

Gero - 回复

添加评论

浏览统计数据:

过去 24 小时: 9

过去 7 天: 19

过去 30 天: 62

总计 1,707