简介
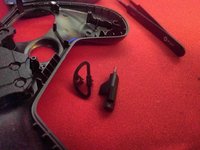
Background: My left analog stick started having drift and left-right phantom input problems, so this controller was already on the deathbed.
For disassembly, I drilled two screws out because I didn't want to wait for a longer T6 driver, so this controller is permanently damaged now both physically and (already was) electronically.
你所需要的
-
-
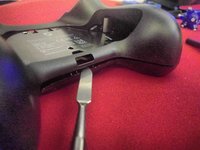
Start by taking out the 4 obvious screws, two on each side.
-
You'll need a long-necked T6 driver if you want to get these out cleanly. (At least 1" / 25mm.)
-
The pro tech toolkit does not have one long enough, so I used a slightly hacked hex key on two of them (stripping the heads) and ended up drilling out the other two because the hex key is not a good fit.
-
-
-
These are hidden under the label, simply use a sharp blade or just punch through the label with something sharp.
-
There are two at the top just outside the holes showing metal, and one near the bottom center.
-
The two at the top are much deeper in, but my normal T6 fits just fine.
-
-
-
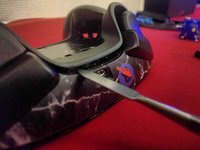
Starting at the bottom center seems easiest and leaves the least amount of visual scratches.
-
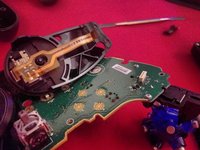
Go all the way around, going below/behind the USB port. (see second picture)
-
-
-
-
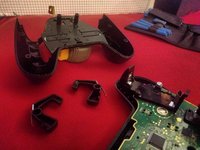
Upon removing the backplate, there will be two battery hinges that may come off on either side.
-
I recommend keeping them on the backplate for reassembly later.
-
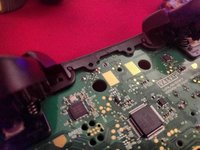
Next there is the backplate release switch, composed of two plastic parts and two springs.
-
See the 3rd picture of those parts.
-
-
-
Two screws near the top center.
-
Two screws on the far sides on top of the battery holder plastic backings.
-
-
-
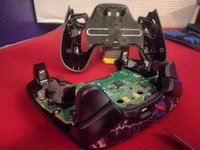
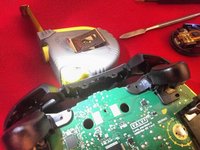
Two screws hold each touchpad in place. They are mirrored across.
-
You might need to lift the motherboard by a finger's width to reach two of the four screws. (They are slightly underneath the battery holder plastic.)
-
-
-
The only thing attached to the trackpads are the ribbon cables, be careful when lifting the motherboard off the front face plastic.
-
-
在这个步骤中使用的工具:Tweezers$4.99
-
These ribbon cables are actually really easy to take out, just tug gently straight away from the board.
-
ESD-safe tweezers are recommended for re-insertion, as the stiff ends are very small and difficult to grasp.
-
-
-
This thing literally just pops off using two plastic pressure-based latches. Just pull it in the direction the USB cable would go from the motherboard.
-
-
-
The screw for the bumper setups is on the opposite side of the motherboard, under the trackpad location.
-


5指南评论
Much appreciated! I'm about to pop mine over to give them a good clean!
Thank you, i finally got around to ordering some long torx to be able to disassemble this. Added some tape to the top bumpers to make them less stiff, and swapped the stick to a convex one. I hate screws under stickers lol.
@christianl49355 A year late, but one of the springs goes to the side of the battery cover release switch, on a small plastic peg, and the other goes inside the small square hole that the D-shaped component of the release switch pushes into. You can just see the one inside the square hole in the photo above.
Oz Browning - 回复 分享
I have a T6 torx (it's the same one that I've used to undo hard drive screws), and I can't for the life of me actually get it to bind to any of the screws in the Steam Controller to actually unscrew them. Is there a trick I'm missing? I'm afraid just blindly pushing and spinning is just going to strip them.
DKesserich - 回复 分享