跳转到主内容

Sony Xperia Z1 Charging Port Replacement

你所需要的

  1. Sony Xperia Z1 Charging Port Replacement, Battery: 步骤 1 中的图像 1,1
    • Before you begin, use caution while handling a heat gun.

    • With caution to hot temperatures, glide a heat gun over the outer edges of the phone bezel to soften the adhesive securing the back panel to the phone.

  2. Sony Xperia Z1 Charging Port Replacement: 步骤 2 中的图像 1,2 Sony Xperia Z1 Charging Port Replacement: 步骤 2 中的图像 2,2
    • Apply a suction cup tool to the center of the back panel and gently pull the panel off the back of the phone.

    • If you are experiencing difficulty, use an opening pick to slide into the crack in between the panel and the rest of the phone body to pry off the back.

  3. Sony Xperia Z1 Charging Port Replacement: 步骤 3 中的图像 1,2 Sony Xperia Z1 Charging Port Replacement: 步骤 3 中的图像 2,2
    • Use the Torx T5 screwdriver to remove the two 3.81mm screws from the corners of the battery.

  4. Sony Xperia Z1 Charging Port Replacement: 步骤 4 中的图像 1,2 Sony Xperia Z1 Charging Port Replacement: 步骤 4 中的图像 2,2
    • Use the plastic opening tool to gently pry off the two flex connectors from the motherboard. Getting access to one of the connectors requires prying off the other first, so be sure to remove the top connector first.

    • Tip: you may need to use the tweezers to gently hold the top connector out of the way while prying off the bottom connector.

  5. Sony Xperia Z1 Charging Port Replacement: 步骤 5 中的图像 1,1
    • Slowly slip the halberd spudger underneath the rest of the orange flex cable to carefully peel the adhesive portion away from the rest of the phone.

  6. Sony Xperia Z1 Charging Port Replacement: 步骤 6 中的图像 1,1
    • Use the tweezers to grab the top right corner of battery and carefully lift it up and away from the phone.

  7. Sony Xperia Z1 Charging Port Replacement: 步骤 7 中的图像 1,1
    • Once the battery is at a safe enough height, grip the corner of the battery and slowly pull it out of the phone.

    • The old battery can be recycled at any local office supply store that supports recycling used batteries.

  8. Sony Xperia Z1 Charging Port Replacement, Charging Port: 步骤 8 中的图像 1,3 Sony Xperia Z1 Charging Port Replacement, Charging Port: 步骤 8 中的图像 2,3 Sony Xperia Z1 Charging Port Replacement, Charging Port: 步骤 8 中的图像 3,3
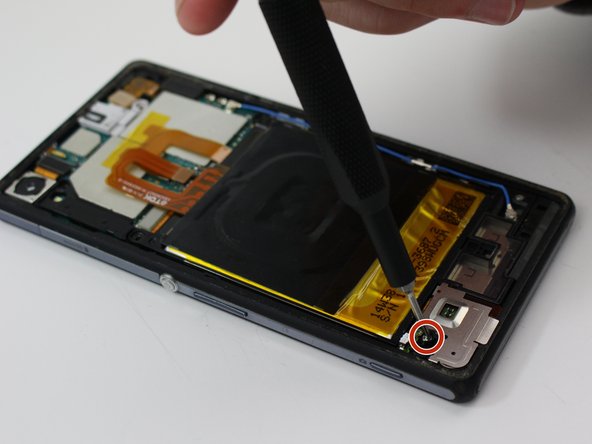
    • Use a T5 Torx screwdriver to remove the two screws on the long metal bracket along the left side of the phone.

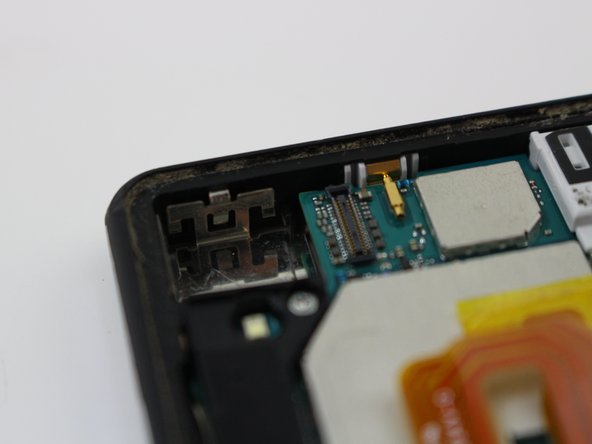
    • Remove the metal cover with a pair of tweezers.

  9. Sony Xperia Z1 Charging Port Replacement: 步骤 9 中的图像 1,1
    • Use a pair of tweezers to remove the plastic cover above the speakers.

  10. Sony Xperia Z1 Charging Port Replacement: 步骤 10 中的图像 1,1
    • Use a plastic opening tool to remove the coaxial cable from the bottom of the motherboard by prying it upward.

  11. Sony Xperia Z1 Charging Port Replacement: 步骤 11 中的图像 1,1
    • Using the plastic opening tool, remove the press fit connector attached to the motherboard.

  12. Sony Xperia Z1 Charging Port Replacement: 步骤 12 中的图像 1,1
    • Using the plastic opening tool, remove the press fit connector attached to the motherboard in the upper righthand corner.

  13. Sony Xperia Z1 Charging Port Replacement: 步骤 13 中的图像 1,2 Sony Xperia Z1 Charging Port Replacement: 步骤 13 中的图像 2,2
    • Using the plastic opening tool, remove the press fit camera connector from the motherboard.

    • Lift the camera out from the motherboard.

  14. Sony Xperia Z1 Charging Port Replacement: 步骤 14 中的图像 1,3 Sony Xperia Z1 Charging Port Replacement: 步骤 14 中的图像 2,3 Sony Xperia Z1 Charging Port Replacement: 步骤 14 中的图像 3,3
    • Using a plastic spudger, lift the motherboard upwards in order to separate it from the phone.

    • The images depict a metal spudger being used, which poses a potential to damage the motherboard. We recommend using an ESD-safe tool instead.

    • As the motherboard is lifted up, grab it with a pair of tweezers and lift it out of the phone.

  15. Sony Xperia Z1 Charging Port Replacement: 步骤 15 中的图像 1,2 Sony Xperia Z1 Charging Port Replacement: 步骤 15 中的图像 2,2
    • Grab your Soldering Iron and heat it up. Once it is at around 200° F, apply pressure to the soldering pads on the left and right side of the connector. In order to replace the charging port, grab your connector and solder it back onto the same soldering pads.

结论

To reassemble your device, follow these instructions in reverse order.

另外一个人完成了本指南。

0条评论

添加评论

浏览统计数据:

过去 24 小时: 2

过去 7 天: 6

过去 30 天: 10

总计 1,424