跳转到主内容

Sony Xperia Z Motherboard Replacement

你所需要的

  1. Sony Xperia Z Motherboard Replacement, Battery: 步骤 1 中的图像 1,3 Sony Xperia Z Motherboard Replacement, Battery: 步骤 1 中的图像 2,3 Sony Xperia Z Motherboard Replacement, Battery: 步骤 1 中的图像 3,3
    • Turn hair dryer to medium heat.

    • Slowly move the hair dryer along the seams on the back of the phone. Keep the dryer a few inches away from the case.

    • Circulate the dryer for a full minute to soften the adhesive binding the phone together.

  2. Sony Xperia Z Motherboard Replacement: 步骤 2 中的图像 1,1
    • Once the adhesive is loosened, stick the suction cup to the top-center of the back of your phone and gently pull back.

    • Gently pull back just enough to create a small gap.

  3. Sony Xperia Z Motherboard Replacement: 步骤 3 中的图像 1,2 Sony Xperia Z Motherboard Replacement: 步骤 3 中的图像 2,2
    • Once you've opened a small space with the back cover, stick the plastic opening tool into the seam of the phone.

    • Move the tool along the seam to loosen the adhesive.

  4. Sony Xperia Z Motherboard Replacement: 步骤 4 中的图像 1,1
    • Caution: Pulling too vigorously or quickly on the suction cup could snap the back of the phone.

    • Once the adhesive has been adequately loosened, pull back slowly on the suction cup to remove the back panel of the phone.

    • The remaining adhesive should be strong enough to hold the phone together tightly upon reassembly. However, once opened the water resistance of your phone has been compromised.

  5. Sony Xperia Z Motherboard Replacement: 步骤 5 中的图像 1,3 Sony Xperia Z Motherboard Replacement: 步骤 5 中的图像 2,3 Sony Xperia Z Motherboard Replacement: 步骤 5 中的图像 3,3
    • Now that the back is removed, the battery is visible. You now have access to the battery and its connecting components.

    • With the plastic opening tool, gently remove the connector from the motherboard.

    • Use your fingers to peel the rest of the adhesive away from the phone.

  6. Sony Xperia Z Motherboard Replacement: 步骤 6 中的图像 1,3 Sony Xperia Z Motherboard Replacement: 步骤 6 中的图像 2,3 Sony Xperia Z Motherboard Replacement: 步骤 6 中的图像 3,3
    • With the plastic opening tool, carefully peel the white adhesive tape up from the bottom of the battery.

    • Use your fingers to peel back the rest of the adhesive tape away from the battery.

  7. Sony Xperia Z Motherboard Replacement: 步骤 7 中的图像 1,3 Sony Xperia Z Motherboard Replacement: 步骤 7 中的图像 2,3 Sony Xperia Z Motherboard Replacement: 步骤 7 中的图像 3,3
    • Slide the spudger firmly along the right side of the battery, loosening the adhesive between the casing and battery.

    • Flex cables run vertically down the phone underneath the battery and can be damaged easily. Make sure to only place the spudger in the indicated area.

    • Insert the spudger in the bottom-center to further loosen the adhesive. Carefully separate the battery from the phone by sliding the spudger vertically underneath the battery and prying up. This may take some time and work as the adhesive is very strong.

  8. Sony Xperia Z Motherboard Replacement, Camera: 步骤 8 中的图像 1,1
    • Remove the one 3 mm screw with the Phillips #000 screwdriver. The screw is located at the top right corner of the motherboard. The motherboard is the green/silver circuit board at the top of the phone.

  9. Sony Xperia Z Motherboard Replacement: 步骤 9 中的图像 1,3 Sony Xperia Z Motherboard Replacement: 步骤 9 中的图像 2,3 Sony Xperia Z Motherboard Replacement: 步骤 9 中的图像 3,3
    • Using with the plastic opening tool, pry up firmly from the bottom and top of the plastic housing. The housing is black and located at the top right corner of the phone.

    • Release the charging cover, located on the right side of the phone at the top. This should cause the housing piece to pop out effortlessly.

    • Getting the black housing off of the phone can be tricky. Just keep prying and pulling up on the housing to get it out.

  10. Sony Xperia Z Motherboard Replacement, Rear Facing Camera: 步骤 10 中的图像 1,3 Sony Xperia Z Motherboard Replacement, Rear Facing Camera: 步骤 10 中的图像 2,3 Sony Xperia Z Motherboard Replacement, Rear Facing Camera: 步骤 10 中的图像 3,3
    • Do not remove all the copper tape. Only remove the copper tape attached to the silver part of the motherboard.

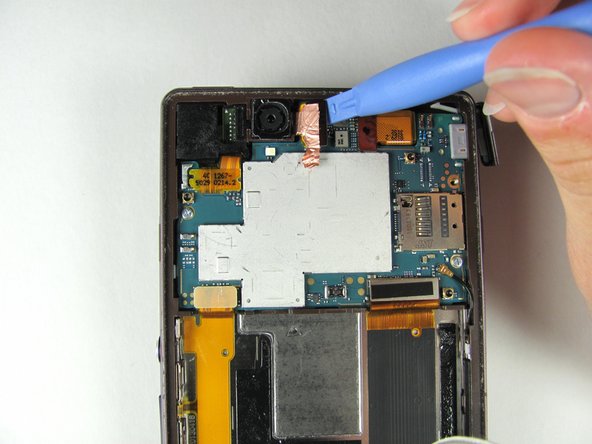
    • Release the copper tape located at the top middle of the phone with a plastic opening tool. This will take some force since the adhesive is rather strong.

    • With the plastic opening tool, release the pop connector, by lifting up to release it. The pop connector should still be attached to the copper tape.

    • Pull up gently on the copper tape and pop connector to remove the back camera. It should pop out easily.

  11. Sony Xperia Z Motherboard Replacement, Front Facing Camera: 步骤 11 中的图像 1,2 Sony Xperia Z Motherboard Replacement, Front Facing Camera: 步骤 11 中的图像 2,2
    • With the plastic opening tool, gently pry the red tape away from motherboard. This pop connector is located at the top right corner of the phone.

    • Using your fingers, gently pull up on the pop connector to remove the front camera. The front camera piece should lift out effortlessly.

  12. Sony Xperia Z Motherboard Replacement, SIM Card: 步骤 12 中的图像 1,2 Sony Xperia Z Motherboard Replacement, SIM Card: 步骤 12 中的图像 2,2
    • The SIM card of the Xperia Z is located in the unlabeled slot above the power button.

    • Gently open the cover by pushing it to the left.

    • Some photos in this guide show the back cover of the phone removed. If you are only removing the SIM card, removing the case is not necessary.

  13. Sony Xperia Z Motherboard Replacement: 步骤 13 中的图像 1,3 Sony Xperia Z Motherboard Replacement: 步骤 13 中的图像 2,3 Sony Xperia Z Motherboard Replacement: 步骤 13 中的图像 3,3
    • To avoid damage to the SIM card, be careful when removing and handling it.

    • Carefully pull the SIM card and SIM card tray out of the phone

  14. Sony Xperia Z Motherboard Replacement, Motherboard: 步骤 14 中的图像 1,1
    • Remove the two 3mm Phillips #000 screws located at the middle left and lower right of motherboard.

  15. Sony Xperia Z Motherboard Replacement: 步骤 15 中的图像 1,3 Sony Xperia Z Motherboard Replacement: 步骤 15 中的图像 2,3 Sony Xperia Z Motherboard Replacement: 步骤 15 中的图像 3,3
    • Gently pry the three flex cables away from the motherboard. They are located on the bottom right, bottom left, and top left corners of the motherboard.

    • Leave the three flex cable flaps up and away from the motherboard. Be careful not to tear the flex cables.

  16. Sony Xperia Z Motherboard Replacement: 步骤 16 中的图像 1,2 Sony Xperia Z Motherboard Replacement: 步骤 16 中的图像 2,2
    • With the plastic opening tool pry up the antenna located at the bottom right of the motherboard.

    • Leave the antenna up and away from the motherboard.

  17. Sony Xperia Z Motherboard Replacement: 步骤 17 中的图像 1,3 Sony Xperia Z Motherboard Replacement: 步骤 17 中的图像 2,3 Sony Xperia Z Motherboard Replacement: 步骤 17 中的图像 3,3
    • With the plastic opening tool, firmly pry the motherboard up out of the phone case. Pry from the right side of the motherboard where the back camera was previously located.

    • Firmly lift the section up where the silver part of the motherboard comes to the edge of the green base board.

    • The motherboard has a lot of adhesive connecting it to the phone, so it will require some force to remove it.

结论

To reassemble your device, follow these instructions in reverse order.

30等其他人完成本指南。

Emily Holland

于02/02/14注册

2,343 声望

创作了4篇指南

团队

Cal Poly, Team 2-7, Amido Winter 2014 Cal Poly, Team 2-7, Amido Winter 2014 的会员

CPSU-AMIDO-W14S2G7

4 名成员

创作了25篇指南

6条评论

Where can you get a motherboard from need on asap

cwhittingham60 - 回复

what is on the back glass panel Wight chip (inner part )

i broke 1 of 2 pins connecting 2 them is it necessary

can i repair it,,?

cashish00 - 回复

the "white chip" is the nfc antenna, and no its not required for the device to function unless you desire a working nfc device..

i would also like to know where to purchase a master logic board for the c6603 xperia z

phil no - 回复

My xperia has wrong negtive postive cnection while charging and now device is not power on and apso not charging can you help me to repair it what is the salution

sunnybhambra - 回复

Do I need to reinstall the operating system after replacing the motherboard? And how to install?

Eric Wong - 回复

添加评论

浏览统计数据:

过去 24 小时: 0

过去 7 天: 0

过去 30 天: 13

总计 69,537