跳转到主内容

Sony Xperia XA LCD Screen Replacement

你所需要的

  1. Sony Xperia XA LCD Screen Replacement, Back Cover: 步骤 1 中的图像 1,1
    • Apply heat on the back surface of the phone.

    • Continue to heat the device as needed throughout the replacement process.

    • The device can get very hot, so be careful when handling it.

  2. Sony Xperia XA LCD Screen Replacement: 步骤 2 中的图像 1,1
    • Stick the small suction cup on the bottom half of the back surface of the phone.

  3. Sony Xperia XA LCD Screen Replacement: 步骤 3 中的图像 1,3 Sony Xperia XA LCD Screen Replacement: 步骤 3 中的图像 2,3 Sony Xperia XA LCD Screen Replacement: 步骤 3 中的图像 3,3
    • With the bottom of the device facing you, lift up on the suction cup handle.

    • Use the plastic opening tool around all sides to pry off the back cover.

  4. Sony Xperia XA LCD Screen Replacement: 步骤 4 中的图像 1,3 Sony Xperia XA LCD Screen Replacement: 步骤 4 中的图像 2,3 Sony Xperia XA LCD Screen Replacement: 步骤 4 中的图像 3,3
    • Pull the back of the phone case away from the device.

    • You will hear popping sounds of glue being ripped from the phone.

    • You will hear the sound of the back unlatching from the device.

    • You will need to apply adhesive or glue along the device to have maximum seal in reassembly.

    • RAF antenna may be attached to the back cover upon removal.

  5. Sony Xperia XA LCD Screen Replacement: 步骤 5 中的图像 1,1
    • Apply heat to the copper RAF antenna.

    • This step and the following step only apply if the RAF antenna does not come off when taking the back cover off.

  6. Sony Xperia XA LCD Screen Replacement: 步骤 6 中的图像 1,1
    • Peel back the RAF antenna.

  7. Sony Xperia XA LCD Screen Replacement, Battery: 步骤 7 中的图像 1,3 Sony Xperia XA LCD Screen Replacement, Battery: 步骤 7 中的图像 2,3 Sony Xperia XA LCD Screen Replacement, Battery: 步骤 7 中的图像 3,3
    • Peel back the black tabs on the battery.

    • This may require some force as you are breaking the adhesive seal.

    • You will need to apply more adhesive for the reassembly.

  8. Sony Xperia XA LCD Screen Replacement: 步骤 8 中的图像 1,2 Sony Xperia XA LCD Screen Replacement: 步骤 8 中的图像 2,2
    • Use a plastic opening tool to pry up the orange battery connector that is directly above the battery in the center of the phone.

  9. Sony Xperia XA LCD Screen Replacement: 步骤 9 中的图像 1,1
    • Use a plastic opening tool to get under the battery and pry it up.

  10. Sony Xperia XA LCD Screen Replacement: 步骤 10 中的图像 1,1
    • Lift the battery out with your hands.

  11. Sony Xperia XA LCD Screen Replacement, LCD Screen: 步骤 11 中的图像 1,2 Sony Xperia XA LCD Screen Replacement, LCD Screen: 步骤 11 中的图像 2,2
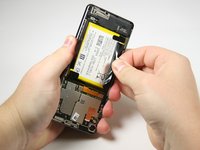
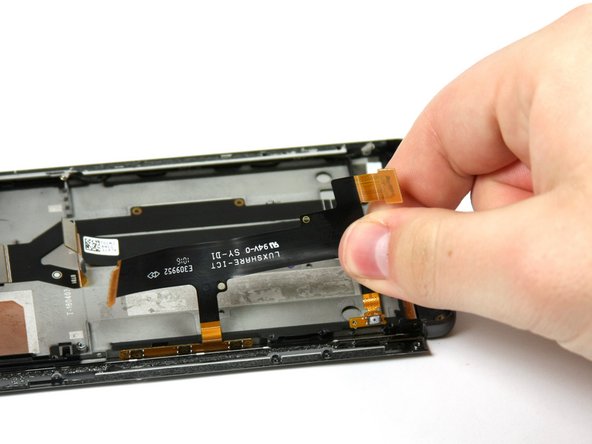
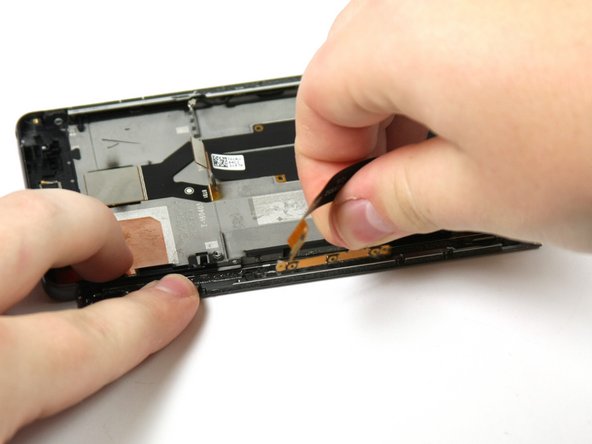
    • Remove the four 4mm screws holding the loudspeaker in place with a Phillips #00 screwdriver.

  12. Sony Xperia XA LCD Screen Replacement: 步骤 12 中的图像 1,2 Sony Xperia XA LCD Screen Replacement: 步骤 12 中的图像 2,2
    • Push back the two retaining tabs on the top of the loudspeaker with the spudger.

  13. Sony Xperia XA LCD Screen Replacement: 步骤 13 中的图像 1,1
    • Pry the loudspeaker up with the spudger.

  14. Sony Xperia XA LCD Screen Replacement: 步骤 14 中的图像 1,1
    • Remove the loudspeaker with your hands.

  15. Sony Xperia XA LCD Screen Replacement: 步骤 15 中的图像 1,1
    • With a spudger, pry up the orange connector that is directly underneath where the loud speaker was just removed.

  16. Sony Xperia XA LCD Screen Replacement: 步骤 16 中的图像 1,2 Sony Xperia XA LCD Screen Replacement: 步骤 16 中的图像 2,2
    • Pry up the small silver connector on the right side of the bottom of the phone with a spudger.

  17. Sony Xperia XA LCD Screen Replacement: 步骤 17 中的图像 1,2 Sony Xperia XA LCD Screen Replacement: 步骤 17 中的图像 2,2
    • Pry up the charging port using a spudger.

  18. Sony Xperia XA LCD Screen Replacement: 步骤 18 中的图像 1,2 Sony Xperia XA LCD Screen Replacement: 步骤 18 中的图像 2,2
    • Remove the five black 4mm screws with a Phillips #00 screwdriver.

  19. Sony Xperia XA LCD Screen Replacement: 步骤 19 中的图像 1,1
    • Pry up the black camera case with a nylon spudger, and then remove the case.

  20. Sony Xperia XA LCD Screen Replacement: 步骤 20 中的图像 1,3 Sony Xperia XA LCD Screen Replacement: 步骤 20 中的图像 2,3 Sony Xperia XA LCD Screen Replacement: 步骤 20 中的图像 3,3
    • Use a spudger to pry up the six motherboard connectors.

  21. Sony Xperia XA LCD Screen Replacement: 步骤 21 中的图像 1,1
    • Use the flat end of the nylon spudger to lift the camera out of the phone.

  22. Sony Xperia XA LCD Screen Replacement: 步骤 22 中的图像 1,1
    • Pull out the front camera using your fingers.

  23. Sony Xperia XA LCD Screen Replacement: 步骤 23 中的图像 1,1
    • Use the spudger to separate the motherboard from the frame.

  24. Sony Xperia XA LCD Screen Replacement: 步骤 24 中的图像 1,2 Sony Xperia XA LCD Screen Replacement: 步骤 24 中的图像 2,2
    • Pry up the headphone jack using a spudger.

  25. Sony Xperia XA LCD Screen Replacement: 步骤 25 中的图像 1,2 Sony Xperia XA LCD Screen Replacement: 步骤 25 中的图像 2,2
    • Peel back the black tabs that were holding the battery in place.

    • You may hear loud sounds as you pull the tabs because they are stuck with adhesive.

  26. Sony Xperia XA LCD Screen Replacement: 步骤 26 中的图像 1,2 Sony Xperia XA LCD Screen Replacement: 步骤 26 中的图像 2,2
    • Remove the two 4 mm screws with a Phillips #000 screwdriver from the left side of the back of the screen.

  27. Sony Xperia XA LCD Screen Replacement: 步骤 27 中的图像 1,2 Sony Xperia XA LCD Screen Replacement: 步骤 27 中的图像 2,2
    • Remove the three 3mm screws with a T5 screwdriver along the side of the device where the volume buttons are.

  28. Sony Xperia XA LCD Screen Replacement: 步骤 28 中的图像 1,2 Sony Xperia XA LCD Screen Replacement: 步骤 28 中的图像 2,2
    • Push down the side of the screen that you just removed screws from.

  29. Sony Xperia XA LCD Screen Replacement: 步骤 29 中的图像 1,3 Sony Xperia XA LCD Screen Replacement: 步骤 29 中的图像 2,3 Sony Xperia XA LCD Screen Replacement: 步骤 29 中的图像 3,3
    • Pull up the orange and black tab that is on the left half of the middle of the screen.

  30. Sony Xperia XA LCD Screen Replacement: 步骤 30 中的图像 1,2 Sony Xperia XA LCD Screen Replacement: 步骤 30 中的图像 2,2
    • Remove the Wifi antenna.

  31. Sony Xperia XA LCD Screen Replacement: 步骤 31 中的图像 1,2 Sony Xperia XA LCD Screen Replacement: 步骤 31 中的图像 2,2
    • Remove the three 3 mm screws with a Star Bit T5 Screwdriver on the opposite side of the phone.

  32. Sony Xperia XA LCD Screen Replacement: 步骤 32 中的图像 1,2 Sony Xperia XA LCD Screen Replacement: 步骤 32 中的图像 2,2
    • Use tweezers to remove the earpiece.

结论

To reassemble your device, follow these instructions in reverse order.

7等其他人完成本指南。

团队

Cal Poly, Team S17-G2, Livingston Spring 2018 Cal Poly, Team S17-G2, Livingston Spring 2018 的会员

CPSU-LIVINGSTON-S18S17G2

4 名成员

创作了8篇指南

0条评论

添加评论

浏览统计数据:

过去 24 小时: 6

过去 7 天: 13

过去 30 天: 30

总计 4,180