跳转到主内容

Sony VAIO VPC-EB33FM Hard Drive Replacement

你所需要的

  1. Sony VAIO VPC-EB33FM Hard Drive Replacement, Battery: 步骤 1 中的图像 1,2 Sony VAIO VPC-EB33FM Hard Drive Replacement, Battery: 步骤 1 中的图像 2,2
    • Power down the laptop by pressing the power button.

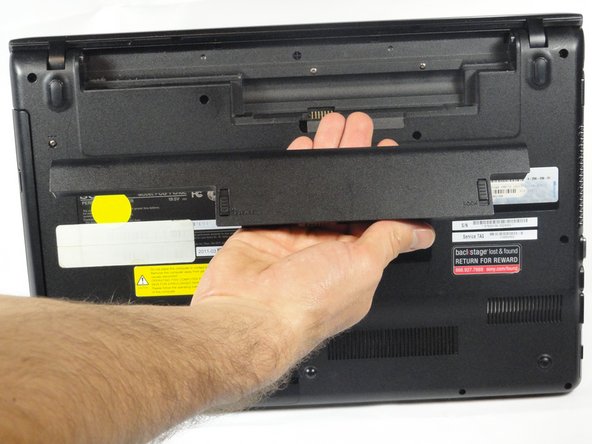
    • Turn the laptop onto its backside.

  2. Sony VAIO VPC-EB33FM Hard Drive Replacement: 步骤 2 中的图像 1,1
    • To release the battery, hold both the release button and the unlock button at the same time.

  3. Sony VAIO VPC-EB33FM Hard Drive Replacement: 步骤 3 中的图像 1,2 Sony VAIO VPC-EB33FM Hard Drive Replacement: 步骤 3 中的图像 2,2
    • Remove the battery out from the notch while continuing to hold the release button.

  4. Sony VAIO VPC-EB33FM Hard Drive Replacement, Hard Drive: 步骤 4 中的图像 1,3 Sony VAIO VPC-EB33FM Hard Drive Replacement, Hard Drive: 步骤 4 中的图像 2,3 Sony VAIO VPC-EB33FM Hard Drive Replacement, Hard Drive: 步骤 4 中的图像 3,3
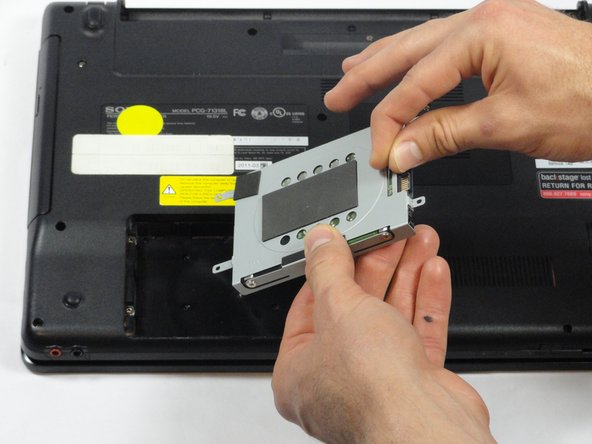
    • Use a Phillips #00 screwdriver to remove the two 7.8 mm cover screws on the bottom corners of the panel.

  5. Sony VAIO VPC-EB33FM Hard Drive Replacement: 步骤 5 中的图像 1,3 Sony VAIO VPC-EB33FM Hard Drive Replacement: 步骤 5 中的图像 2,3 Sony VAIO VPC-EB33FM Hard Drive Replacement: 步骤 5 中的图像 3,3
    • Use a finger/fingernail to grip the notch at the bottom of the panel to lift it off.

    • You may need to use your other hand to safely remove the panel.

    • You can also use a spudger for this step.

  6. Sony VAIO VPC-EB33FM Hard Drive Replacement: 步骤 6 中的图像 1,1
    • Remove the two remaining 7.8 mm screws using the Phillips #00 screwdriver.

  7. Sony VAIO VPC-EB33FM Hard Drive Replacement: 步骤 7 中的图像 1,1
    • Grab the tab between your thumb and index finger.

    • Hold the hard drive securely in a horizontal position using your other hand.

    • Push the hard drive to the left using the plastic tab to disconnect it from the laptop.

    • To prevent damage of the connection on the hard disk drive or the laptop, perform this task slowly and with care.

  8. Sony VAIO VPC-EB33FM Hard Drive Replacement: 步骤 8 中的图像 1,2 Sony VAIO VPC-EB33FM Hard Drive Replacement: 步骤 8 中的图像 2,2
    • While still holding the plastic tab, lift the right side of the hard drive out at a 45º angle.

    • Pull the hard drive out.

  9. Sony VAIO VPC-EB33FM Hard Drive Replacement: 步骤 9 中的图像 1,2 Sony VAIO VPC-EB33FM Hard Drive Replacement: 步骤 9 中的图像 2,2
    • If you need to remove the bracket from the hard drive, follow the next few steps:

    • Remove the two 3.7 mm screws from either side of the bracket with a Phillips #00 screwdriver.

    • Lift the bracket off the hard drive.

结论

To reassemble your device, follow these instructions in reverse order.

8等其他人完成本指南。

Christian

于01/14/13注册

177 声望

撰写一个指南

团队

Cal Poly, Team 18-39, Regan Winter 2013 Cal Poly, Team 18-39, Regan Winter 2013 的会员

CPSU-REGAN-W13S18G39

5 名成员

创作了15篇指南

一条评论

This is very good step by step instructions guide. Loved it and was able to remove my laptop hd very easily. I created this account only to say thanks to writer. Amazing job !! Thaks ton.

Dinesh - 回复

添加评论

浏览统计数据:

过去 24 小时: 0

过去 7 天: 3

过去 30 天: 6

总计 18,423