跳转到主内容

Sony Handycam DCR-DVD103 LCD Screen Replacement

你所需要的

  1. Sony Handycam DCR-DVD103 LCD Screen Replacement, Battery: 步骤 1 中的图像 1,1
    • Images do not show the camera's battery.

    • On the back of the camera beneath the viewfinder, locate the battery pack.

    • Press the small button.

    • Slide the switch forward.

  2. Sony Handycam DCR-DVD103 LCD Screen Replacement: 步骤 2 中的图像 1,1
    • Remove the battery from the camera.

    • To reinsert the battery, slide the battery into the camera.

  3. Sony Handycam DCR-DVD103 LCD Screen Replacement, Outer Cover: 步骤 3 中的图像 1,1
    • Using a #00 Phillips screwdriver, remove the six 4.5 mm screws from the camera's bottom.

  4. Sony Handycam DCR-DVD103 LCD Screen Replacement: 步骤 4 中的图像 1,2 Sony Handycam DCR-DVD103 LCD Screen Replacement: 步骤 4 中的图像 2,2
    • Remove the three 4.5 mm screws beneath the battery.

    • Remove the 2.9 mm screw from the right corner.

    • Remove the two 4.5 mm screws from the battery's right wall.

    • Images do not show the battery.

  5. Sony Handycam DCR-DVD103 LCD Screen Replacement: 步骤 5 中的图像 1,1
    • Remove the 4.5 mm screw under the output flap on the front of the camera below the lens.

  6. Sony Handycam DCR-DVD103 LCD Screen Replacement: 步骤 6 中的图像 1,2 Sony Handycam DCR-DVD103 LCD Screen Replacement: 步骤 6 中的图像 2,2
    • Remove the two 4.5 mm screws at the top of the camera.

    • Remove the 4.5 mm screw from the disk side of the camera (next to the lens).

  7. Sony Handycam DCR-DVD103 LCD Screen Replacement: 步骤 7 中的图像 1,2 Sony Handycam DCR-DVD103 LCD Screen Replacement: 步骤 7 中的图像 2,2
    • Extend the gray viewfinder, then gently remove the black plastic casing.

    • Caution: Plastic pieces are fragile.

  8. Sony Handycam DCR-DVD103 LCD Screen Replacement: 步骤 8 中的图像 1,1
    • Remove the two 2.9 mm screws under the black plastic casing.

  9. Sony Handycam DCR-DVD103 LCD Screen Replacement: 步骤 9 中的图像 1,1
    • Gently pull apart the outer silver case and screen.

    • Remove the copper wire strip to detach the case from the camera.

  10. Sony Handycam DCR-DVD103 LCD Screen Replacement, LCD Screen: 步骤 10 中的图像 1,1
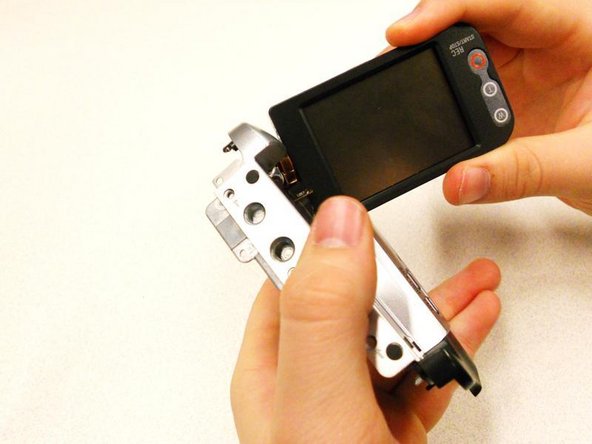
    • Remove the copper strip from the housing that connects the outer casing to the entire of the camera.

    • Use caution when removing the wire, too much force may cause it to tear.

  11. Sony Handycam DCR-DVD103 LCD Screen Replacement: 步骤 11 中的图像 1,3 Sony Handycam DCR-DVD103 LCD Screen Replacement: 步骤 11 中的图像 2,3 Sony Handycam DCR-DVD103 LCD Screen Replacement: 步骤 11 中的图像 3,3
    • Remove (4) 2.9mm screws from the L-shaped circuit board. They are marked with red circles in the slide.

    • Remove the (3) wire strips connected to the camera so you can pull off the L-shaped circuit board.

    • Remove the single wire strip that is connected to the bottom of the circuit board.

  12. Sony Handycam DCR-DVD103 LCD Screen Replacement: 步骤 12 中的图像 1,1
    • Remove the (2) 4.5mm screws.

    • Remove the small black holder from above the base of the LCD screen.

  13. Sony Handycam DCR-DVD103 LCD Screen Replacement: 步骤 13 中的图像 1,1
    • Remove (1) 2.9mm screw from the base of the LCD screen.

  14. Sony Handycam DCR-DVD103 LCD Screen Replacement: 步骤 14 中的图像 1,1
    • Remove the silver and black, front and back casings from the base of the screen.

    • Remove one copper strip from the inside of the bottom case.

  15. Sony Handycam DCR-DVD103 LCD Screen Replacement: 步骤 15 中的图像 1,1
    • Remove (2) 5.4mm screws that are securing the screen to the cover, from the base of the LCD.

  16. Sony Handycam DCR-DVD103 LCD Screen Replacement: 步骤 16 中的图像 1,3 Sony Handycam DCR-DVD103 LCD Screen Replacement: 步骤 16 中的图像 2,3 Sony Handycam DCR-DVD103 LCD Screen Replacement: 步骤 16 中的图像 3,3
    • Twist out the screen from the cover.

    • Be careful not to break the casing when trying to get the screen out, as it does require some maneuvering.

  17. Sony Handycam DCR-DVD103 LCD Screen Replacement: 步骤 17 中的图像 1,1
    • Remove (2) 3.8mm screws from the end of the LCD.

  18. Sony Handycam DCR-DVD103 LCD Screen Replacement: 步骤 18 中的图像 1,1
    • Remove (2) 3.8mm screws from the bottom of the LCD.

  19. Sony Handycam DCR-DVD103 LCD Screen Replacement: 步骤 19 中的图像 1,2 Sony Handycam DCR-DVD103 LCD Screen Replacement: 步骤 19 中的图像 2,2
    • Pull off the silver cover on the screen, which will reveal the circuit board from behind the screen itself.

    • Pull off the black tape stuck to both sides of the circuit board.

  20. Sony Handycam DCR-DVD103 LCD Screen Replacement: 步骤 20 中的图像 1,1
    • Remove (3) 4.5mm screws from back-side of the LCD.

  21. Sony Handycam DCR-DVD103 LCD Screen Replacement: 步骤 21 中的图像 1,3 Sony Handycam DCR-DVD103 LCD Screen Replacement: 步骤 21 中的图像 2,3 Sony Handycam DCR-DVD103 LCD Screen Replacement: 步骤 21 中的图像 3,3
    • Remove the (3) copper strips to remove both the screen and the back light.

    • Replace what is broken.

结论

To reassemble your device, follow these instructions in reverse order.

另外一个人完成了本指南。

kaitlin

于01/11/11注册

342 声望

创作了3篇指南

团队

Cal Poly, Team 7-44, Regan Winter 2011 Cal Poly, Team 7-44, Regan Winter 2011 的会员

CPSU-REGAN-W11S7G44

5 名成员

创作了10篇指南

0条评论

添加评论

浏览统计数据:

过去 24 小时: 0

过去 7 天: 2

过去 30 天: 13

总计 8,043