跳转到主内容

Sony Ericsson Xperia X10 Touchscreen Glass Digitizer Replacement

你所需要的

视频概述

  1. Sony Ericsson Xperia X10 Touchscreen Glass Digitizer Replacement, Logic Board: 步骤 1 中的图像 1,3 Sony Ericsson Xperia X10 Touchscreen Glass Digitizer Replacement, Logic Board: 步骤 1 中的图像 2,3 Sony Ericsson Xperia X10 Touchscreen Glass Digitizer Replacement, Logic Board: 步骤 1 中的图像 3,3
    • Switch-off the phone.

    • Remove the battery.

    • Unscrew 8x T6 Torx screws.

  2. Sony Ericsson Xperia X10 Touchscreen Glass Digitizer Replacement: 步骤 2 中的图像 1,3 Sony Ericsson Xperia X10 Touchscreen Glass Digitizer Replacement: 步骤 2 中的图像 2,3 Sony Ericsson Xperia X10 Touchscreen Glass Digitizer Replacement: 步骤 2 中的图像 3,3
    • Use a Plastic Pry or other plastic tool to unhook the back housing / bezel and remove it.

    • Tip - try prying it open from the top and over to the side. It can be very tight if you are doing this for the first time. The volume rocker and camera button are not part of the housing, so try going around it.

  3. Sony Ericsson Xperia X10 Touchscreen Glass Digitizer Replacement: 步骤 3 中的图像 1,3 Sony Ericsson Xperia X10 Touchscreen Glass Digitizer Replacement: 步骤 3 中的图像 2,3 Sony Ericsson Xperia X10 Touchscreen Glass Digitizer Replacement: 步骤 3 中的图像 3,3
    • Remove the Volume Up/Down and Camera buttons.

    • Unhook the SIM & SD Card reader unit and disconnect the flex cable.

  4. Sony Ericsson Xperia X10 Touchscreen Glass Digitizer Replacement: 步骤 4 中的图像 1,3 Sony Ericsson Xperia X10 Touchscreen Glass Digitizer Replacement: 步骤 4 中的图像 2,3 Sony Ericsson Xperia X10 Touchscreen Glass Digitizer Replacement: 步骤 4 中的图像 3,3
    • Remove the Audio jack connector.

    • Disconnect 4x flex cables:

    • LCD Display

    • Menu buttons

    • Touchscreen

    • Earpiece, Volume & Power On buttons

    • Carefully remove the mother board.

    • Please SUBSCRIBE to my channel ツ

  5. Sony Ericsson Xperia X10 Touchscreen Glass Digitizer Replacement, Touchscreen Glass Digitizer: 步骤 5 中的图像 1,3 Sony Ericsson Xperia X10 Touchscreen Glass Digitizer Replacement, Touchscreen Glass Digitizer: 步骤 5 中的图像 2,3 Sony Ericsson Xperia X10 Touchscreen Glass Digitizer Replacement, Touchscreen Glass Digitizer: 步骤 5 中的图像 3,3
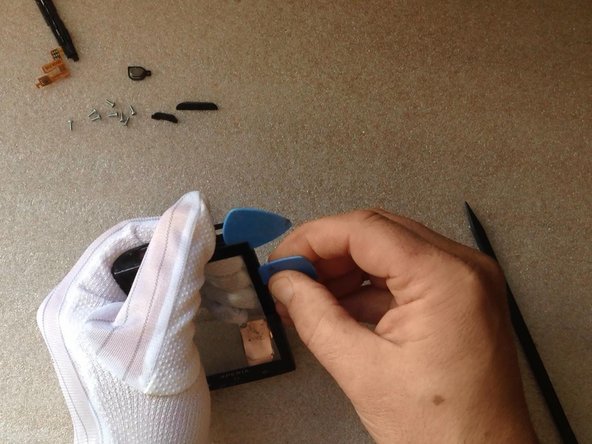
    • Use a heat gun or a hairdryer and warm the glass.

    • With a cutter carefully make a room between the glass and the frame to insert a Plastic Pick.

    • Slowly separate the Touchscreen from the frame.

  6. Sony Ericsson Xperia X10 Touchscreen Glass Digitizer Replacement: 步骤 6 中的图像 1,2 Sony Ericsson Xperia X10 Touchscreen Glass Digitizer Replacement: 步骤 6 中的图像 2,2
结论

To reassemble your device, follow these instructions in reverse order.

另外一个人完成了本指南。

ZFix

于12/09/13注册

191,308 声望

创作了330篇指南

团队

Master Techs Master Techs 的会员

Community

322 名成员

创作了2,535篇指南

0条评论

添加评论

浏览统计数据:

过去 24 小时: 0

过去 7 天: 0

过去 30 天: 2

总计 1,669