跳转到主内容
Sony Cyber-shot DSC-HX300 LCD Screen Replacement

Sony Cyber-shot DSC-HX300 LCD Screen Replacement

Elizabeth Surface

Elizabeth Surface10 其他贡献者

最后更新于 January 10, 2025

30分钟 - 1小时
中等

Use this guide to replace the LCD screen of your Sony Cyber-shot DSC-HX300.

The LCD (liquid-crystal display) screen is a flat panel that uses liquid crystals, polarizers, and a backlight or reflector to display images. Without the LCD screen, the user is unable to access some information or the image gallery.

If the LCD screen is not powering on after the LCD/Finder button has been pressed twice, then the screen may need to be replaced.

Before starting this guide, make sure to review the repair page. There may be charging or battery issues that are causing issues rather than the LCD screen itself.

Make sure to turn off your camera before starting this guide.

你所需要的

工具

查看更多...

当你通过这些链接购买商品时,iFixit 会赚取佣金。
  1. Sony Cyber-shot DSC-HX300 LCD Screen Replacement, Battery: 步骤 1 中的图像 1,1
    • Make sure the camera is powered off

    • Turn the camera upside down. This is a view of the bottom of the camera.

  2. Sony Cyber-shot DSC-HX300 LCD Screen Replacement: 步骤 2 中的图像 1,1
    • Push battery cover away from the camera.

  3. Sony Cyber-shot DSC-HX300 LCD Screen Replacement: 步骤 3 中的图像 1,1
    • Push the blue tab that secures the battery. The battery will then spring out.

  4. Sony Cyber-shot DSC-HX300 LCD Screen Replacement: 步骤 4 中的图像 1,2 Sony Cyber-shot DSC-HX300 LCD Screen Replacement: 步骤 4 中的图像 2,2
    • Remove the battery.

  5. Sony Cyber-shot DSC-HX300 LCD Screen Replacement, LCD Screen: 步骤 5 中的图像 1,1
    • Working on your device while it is turned on may result in electric shock. Make sure to shut down the camera, remove the battery, and unplug your device before you begin.

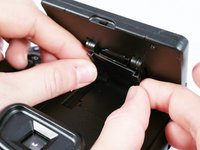
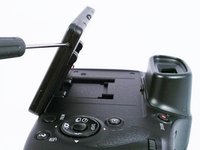
    • Use a Phillips head screwdriver to remove one 2 cm screw located on the inside portion of the LCD hinge.

  6. Sony Cyber-shot DSC-HX300 LCD Screen Replacement: 步骤 6 中的图像 1,2 Sony Cyber-shot DSC-HX300 LCD Screen Replacement: 步骤 6 中的图像 2,2
    • While using a plastic opening tool, carefully remove the plastic housing that surrounds the hinge.

  7. Sony Cyber-shot DSC-HX300 LCD Screen Replacement: 步骤 7 中的图像 1,2 Sony Cyber-shot DSC-HX300 LCD Screen Replacement: 步骤 7 中的图像 2,2
    • Using a small Phillips head screwdriver, remove the (2) 2 cm screws on the back of the LCD display, as indicated in the photo.

    • Turn the camera on its side to access the last remaining 2 cm Phillips head screw holding the LCD case together.

  8. Sony Cyber-shot DSC-HX300 LCD Screen Replacement: 步骤 8 中的图像 1,1
    • Remove the plastic cover from the back of the LCD display by simply sliding it up and off of the camera.

  9. Sony Cyber-shot DSC-HX300 LCD Screen Replacement: 步骤 9 中的图像 1,2 Sony Cyber-shot DSC-HX300 LCD Screen Replacement: 步骤 9 中的图像 2,2
    • Using a plastic opening tool, carefully remove the plastic housing that surrounds the LCD display.

  10. Sony Cyber-shot DSC-HX300 LCD Screen Replacement: 步骤 10 中的图像 1,3 Sony Cyber-shot DSC-HX300 LCD Screen Replacement: 步骤 10 中的图像 2,3 Sony Cyber-shot DSC-HX300 LCD Screen Replacement: 步骤 10 中的图像 3,3
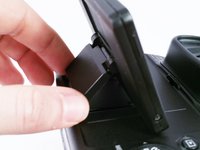
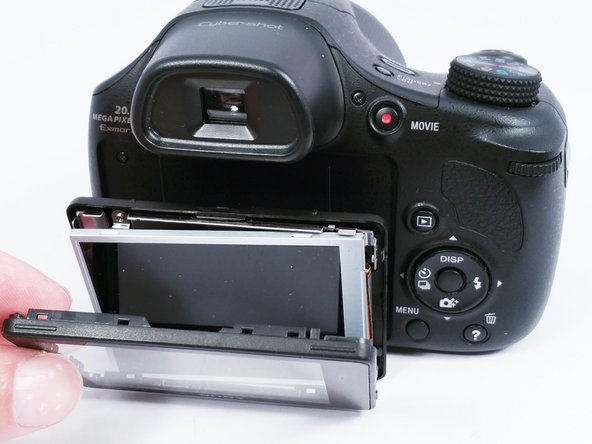
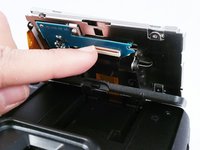
    • Once the plastic housing is separated, disconnect the ribbon wire located on the back of the LCD display. This can be achieved by pulling up lightly on the brown bar that locks the ribbon wire to the circuit board..

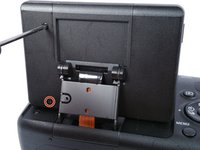
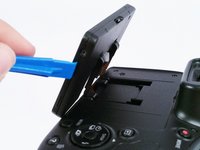
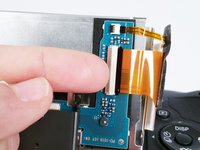
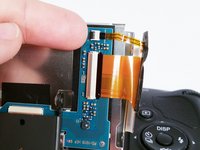
    • Disconnect the remaining two ribbon wires the same way. They are located on the right, rear side of the LCD frame.

  11. Sony Cyber-shot DSC-HX300 LCD Screen Replacement: 步骤 11 中的图像 1,1
    • Using a small Phillips head screwdriver, remove the last 2 cm screw that mounts the circuit board to the metal LCD display frame.

  12. Sony Cyber-shot DSC-HX300 LCD Screen Replacement: 步骤 12 中的图像 1,2 Sony Cyber-shot DSC-HX300 LCD Screen Replacement: 步骤 12 中的图像 2,2
    • Once the circuit board is removed the replacement parts can be installed in the reverse order.

结论

To reassemble your device, follow these instructions in reverse order. It is important to follow the steps in this order as it may not turn on properly if the user does not follow every step.

2等其他人完成本指南。

团队

USF Tampa, Team 4-6, Meier Fall 2015 USF Tampa, Team 4-6, Meier Fall 2015 的会员

USFT-MEIER-F15S4G6

4 名成员

创作了18篇指南

3指南评论

my screen is working but in negative effect, any ideas??

wilmer - 回复

Comment réparer la carte circuit imprimé de l'écran? Il y'a un transistor qui reçoit 3.7v et qui laisse rien sortir

Abdoul Traore - 回复

my screen was showing vertical red and green lines but you could read the settings. Now the lcd screen is white. Can the lcd be replaced?

yuclin - 回复

添加评论

浏览统计数据:

过去 24 小时: 2

过去 7 天: 9

过去 30 天: 40

总计 4,613