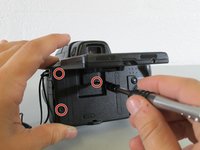
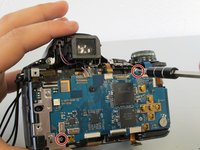
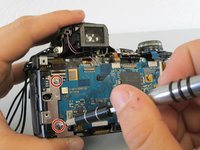
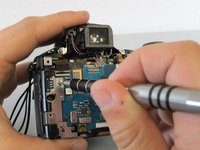
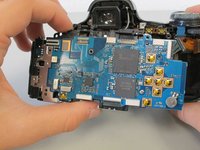
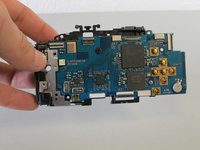
跳转到主内容

Sony Cyber-shot DSC-HX1 Lens Assembly Replacement

你所需要的

  1. Sony Cyber-shot DSC-HX1 Lens Assembly Replacement, Battery: 步骤 1 中的图像 1,1
    • Make sure the surface you place the screen on is clean of debris and dust. Otherwise you risk scratching your screen.

    • Place the camera with the bottom facing you and the lens facing up.

  2. Sony Cyber-shot DSC-HX1 Lens Assembly Replacement: 步骤 2 中的图像 1,1
    • Push down and away from the camera to the left on the indicated indentation in the battery cover. The compartment should slide open as shown.

  3. Sony Cyber-shot DSC-HX1 Lens Assembly Replacement: 步骤 3 中的图像 1,2 Sony Cyber-shot DSC-HX1 Lens Assembly Replacement: 步骤 3 中的图像 2,2
    • Push the blue tab towards the camera body to the right, while simultaneously pulling out the battery.

    • The battery is not shown here. However, normally the battery would be in the displayed compartment.

  4. Sony Cyber-shot DSC-HX1 Lens Assembly Replacement, Motherboard: 步骤 4 中的图像 1,2 Sony Cyber-shot DSC-HX1 Lens Assembly Replacement, Motherboard: 步骤 4 中的图像 2,2
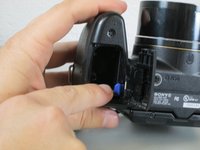
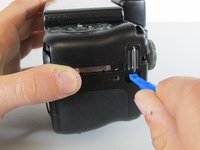
    • Close the battery cover by pushing the cover inwards and sliding it to the left to allow more maneuverability when disassembling other parts of the camera.

  5. Sony Cyber-shot DSC-HX1 Lens Assembly Replacement: 步骤 5 中的图像 1,1
    • Unscrew the four #00 4.0 mm Phillips screws on the bottom of the camera.

  6. Sony Cyber-shot DSC-HX1 Lens Assembly Replacement: 步骤 6 中的图像 1,1
    • Remove the two #00 4.0 mm Phillips screws shown on the side of the camera.

  7. Sony Cyber-shot DSC-HX1 Lens Assembly Replacement: 步骤 7 中的图像 1,1
    • Unscrew the #00 4.0 mm Phillips screw on the top next to the view finder.

  8. Sony Cyber-shot DSC-HX1 Lens Assembly Replacement: 步骤 8 中的图像 1,1
    • Pull open the plastic port covers on the side of the camera.

    • Remove the revealed #00 4.0 mm Phillips screw.

  9. Sony Cyber-shot DSC-HX1 Lens Assembly Replacement: 步骤 9 中的图像 1,3 Sony Cyber-shot DSC-HX1 Lens Assembly Replacement: 步骤 9 中的图像 2,3 Sony Cyber-shot DSC-HX1 Lens Assembly Replacement: 步骤 9 中的图像 3,3
    • Lift the back LCD screen to reveal the back of the camera unit.

    • Unscrew the three #00 4.0 mm Phillips screws at the edge and center of the back camera unit.

  10. Sony Cyber-shot DSC-HX1 Lens Assembly Replacement: 步骤 10 中的图像 1,3 Sony Cyber-shot DSC-HX1 Lens Assembly Replacement: 步骤 10 中的图像 2,3 Sony Cyber-shot DSC-HX1 Lens Assembly Replacement: 步骤 10 中的图像 3,3
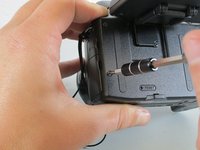
    • Using the plastic opening tool, pry apart the bottom of the camera at the line between the four removed screws.

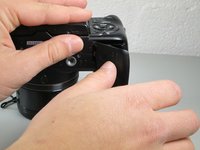
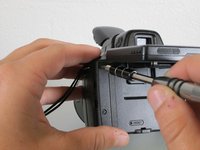
    • Place the camera on its lens and use the plastic opening tool to pry at the crack in the case on all four sides of the camera.

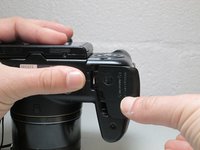
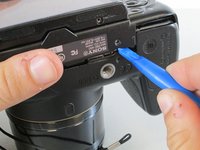
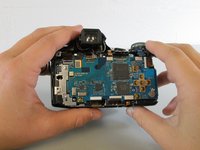
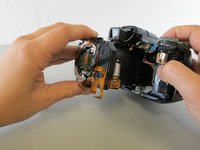
    • Apply moderate force to the backside of the camera enclosure until the two pieces separate.

  11. Sony Cyber-shot DSC-HX1 Lens Assembly Replacement: 步骤 11 中的图像 1,2 Sony Cyber-shot DSC-HX1 Lens Assembly Replacement: 步骤 11 中的图像 2,2
    • Remove the #00 4.0 mm Phillips screw and the #00 6.0 mm Phillips screw holding the motherboard to the front enclosure.

    • Disconnect the eight ribbon cables from their ports on the motherboard.

  12. Sony Cyber-shot DSC-HX1 Lens Assembly Replacement: 步骤 12 中的图像 1,2 Sony Cyber-shot DSC-HX1 Lens Assembly Replacement: 步骤 12 中的图像 2,2
    • Detach the metal bracket from the enclosure by removing the two #00 4.0 mm Phillips screws.

  13. Sony Cyber-shot DSC-HX1 Lens Assembly Replacement: 步骤 13 中的图像 1,2 Sony Cyber-shot DSC-HX1 Lens Assembly Replacement: 步骤 13 中的图像 2,2
    • If you feel resistance from the board, double check all screws and cables have been removed to avoid damage.

    • Completely remove the motherboard by gently pulling the board away from the camera.

  14. Sony Cyber-shot DSC-HX1 Lens Assembly Replacement, Lens Assembly: 步骤 14 中的图像 1,1
    • Unscrew the #00 6.0 mm Phillips screw on the left side of the lens.

  15. Sony Cyber-shot DSC-HX1 Lens Assembly Replacement: 步骤 15 中的图像 1,2 Sony Cyber-shot DSC-HX1 Lens Assembly Replacement: 步骤 15 中的图像 2,2
    • The lens assembly contains exposed leads to capacitors. Be very careful to avoid contact or discharge capacitors before handling as touching the capacitors could lead to electric shock.

    • Gently slide the lens assembly out of the front camera housing and remove completely.

结论

To reassemble your device, follow these instructions in reverse order.

4等其他人完成本指南。

Brianna Greenlaw

于04/06/15注册

1,181 声望

创作了5篇指南

团队

Cal Poly, Team 17-3, Forte Spring 2015 Cal Poly, Team 17-3, Forte Spring 2015 的会员

CPSU-FORTE-S15S17G3

4 名成员

创作了10篇指南

2条评论

Hi!

Very good tutorial, thanks a lot.

I have a question : after reassembling the device, do you need to do some kind of adjustment or is it "simply plug-and-play"?

Best regards,

Marin

Marin Aymon - 回复

Muy bueno el tutorial felicitaciones, sin embargo faltaron tornillos por nombrar, saludos

Cesar Carrillo - 回复

添加评论

浏览统计数据:

过去 24 小时: 3

过去 7 天: 11

过去 30 天: 39

总计 5,158