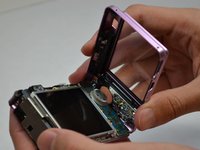
跳转到主内容

Sony Cyber-Shot DSC-W120 LCD Screen Replacement

你所需要的

  1. Sony Cyber-Shot DSC-W120 LCD Screen Replacement, LCD Screen: 步骤 1 中的图像 1,1
    • Unscrew the screws on the right side of the camera.

  2. Sony Cyber-Shot DSC-W120 LCD Screen Replacement: 步骤 2 中的图像 1,2 Sony Cyber-Shot DSC-W120 LCD Screen Replacement: 步骤 2 中的图像 2,2
    • With a plastic opening tool, gently lift and remove the silver piece on the right side of the camera.

  3. Sony Cyber-Shot DSC-W120 LCD Screen Replacement: 步骤 3 中的图像 1,3 Sony Cyber-Shot DSC-W120 LCD Screen Replacement: 步骤 3 中的图像 2,3 Sony Cyber-Shot DSC-W120 LCD Screen Replacement: 步骤 3 中的图像 3,3
    • Use a plastic opening tool to carefully lift and remove the front case.

  4. Sony Cyber-Shot DSC-W120 LCD Screen Replacement: 步骤 4 中的图像 1,1
    • Gently pry the silver piece on the left side of the camera off with a plastic opening tool.

  5. Sony Cyber-Shot DSC-W120 LCD Screen Replacement: 步骤 5 中的图像 1,1
    • Unscrew the three screws on the bottom of the camera.

  6. Sony Cyber-Shot DSC-W120 LCD Screen Replacement: 步骤 6 中的图像 1,2 Sony Cyber-Shot DSC-W120 LCD Screen Replacement: 步骤 6 中的图像 2,2
    • Use a plastic opening tool to lift and remove the back case.

  7. Sony Cyber-Shot DSC-W120 LCD Screen Replacement: 步骤 7 中的图像 1,1
    • Remove the screw located above the mode dial.

  8. Sony Cyber-Shot DSC-W120 LCD Screen Replacement: 步骤 8 中的图像 1,2 Sony Cyber-Shot DSC-W120 LCD Screen Replacement: 步骤 8 中的图像 2,2
    • Lift the LCD display from the rest of the camera.

    • Use tweezers to carefully separate the connecting tape.

结论

To reassemble your device, follow these instructions in reverse order.

另外一个人完成了本指南。

Christopher

于10/07/14注册

10 声望

撰写一个指南

团队

USF Tampa, Team 1-5, Leahy Fall 2014 USF Tampa, Team 1-5, Leahy Fall 2014 的会员

USFT-LEAHY-F14S1G5

4 名成员

创作了10篇指南

一条评论

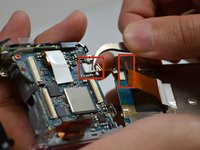
Hi, for step 8 the wider of the two ribbon cables is held by a black/dark grey clamp on the connector on the motherboard, it's best to release the clamp before pulling the cable out.

Do that by gently lifting it with a fingernail, it hinges on the screen side, it will rotate about 90 degrees to open. When reassembling it's simply the reverse, so push the cable in to the connector with the clamp open, when the cable is fully in there will be about 1mm of the gold connectors on the ribbon cable showing still, and then just clamp connector clamp shut but pushing it with your thumb.

Tony Neville - 回复

添加评论

浏览统计数据:

过去 24 小时: 0

过去 7 天: 1

过去 30 天: 19

总计 941