跳转到主内容
加入维修社区 - 创建账户

Sony α6000 Motherboard Replacement

你所需要的

    1. Sony α6000 Motherboard Replacement, Battery: 步骤 1 中的图像 1,2 Sony α6000 Motherboard Replacement, Battery: 步骤 1 中的图像 2,2
      • Begin by placing the camera facing upside down.

      询问修复机器人

      添加评论

    2. Sony α6000 Motherboard Replacement: 步骤 2 中的图像 1,2 Sony α6000 Motherboard Replacement: 步骤 2 中的图像 2,2
      • Slide the notched locking bar on the battery compartment from LOCK to OPEN.

      询问修复机器人

      添加评论

    3. Sony α6000 Motherboard Replacement: 步骤 3 中的图像 1,2 Sony α6000 Motherboard Replacement: 步骤 3 中的图像 2,2
      • Push the small blue bar horizontally off of the battery.

      询问修复机器人

      添加评论

    4. Sony α6000 Motherboard Replacement: 步骤 4 中的图像 1,2 Sony α6000 Motherboard Replacement: 步骤 4 中的图像 2,2
      • Remove the battery.

      添加评论

    1. Sony α6000 Motherboard Replacement, Motherboard: 步骤 5 中的图像 1,1
      • Remove the 1.75mm Phillips #00 screw from the left side of the camera.

      询问修复机器人

      添加评论

    2. Sony α6000 Motherboard Replacement: 步骤 6 中的图像 1,2 Sony α6000 Motherboard Replacement: 步骤 6 中的图像 2,2
      • Remove the two 1.75mm Phillips #00 screws from inside the battery department.

      询问修复机器人

      添加评论

    3. Sony α6000 Motherboard Replacement: 步骤 7 中的图像 1,1
      • Remove the 1.75mm screw using a Phillips #00 head from underneath the flash.

      询问修复机器人

      添加评论

    4. Sony α6000 Motherboard Replacement: 步骤 8 中的图像 1,1
      在这个步骤中使用的工具:
      Tweezers
      $4.99
      • Carefully remove the ribbon of the flash from the socket by using a pair of tweezers.

      • The best known method to removing the ribbon is to use a pair of tweezers with a rubber tip. This will help to prevent damage to the ribbon.

      询问修复机器人

      添加评论

    5. Sony α6000 Motherboard Replacement: 步骤 9 中的图像 1,1
      • The top of the camera will be free and can be removed.

      • Set the top of the camera to the side.

      询问修复机器人

      添加评论

    6. Sony α6000 Motherboard Replacement: 步骤 10 中的图像 1,1
      • Remove the three 1.75mm Phillips #00 screws just below the eye sensor.

      询问修复机器人

      添加评论

    7. Sony α6000 Motherboard Replacement: 步骤 11 中的图像 1,1
      • Remove the 1.75mm Phillips #00 screw from underneath the SD card cover.

      询问修复机器人

      添加评论

    8. Sony α6000 Motherboard Replacement: 步骤 12 中的图像 1,1
      • Remove two 1.75mm Phillips #00 screws from the bottom of the camera.

      询问修复机器人

      添加评论

    9. Sony α6000 Motherboard Replacement: 步骤 13 中的图像 1,1
      • Remove the 1.25mm screw from the right side underneath the battery cover.

      询问修复机器人

      添加评论

    10. Sony α6000 Motherboard Replacement: 步骤 14 中的图像 1,1
      • Remove the 1.75mm Phillips #00 screw just to the right of the eye sensor.

      询问修复机器人

      添加评论

    11. Sony α6000 Motherboard Replacement: 步骤 15 中的图像 1,1
      • Set the eye sensor aside.

      询问修复机器人

      添加评论

    12. Sony α6000 Motherboard Replacement: 步骤 16 中的图像 1,1
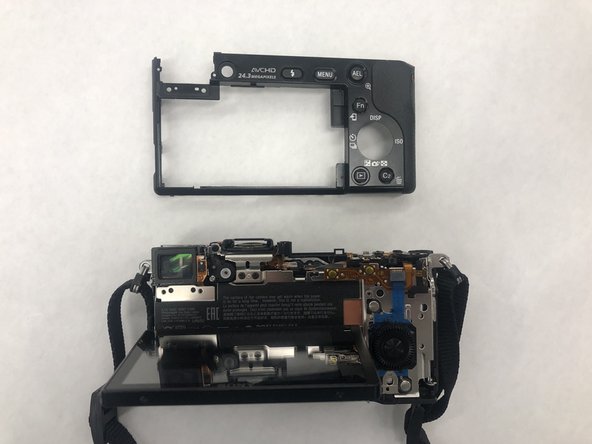
      • Remove the back panel of the camera.

      询问修复机器人

      添加评论

    13. Sony α6000 Motherboard Replacement: 步骤 17 中的图像 1,1
      • Remove the two 1.25mm Phillips #00 screws near the top of the camera, just to the left of the eye socket.

      询问修复机器人

      添加评论

    14. Sony α6000 Motherboard Replacement: 步骤 18 中的图像 1,1
      • Remove the two 1.75mm Phillips #00 screws from the bottom of the camera.

      询问修复机器人

      添加评论

    15. Sony α6000 Motherboard Replacement: 步骤 19 中的图像 1,1
      • Remove the three 1.75mm Phillips #00 screws from the right side of the camera.

      询问修复机器人

      添加评论

    16. Sony α6000 Motherboard Replacement: 步骤 20 中的图像 1,1
      • Remove one ribbon that is attached to the selector wheel with a pair of tweezers.

      询问修复机器人

      添加评论

    17. Sony α6000 Motherboard Replacement: 步骤 21 中的图像 1,1
      • lift up the protector plate and remove one ribbon that is attached to the LCD screen with a pair of tweezers.

      询问修复机器人

      添加评论

    18. Sony α6000 Motherboard Replacement: 步骤 22 中的图像 1,1
      • Detach the LCD screen from the back portion of the camera and set it aside.

      询问修复机器人

      添加评论

    19. Sony α6000 Motherboard Replacement: 步骤 23 中的图像 1,1
      • Lift up the black cover to reveal the motherboard and ten ribbons.

      • Use a pair of tweezers to gently pull the ribbon cables out of their sockets on the motherboard.

      添加评论

    20. Sony α6000 Motherboard Replacement: 步骤 24 中的图像 1,1
      • Remove the four 1.25mm Phillips #00 screws located on the borders of the motherboard.

      询问修复机器人

      添加评论

    21. Sony α6000 Motherboard Replacement: 步骤 25 中的图像 1,1
      • Remove the power supply at the bottom right hand corner with a pair of tweezers.

      询问修复机器人

      添加评论

    22. Sony α6000 Motherboard Replacement: 步骤 26 中的图像 1,1
      • Lift the motherboard up and remove the last ribbon cable with a pair of tweezers.

      询问修复机器人

      添加评论

    23. Sony α6000 Motherboard Replacement: 步骤 27 中的图像 1,1
      • Remove the motherboard and set aside.

      询问修复机器人

      添加评论

结论

To reassemble your device, follow these instructions in reverse order.

取消:我没有完成这个指南。

3等其他人完成本指南。

团队

IUPUI, Team S2-G2, Harley Summer 2019 IUPUI, Team S2-G2, Harley Summer 2019 的会员

IUPUI-HARLEY-SU19S2G2

3 名成员

创作了7篇指南

5指南评论

I have been wondering what path I will take when I replace my battery contacts part and this looks like an ideal guide for how I can do it. I wondered why you don’t discharge the capacitor before removing ribbon cables. When I removed the top block off my nex-6 I did discharge the capacitor as what the service manual suggested before I removed the control dial and flash ribbon cables. Before I did it I found a youtube about using wires to the discharge contacts going to a light bulb to safely discharge the capacitor. The service manual suggests using a short jig R:1 k Ω/1 W but since I don’t have access to an electronics store nearby the youtube did the trick trouble free.

georgevp1 - 回复 分享

I was successful with the dissembling the camera and will need to invest in a working logic board and maybe something that is part of the shutter. I was hoping the camera would be an easy fix but sometimes this isn’t this case.

georgevp1 - 回复 分享

is there a way to fix the hdmi out port without buying a new mother board?

Nicholas Costanza - 回复 分享

Hi this is a really helpful guide thank you but I need to go a bit further to replace the sticky shutter. Do you have a guide for that please

richardmason18 - 回复 分享

It really should be mentioned in step 9 to discharge the flash's capacitor using a resistor. It can be sitting at 200+ volts for long after the camera has been turned off, which is quite dangerous.

junstred - 回复 分享

添加评论

浏览统计数据:

过去 24 小时: 8

过去 7 天: 27

过去 30 天: 114

总计 6,542