跳转到主内容

Sonos Play 1 Motherboard Replacement

你所需要的

  1. Sonos Play 1 Motherboard Replacement, Exterior Screen: 步骤 1 中的图像 1,2 Sonos Play 1 Motherboard Replacement, Exterior Screen: 步骤 1 中的图像 2,2
    • Remove the rubber footing from the bottom of the device. Pry it up from one end using one of the plastic opening tools.

    • Once you pry open one end, use precision tweezers to remove rubber footing.

  2. Sonos Play 1 Motherboard Replacement: 步骤 2 中的图像 1,2 Sonos Play 1 Motherboard Replacement: 步骤 2 中的图像 2,2
    • Using a metal spudger, pry open a corner of the adhesive tape.

    • Use precision tweezers to remove the adhesive tape.

  3. Sonos Play 1 Motherboard Replacement: 步骤 3 中的图像 1,2 Sonos Play 1 Motherboard Replacement: 步骤 3 中的图像 2,2
    • Remove the four 10 mm Torx security #10 screws that hold the base together.

    • Remove the base by lifting it vertically away from the bulk of the device.

    The metal lip doesn’t hold down the metal screen. It’s just a connection/conductor between the inside of the metal screen and the shell against which the motherboard is screwed.

    P-308 - 回复

  4. Sonos Play 1 Motherboard Replacement: 步骤 4 中的图像 1,2 Sonos Play 1 Motherboard Replacement: 步骤 4 中的图像 2,2
    • Remove the 10 mm Torx security #10 screw that holds down the exterior screen.

    • Using precision tweezers, remove the metal bracket.

  5. Sonos Play 1 Motherboard Replacement: 步骤 5 中的图像 1,1
    • Remove the exterior screen by lifting it away from the bulk of the device.

  6. Sonos Play 1 Motherboard Replacement, Sonos Play 1 Top Cover Disassembly: 步骤 6 中的图像 1,1
    • Remove the four 9 mm Torx Security #9 head screws. There are two on each side.

  7. Sonos Play 1 Motherboard Replacement: 步骤 7 中的图像 1,3 Sonos Play 1 Motherboard Replacement: 步骤 7 中的图像 2,3 Sonos Play 1 Motherboard Replacement: 步骤 7 中的图像 3,3
    • Using a plastic opening tool, pry open the top cap containing the power and volume button.

    • Vertically remove the top cap.

    • Be sure to not jerk the top cap when removing , as to not damage the cable linking the switchboard to the motherboard.

    Easily done- fortunately mine didn't snap…

    Oliver Moor - 回复

  8. Sonos Play 1 Motherboard Replacement: 步骤 8 中的图像 1,2 Sonos Play 1 Motherboard Replacement: 步骤 8 中的图像 2,2
    • Using a plastic opening tool, pry open the circuit flap.

    • Once flap is loosened, use your hand to remove the circuit wire.

  9. Sonos Play 1 Motherboard Replacement, Disassembling Sonos Play 1 Rear Housing Cover: 步骤 9 中的图像 1,2 Sonos Play 1 Motherboard Replacement, Disassembling Sonos Play 1 Rear Housing Cover: 步骤 9 中的图像 2,2
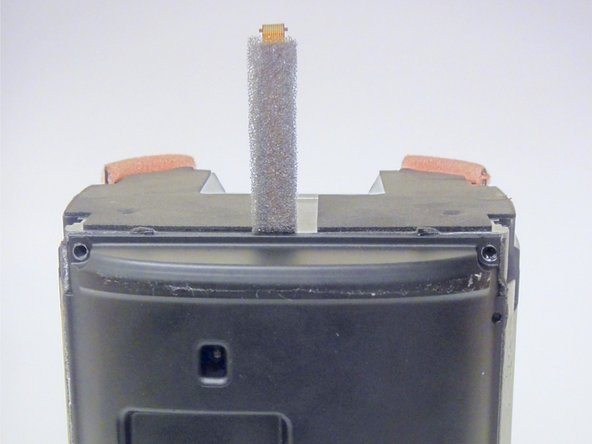
    • Using a plastic opening tool, remove the grey tape from both sides of the device.

  10. Sonos Play 1 Motherboard Replacement: 步骤 10 中的图像 1,2 Sonos Play 1 Motherboard Replacement: 步骤 10 中的图像 2,2
    • Remove the six 9 mm Torx #9 screws.

    • Using a plastic opening tool, detach the rear housing cover from the housing.

    • Try not to jerk the rear housing cover, as its wires are still connected to delicate electronics.

  11. Sonos Play 1 Motherboard Replacement: 步骤 11 中的图像 1,2 Sonos Play 1 Motherboard Replacement: 步骤 11 中的图像 2,2
    • Using tweezers, grip the connector fixed to the motherboard's audio cable.

    • While pulling on the connector, detach the cable by pressing the connectors release.

  12. Sonos Play 1 Motherboard Replacement: 步骤 12 中的图像 1,1
    • Using your fingers, grip the connector fixed to the motherboards power cable and detach it.

    • You will now be able to remove the rear housing cover.

    you forgot about the WiFi antennas

    Madison Mehlhose - 回复

  13. Sonos Play 1 Motherboard Replacement, Motherboard: 步骤 13 中的图像 1,2 Sonos Play 1 Motherboard Replacement, Motherboard: 步骤 13 中的图像 2,2
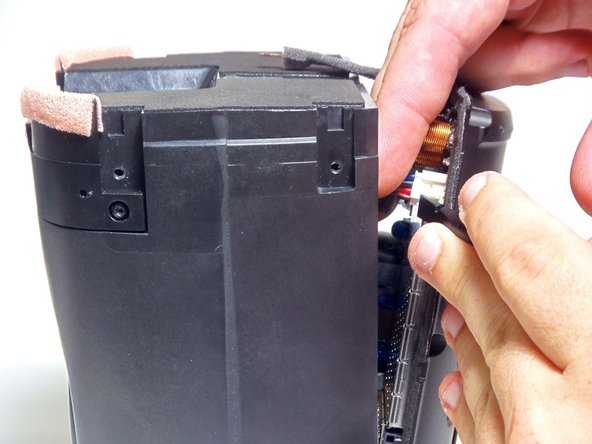
    • Remove the two 6 mm Torx #6 screws securing the communications board to the motherboard.

    • Using your fingers, detach and remove the communications board from the motherboard.

    • Be sure to keep the communications board parallel to the motherboard when removing as to prevent damage to the connector.

  14. Sonos Play 1 Motherboard Replacement: 步骤 14 中的图像 1,2 Sonos Play 1 Motherboard Replacement: 步骤 14 中的图像 2,2
    • Remove the six 10 mm Torx #10 screws fastening the motherboard to the rear housing cover.

    • Using a plastic opening tool, remove the motherboard from the rear housing cover.

    Tolle Doku :-)

    Wiku7777 - 回复

结论

To reassemble your device, follow these instructions in reverse order.

7等其他人完成本指南。

Margarita

于09/03/15注册

180 声望

撰写一个指南

团队

USF Tampa, Team 8-4, Eyestone Fall 2015 USF Tampa, Team 8-4, Eyestone Fall 2015 的会员

USFT-EYESTONE-F15S8G4

4 名成员

创作了16篇指南

15条评论

Where do you get these replacement parts from - not directly from Sonos I understand.

iou_james - 回复

…by the way I am looking for a new motherboard for a Sonos Play1 unit.

iou_james - 回复

On a Play 1 r524 and r525 are blown. What are these.and how do I get replacements

houser_m.d - 回复

Same here. r524 and r525 look blown. Have you been able to identify their values? Did you find any further damage? Have you been able to repair it?

Oliver Krause -

The parts has 1R00 printed on them. 1R= 1 Ohm resistor. You can open an old electronic gadget or look at an old PC-motherboard and see if you find one there. It’s normally hard find surface mounted resistors in local stores…

Patrick Tollgren lazarov -

Did anyone find out where Sonos play 1 parts can be purchased from?

Dawn - 回复

I have two blown components. Here is a screenshot https://web.capture-app.com/share/d77cb9...

And here is the place on the motherboard from the picture in this guide. https://web.capture-app.com/share/89a940...

I cant see any other blown components on my board.

Anyone knows what the components are?

Patrick Tollgren lazarov - 回复

I have a Sonos Play 1 with also R524 and 525 blown. I see on a ‘good’ board that both these SMD resistors are 1R10, that’s 1,1 ohm. Did somebody had succes in replacing the 2 resistors resulting in a working Sonos Play 1?

Rob Korver - 回复

has anyone tried adding a “line in “ for those?

Jarek Pawlega - 回复

I am looking for a component value for C303 on the Play:1 motherboard. It is (was) a 1206?? surface mount capacitor on the bottom side of the motherboard to the left of the Ethernet port. It is cracked crumbled and charred so I think replacing it may bring life back to the device. If anyone can provide the value, greatly appreciated!

Jonathan Wescott - 回复

Still not any wiser on where to get a new motherboard?

magnusson80 - 回复

the R178 resistor on my board went dead. Anyone can look it up on their sonos 1

Loo Harmless - 回复

r178 is located on the other side, just underneath the most blown resistors R525 , R423 and R524

Loo Harmless - 回复

I see still nobody has a clue where to buy a new motherboard for the sonos play 1?

Please advice?

Jozef Bakker - 回复

Hello,

What are the values / refs of TH301 & MOV301 ? It is near the AC input

Thx for your answer

Br Roland

Roland Platteau - 回复

添加评论

浏览统计数据:

过去 24 小时: 4

过去 7 天: 32

过去 30 天: 180

总计 19,773