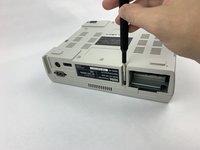
跳转到主内容

Sega Saturn Power Button Replacement

你所需要的

  1. Sega Saturn Power Button Replacement, Battery: 步骤 1 中的图像 1,2 Sega Saturn Power Button Replacement, Battery: 步骤 1 中的图像 2,2
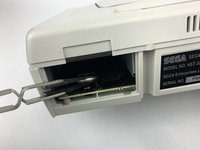
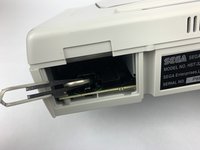
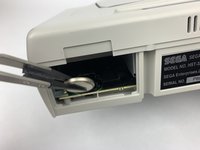
    • Press on the plastic lever on the back of the Sega Saturn to pop open the battery slot.

  2. Sega Saturn Power Button Replacement: 步骤 2 中的图像 1,3 Sega Saturn Power Button Replacement: 步骤 2 中的图像 2,3 Sega Saturn Power Button Replacement: 步骤 2 中的图像 3,3
    • Push up the edge of the battery with the iFixit opening tool to get the battery out of its socket.

  3. Sega Saturn Power Button Replacement: 步骤 3 中的图像 1,3 Sega Saturn Power Button Replacement: 步骤 3 中的图像 2,3 Sega Saturn Power Button Replacement: 步骤 3 中的图像 3,3
    • Use the ESD safe tweezers to pull the battery out of its slot.

  4. Sega Saturn Power Button Replacement, Case: 步骤 4 中的图像 1,3 Sega Saturn Power Button Replacement, Case: 步骤 4 中的图像 2,3 Sega Saturn Power Button Replacement, Case: 步骤 4 中的图像 3,3
    • Remove the five black 13.5mm JIS#1 screws on the bottom of the device. One might be hidden by a sticker.

  5. Sega Saturn Power Button Replacement: 步骤 5 中的图像 1,3 Sega Saturn Power Button Replacement: 步骤 5 中的图像 2,3 Sega Saturn Power Button Replacement: 步骤 5 中的图像 3,3
    • Flip the device over so it rests right side up.

    • Lift gently across the seam of the Sega Saturn. If parts get stuck, a light shake or prying with the iFixit opening tool should free it up. Do not use any brute force, as this can damage the case so it doesn't close again.

  6. Sega Saturn Power Button Replacement, Power Supply: 步骤 6 中的图像 1,2 Sega Saturn Power Button Replacement, Power Supply: 步骤 6 中的图像 2,2
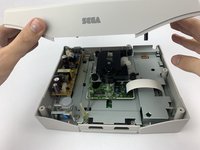
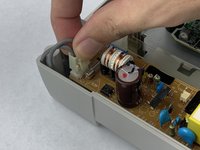
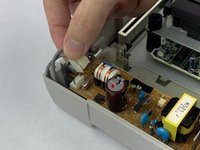
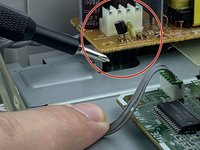
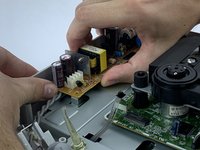
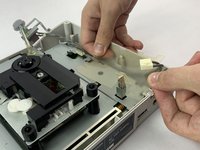
    • Unplug the power button plug on the power supply board. Use the iFixit opening tool if necessary.

  7. Sega Saturn Power Button Replacement: 步骤 7 中的图像 1,3 Sega Saturn Power Button Replacement: 步骤 7 中的图像 2,3 Sega Saturn Power Button Replacement: 步骤 7 中的图像 3,3
    • Remove the two black 11.4mm standoff screws on the back of the Sega Saturn holding the power socket in place. These screws are tight and easily stripped, so it's suggested to use a standoff screw head.

  8. Sega Saturn Power Button Replacement: 步骤 8 中的图像 1,2 Sega Saturn Power Button Replacement: 步骤 8 中的图像 2,2
    • Remove the metallic 12.3mm JIS#1 screw holding down the power supply board.

  9. Sega Saturn Power Button Replacement: 步骤 9 中的图像 1,3 Sega Saturn Power Button Replacement: 步骤 9 中的图像 2,3 Sega Saturn Power Button Replacement: 步骤 9 中的图像 3,3
    • Lift the power supply board out of its socket, minding the pins that connect it to the motherboard. Some force will be required, but be careful when lifting or shaking the power supply board out.

  10. Sega Saturn Power Button Replacement, Power Button: 步骤 10 中的图像 1,3 Sega Saturn Power Button Replacement, Power Button: 步骤 10 中的图像 2,3 Sega Saturn Power Button Replacement, Power Button: 步骤 10 中的图像 3,3
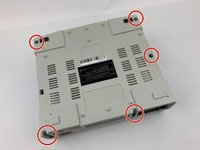
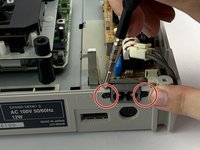
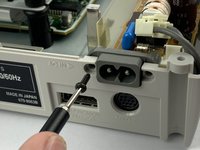
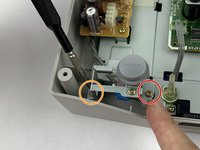
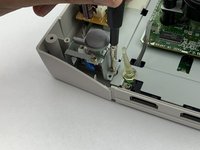
    • Remove the metallic 13.7mm JIS#1 screw on the right of the Power Button.

    • Remove the metallic 12.4mm JIS#1 screw on the left of the Power Button.

  11. Sega Saturn Power Button Replacement: 步骤 11 中的图像 1,2 Sega Saturn Power Button Replacement: 步骤 11 中的图像 2,2
    • Push the plastic resting tray’s pin located here.

    • Remove the plastic resting tray to free the wire between the power supply board and the button.

    • Remove the power button when the wire is free.

结论

To reassemble your device, follow these instructions in reverse order.

团队

USF Tampa, Team S1-G6, Leahy Fall 2019 USF Tampa, Team S1-G6, Leahy Fall 2019 的会员

USFT-LEAHY-F19S1G6

3 名成员

创作了12篇指南

0条评论

添加评论

浏览统计数据:

过去 24 小时: 0

过去 7 天: 18

过去 30 天: 39

总计 1,356