跳转到主内容

本指南有最近更改,您可查看未经巡查的最新版本

Samsung Gear 2 Home Button Replacement

你所需要的

  1. Samsung Gear 2 Home Button Replacement, Front half and Back half: 步骤 1 中的图像 1,2 Samsung Gear 2 Home Button Replacement, Front half and Back half: 步骤 1 中的图像 2,2
    • Before disassembling your Gear, be sure it is powered off.

    • To remove each strap, locate the metal latches on both sides of the back of the Gear.

    • Press down on the metal latch while pulling the strap away from the Gear until it is completely off.

  2. Samsung Gear 2 Home Button Replacement: 步骤 2 中的图像 1,1
    • Remove the four 4.0 mm screws on the back of the Gear using a T5 Torx Screwdriver.

  3. Samsung Gear 2 Home Button Replacement: 步骤 3 中的图像 1,3 Samsung Gear 2 Home Button Replacement: 步骤 3 中的图像 2,3 Samsung Gear 2 Home Button Replacement: 步骤 3 中的图像 3,3
    • Firmly holding the Gear, insert the flat side of the spudger at an angle to pry the back casing off of the device. Move the spudger along the sides of the Gear to completely detach the back and front components.

    • Pry the device open from the other side also if it does not fully disassemble from one side.

  4. Samsung Gear 2 Home Button Replacement, Camera: 步骤 4 中的图像 1,2 Samsung Gear 2 Home Button Replacement, Camera: 步骤 4 中的图像 2,2
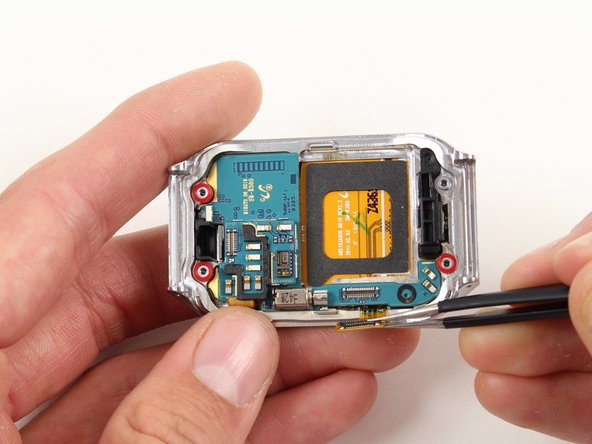
    • Locate the rectangular metal connector that attaches the camera to the Gear.

    • Use tweezers to gently lift and detach the metal plate of the connector.

    • When reassembling the Gear, reattach the camera connector by carefully aligning the metal plate and its pins to its original placement. Make sure it snaps in place to avoid improper connections and possible damage.

  5. Samsung Gear 2 Home Button Replacement: 步骤 5 中的图像 1,1
    • Use tweezers to carefully lift the camera from its slot out of the case.

  6. Samsung Gear 2 Home Button Replacement, Motherboard: 步骤 6 中的图像 1,2 Samsung Gear 2 Home Button Replacement, Motherboard: 步骤 6 中的图像 2,2
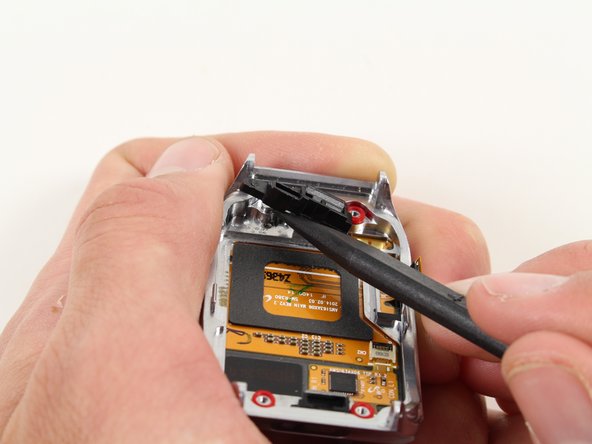
    • Use tweezers to grab and then gently lift up the metal plate of the safety belt.

    • When removing the metal plate, be sure to remove them carefully as to not rip the orange tape that is attached to them.

    • During reassembly, be sure to line up the pins of the metal plate in order to reattach correctly.

  7. Samsung Gear 2 Home Button Replacement: 步骤 7 中的图像 1,2 Samsung Gear 2 Home Button Replacement: 步骤 7 中的图像 2,2
    • Once the safety belt is removed, use tweezers to take the motherboard out of the Gear 2.

  8. Samsung Gear 2 Home Button Replacement, Home Button: 步骤 8 中的图像 1,2 Samsung Gear 2 Home Button Replacement, Home Button: 步骤 8 中的图像 2,2
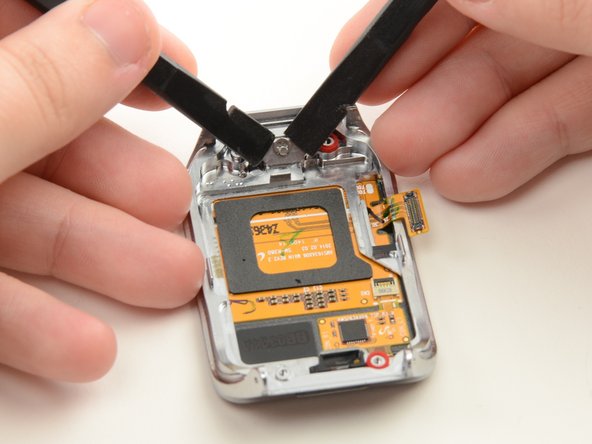
    • Insert the spudger into the small opening underneath the black home button assembly and pry it off the casing.

    • Lift up to detach the black assembly.

    • Be sure not to rip the orange tape that keeps the home button assembly attached to the device.

  9. Samsung Gear 2 Home Button Replacement: 步骤 9 中的图像 1,2 Samsung Gear 2 Home Button Replacement: 步骤 9 中的图像 2,2
    • Use tweezers to grab the orange connector that is attached to side the home button assembly and lift to remove it from its adhesive.

  10. Samsung Gear 2 Home Button Replacement: 步骤 10 中的图像 1,3 Samsung Gear 2 Home Button Replacement: 步骤 10 中的图像 2,3 Samsung Gear 2 Home Button Replacement: 步骤 10 中的图像 3,3
    • Using two spudgers, place the pointed tips at each end of the U-shaped snap ring located under where the home button assembly was.

    • Remove the snap ring by pushing down with both pointed objects on each side of the ring simultaneously, it should pop off.

    • Be careful not to lose the snap ring because it can be lost easily.

    • To replace the snap ring, rest it above the home button peg using tweezers so the open side rests on the peg. Then use the flat end of the spudger and push firmly down on the snap ring to snap it back onto the peg as shown in the last picture.

  11. Samsung Gear 2 Home Button Replacement: 步骤 11 中的图像 1,1
    • Use either the tweezers or the spudger to push the button peg out through the hole.

结论

To reassemble your device, follow these instructions in reverse order.

2等其他人完成本指南。

Allison Michel

于04/14/14注册

513 声望

创作了3篇指南

团队

Cal Poly, Team 13-27, Maness Spring 2014 Cal Poly, Team 13-27, Maness Spring 2014 的会员

CPSU-MANESS-S14S13G27

4 名成员

创作了6篇指南

0条评论

添加评论

浏览统计数据:

过去 24 小时: 0

过去 7 天: 1

过去 30 天: 1

总计 3,186