跳转到主内容

当前版本的文档还未经巡查,您可以查看最新的已查核版本

你所需要的

  1. , 电池: 步骤 1 中的图像 1,1
    • 在拆解前请确保您的设备已关机。

    • 在存储卡插槽的顶部,使用小金属撬棒在后盖和平板主体之间撬开缝隙。

    • 这个小的金属撬棒仅用做来在后壳和设备之间撬开缝隙,切勿移除后壳。

    • 如果可能的话,尝试使用普通的塑料撬棒来分离后壳。 这种撬棒会更加的柔软,降低设备被刮花损坏的可能性。

  2. : 步骤 2 中的图像 1,2 : 步骤 2 中的图像 2,2
    • 使用金属撬棒中型代替小的金属撬棒移除后盖。 从存储卡卡槽顶部开始,使用中型撬棒在设备周围滑动。

    • 第二张图片展示了移除后盖以后的情况。

  3. : 步骤 3 中的图像 1,1
    • 使用镊子来将电源插头从主板上撬起。

    • 避免使用镊子触碰到主板。 金属工具如镊子可能会刮伤主板并可能造成损坏。

  4. : 步骤 4 中的图像 1,3 : 步骤 4 中的图像 2,3 : 步骤 4 中的图像 3,3
    • 使用塑料撬棒扁平的一端从设备中撬起电池。

    • 另一种方法是使用塑料撬棒松开电池,然后通过拉动“拉(只能用手)”的卡舌取出电池。

    • 一旦后壳和电池被移走,设备看起来就像第二张一样。

  5. 这个步骤还没有翻译 帮忙翻译一下

    : 步骤 5 中的图像 1,2 : 步骤 5 中的图像 2,2
    • Use a spudger to lift up and release the press-fit display cable connector from the motherboard.

  6. 这个步骤还没有翻译 帮忙翻译一下

    : 步骤 6 中的图像 1,2 : 步骤 6 中的图像 2,2
    • Use a spudger to lift up and release the ZIF connector; gently pull the rear facing camera ribbon cable free.

    • Use a pair of tweezers to gently secure the camera and lift it out of the frame.

    • If you're unable to secure the camera with tweezers, slide an opening pick between the frame and the camera and lift the camera out.

  7. 这个步骤还没有翻译 帮忙翻译一下

    : 步骤 7 中的图像 1,1
    • Use a spudger to flip the front-facing camera ZIF connector up; gently pull the ribbon cable free.

    • Use tweezers to gently remove the front facing camera from the frame.

  8. 这个步骤还没有翻译 帮忙翻译一下

    : 步骤 8 中的图像 1,1
    • Use the flat end of a spudger to lift up and disconnect the LCD screen press-fit connector.

  9. 这个步骤还没有翻译 帮忙翻译一下

    : 步骤 9 中的图像 1,1
    • Use the flat end of a spudger to lift up and disconnect the 3.5mm headset jack press-fit connector.

  10. 这个步骤还没有翻译 帮忙翻译一下

    : 步骤 10 中的图像 1,1
    • Use a PH000 screwdriver to remove the two 3 mm screws that connect the USB port shield to the midframe.

  11. 这个步骤还没有翻译 帮忙翻译一下

    : 步骤 11 中的图像 1,2 : 步骤 11 中的图像 2,2
    • Use a PH000 screwdriver to remove the two 3 mm screws on the left side of the motherboard.

  12. 这个步骤还没有翻译 帮忙翻译一下

    : 步骤 12 中的图像 1,3 : 步骤 12 中的图像 2,3 : 步骤 12 中的图像 3,3
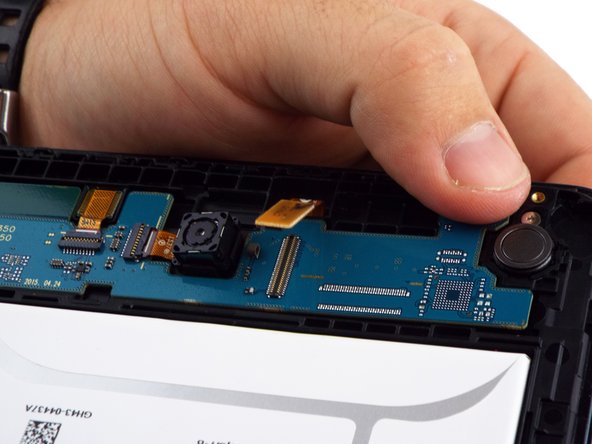
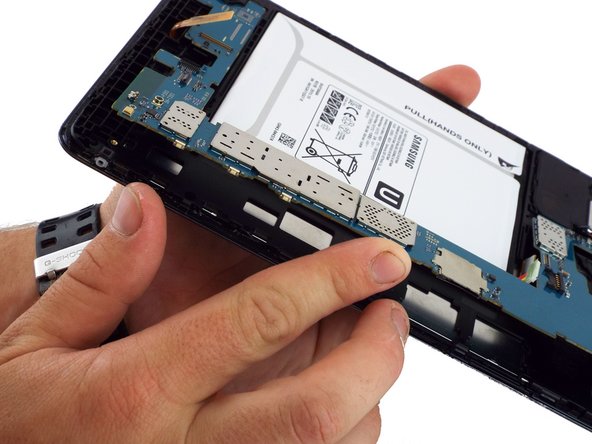
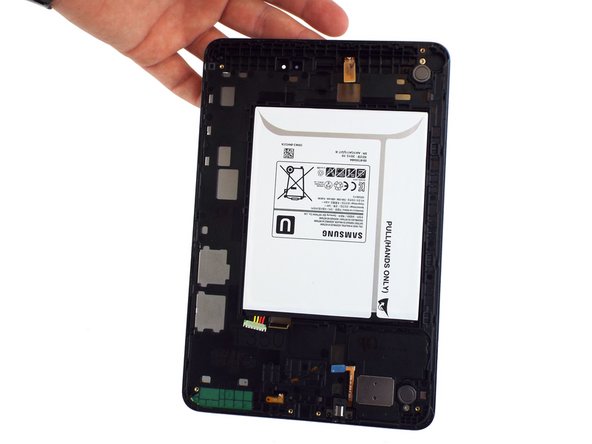
    • Lift the motherboard free from the power and volume button side.

    • You may use a spudger to assist in gently lifting the motherboard up from the button side.

    • A small plastic bracket secures the motherboard to the frame; lift the motherboard from the power and volume button side first, and slide away from the bracket.

终点

13等其他人完成本指南。

Richard

于02/07/17注册

30,037 声望

创作了11篇指南

团队

iFixit iFixit 的会员

Staff

135 名成员

创作了16,817篇指南

3条评论

Where is the rest of this guide? Just stops after removing motherboard :[

chrischevrier - 回复

It appears that it is intended to remove all parts from the case (battery and motherboard) and install them in a new body with a good screen attached.

Ben D -

After removing the motherboard, I continued with disassembly by following the iFixit guide for the Digitizer removal.

( Samsung Galaxy Tab A Digitizer Replacement )

After removing the glass/digitizer, I was able to remove the LCD relatively easy by pushing it through the gaps on the back end of the frame. It appeared to not have any adhesive holding it in place. I was replacing the LCD and the digitizer in my case so I was I bit more careless with the removal of those components. I did place a bit of adhesive on the new LCD replacement and everything fit back snuggly.

Uriel Garcia -

添加评论

浏览统计数据:

过去 24 小时: 12

过去 7 天: 31

过去 30 天: 151

总计 16,010