跳转到主内容

Samsung Galaxy Tab 4 8.0 Wi-Fi Battery Replacement

你所需要的

  1. Samsung Galaxy Tab 4 8.0 Wi-Fi Battery Replacement, Rear Case: 步骤 1 中的图像 1,1
    • Before you being the replacement process, make sure the tablet is completely powered off.

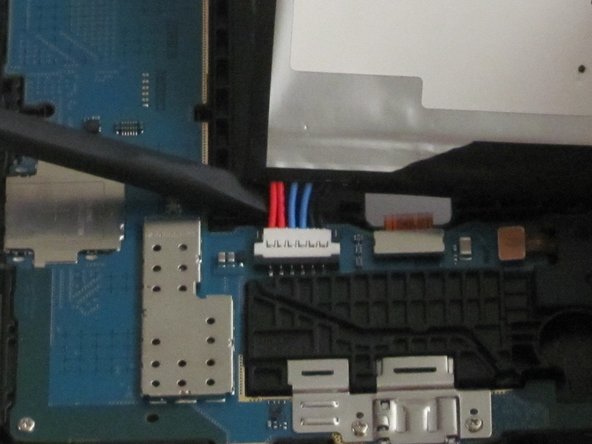
    • Gently insert the plastic opening tool between the metal rim and the back plastic casing at the bottom of the tablet and pry the back casing away from the device. Continue to separate the back panel of the device from the front assembly.

    • Right-handed users will probably be more comfortable prying in a clockwise movement, while left-handed users will feel more comfortable doing a counter clockwise movement.

    • When taking off the rear case there will be periodic clicking noises. Do not worry about those noises. They are just the rear case being disconnected.

    • Be careful not to use too much force as the plastic clips can easily be broken.

  2. Samsung Galaxy Tab 4 8.0 Wi-Fi Battery Replacement: 步骤 2 中的图像 1,1
    • Place the tablet screen down on a clean surface.

    • Grasp the back panel and lift it from the device.

  3. Samsung Galaxy Tab 4 8.0 Wi-Fi Battery Replacement, Battery: 步骤 3 中的图像 1,2 Samsung Galaxy Tab 4 8.0 Wi-Fi Battery Replacement, Battery: 步骤 3 中的图像 2,2
    • Peel the sticker, reading "PULL (HANDS ONLY)," off of the battery starting at the detachable corner.

  4. Samsung Galaxy Tab 4 8.0 Wi-Fi Battery Replacement: 步骤 4 中的图像 1,1
    • Grab the top right corner of the battery and pull it out of the device.

    • If there is adhesive keeping the battery in place, use the flat end of the spudger and run it between the battery and the front panel.

    • Do not completely remove the battery as doing so could cause damage to the motherboard and the cables attached to the battery.

  5. Samsung Galaxy Tab 4 8.0 Wi-Fi Battery Replacement: 步骤 5 中的图像 1,1
    • Peel away the green tape starting at the bottom left side.

  6. Samsung Galaxy Tab 4 8.0 Wi-Fi Battery Replacement: 步骤 6 中的图像 1,2 Samsung Galaxy Tab 4 8.0 Wi-Fi Battery Replacement: 步骤 6 中的图像 2,2
    • Use the spudger to disconnect the battery connector by running it along the underside of the battery.

    • Lift the battery out of the assembly.

结论

To reassemble your device, follow these instructions in reverse order.

6等其他人完成本指南。

Steven Lamb

于04/11/16注册

277 声望

撰写一个指南

团队

Cal Poly, Team 25-3, Maness Spring 2016 Cal Poly, Team 25-3, Maness Spring 2016 的会员

CPSU-MANESS-S16S25G3

4 名成员

创作了10篇指南

0条评论

添加评论

浏览统计数据:

过去 24 小时: 0

过去 7 天: 3

过去 30 天: 17

总计 3,953