你所需要的
-
-
Start out by separating the screen from the back cover using the larger plastic opening tool to pry them apart.
-
-
-
Once every part of the screen is separated from the back cover, you should be able to fully remove it with your hands.
Peter how do I know which charging port I need thank you I don't know how else to reach you Tom Patrick mlc@earthlink.net all small case and no spaces thank you
Yikes. I began carefully prizing off the screen - but when it finally came away the connector (near the top of the screen, about 1” from the right side) got ripped, so the unit is damaged beyond repair. I think it would have been helpful if your guide had warned us about this possibility and given some advice about how to make sure it doesn’t happen. I now have a broken tablet and a brand new battery, likewise of no use to me. Pretty heartbroken - the unit had been working fine, mainstay of daily use.
For any future people repairing their tablets. DO NOT REMOVE THE SCREEN. I thought my tablet was a Tab 2, but no it was a Tab 3. No heat guns needed. I ended up cracking my screen a bit. I don’t know the extent of the damage yet, but Im probably going to get a replacement screen. You need to pop out the whole thing. Not just the front screen. The reason being that there’s a sort of metal scaffolding holding the screen and the back together. This needs to be separated to put in the new charging port.
Matt -
-
-
-
To remove the battery you must use something small, such as tweezers, to disconnect the battery from its port.
-
-
-
After the battery is disconnected, use the pulling tab to safely remove the battery.
You don't have to, just be careful with battery connector.
Kyoko Hori - 回复
You have to be very careful with the battery connector. On mine, the plug was difficult to remove from the base and I ended up breaking the connections between the base and the circuit board. Maybe use the pry tool to hold the base down while easing out the plug.
I just did the same thing Hugh...does that mean my tablet is trashed? Can it be repaired?
tlibert -
-
-
-
-
Unscrew the 2.9mm screws from the speakers using a Phillips head #000 screwdriver, then lift the speakers from the device.
-
-
-
Using the plastic remover tool carefully unseat the four rectangular electric leads from the board. Each rectangle is a different size, the first one is large, the second one is medium, and the last two are small.
-
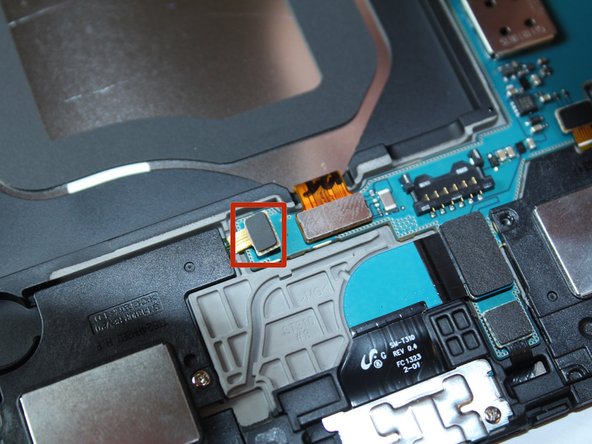
Using the plastic remover tool carefully unseat the square electric lead (marked in orange) from the board.
-
Using the plastic remover tool carefully unseat the small square and the two rectangular electric leads (marked in yellow) from the board.
-
-
-
Unscrew the one 2.9mm Phillips #000 screw above the battery, and the three 2.9mm Phillips #000 screws to the right of the battery.
-
-
-
Carefully lift the board from the device.
-
-
-
Flip the motherboard to reveal the rear camera connection and with tweezers gently lift the connector pins and remove the camera.
-


To reassemble your device, follow these instructions in reverse order.
To reassemble your device, follow these instructions in reverse order.
4等其他人完成本指南。
团队

USF Tampa, Team 4-2, Brown Fall 2014 USF Tampa, Team 4-2, Brown Fall 2014 的会员
USFT-BROWN-F14S4G2
3 名成员
创作了26篇指南
一条评论
That worked a treat, thanks a lot Anthony, I don’t quite know when I broke my rear camera but I suspect it’s after being dropped, unfortunatly more than once, a replacement camera was sourced from ebay and only cost £3.29 that included the postage! So all is well again now.
Here’s a link to where I bought mine, I can recommend them 100%
https://www.ebay.co.uk/itm/Genuine-Rear-...
Once again, Cheers!
Separating the back cover was the hardest part of the procedure for me (a retired electrical/software engineer). I used a large flat screwdriver blade instead of the hard plastic tool shown. Go slow all the way around the tablet and expect pops as the pieces separate. I was not able to re-connect the back cover completely, accepting a paper-thin gap about 30% around the cover, but it is secure.
Rick Nungester - 回复