跳转到主内容

Samsung Galaxy Tab 10.1 4G Back Facing Camera Replacement

你所需要的

  1. Samsung Galaxy Tab 10.1 4G Back Facing Camera Replacement, Back Panel: 步骤 1 中的图像 1,1
    • Power off your tablet before you begin disassembly.

    • Screen side facing you, rotate device 180 degrees so the "SAMSUNG" logo is upside down.

  2. Samsung Galaxy Tab 10.1 4G Back Facing Camera Replacement: 步骤 2 中的图像 1,2 Samsung Galaxy Tab 10.1 4G Back Facing Camera Replacement: 步骤 2 中的图像 2,2
    • Using the plastic opening tool, start in the center near the charge port and wedge the angled tip between the plastic back and the glass screen.

    • Create a wedge and apply pressure. Use the tool to separate the screen from the back until you hear an audible “pop."

    • Continue to wedge the tool about every inch along the current edge.

  3. Samsung Galaxy Tab 10.1 4G Back Facing Camera Replacement: 步骤 3 中的图像 1,2 Samsung Galaxy Tab 10.1 4G Back Facing Camera Replacement: 步骤 3 中的图像 2,2
    • Once the bottom edge has been loosened, work towards a bottom corner from the other edge and continue to wedge gently until you can “pop” the corner out.

    • Continue this process on the other bottom corner until it can be popped out as well.

  4. Samsung Galaxy Tab 10.1 4G Back Facing Camera Replacement: 步骤 4 中的图像 1,1
    • Place your hand between the device and the back panel. Then continue the wedging motion along the top edge of the device until the back panel comes loose.

    • Do not wedge the tool directly on top of the power buttons and headphone jack. Wedge nearby so that you don’t damage internal hardware.

  5. Samsung Galaxy Tab 10.1 4G Back Facing Camera Replacement: 步骤 5 中的图像 1,1
    • Remove the back from the device.

    • Excessive force shouldn't be necessary here. If the back panel is sticking, find the area of the edge closest to the sticking point and wedge the opening tool there until the back panel pops free.

  6. Samsung Galaxy Tab 10.1 4G Back Facing Camera Replacement: 步骤 6 中的图像 1,2 Samsung Galaxy Tab 10.1 4G Back Facing Camera Replacement: 步骤 6 中的图像 2,2
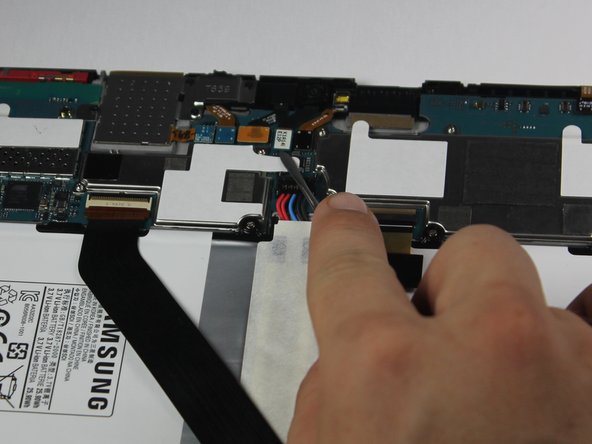
    • When working with electronics, it's important to choose a tool that's ESD-safe to avoid accidental damage to the device. The regular black nylon spudger or a plastic opening tool should be used whenever possible.

    • The connection between the battery and motherboard is a group of four wires in black housing that can be found near the top middle of the device. Using a plastic spudger or a flat, slim tool, lift the black connector housing upwards to disconnect it.

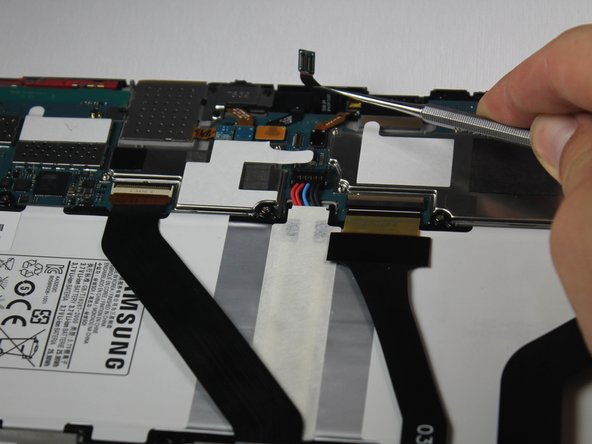
  7. Samsung Galaxy Tab 10.1 4G Back Facing Camera Replacement, Back Facing Camera: 步骤 7 中的图像 1,3 Samsung Galaxy Tab 10.1 4G Back Facing Camera Replacement, Back Facing Camera: 步骤 7 中的图像 2,3 Samsung Galaxy Tab 10.1 4G Back Facing Camera Replacement, Back Facing Camera: 步骤 7 中的图像 3,3
    • Disconnect the rectangular connection from the rear camera to the motherboard.

    • A group of five connections are all together. Starting from the left, the fourth connection is the one you want to remove.

  8. Samsung Galaxy Tab 10.1 4G Back Facing Camera Replacement: 步骤 8 中的图像 1,1
    • Remove the back facing camera.

结论

To reassemble your device, follow these instructions in reverse order.

2等其他人完成本指南。

Ashley Stark

于09/23/15注册

1,220 声望

创作了6篇指南

团队

Baylor, Team 10-11, Williams Fall 2015 Baylor, Team 10-11, Williams Fall 2015 的会员

BU-WILLIAMS-F15S10G11

3 名成员

创作了16篇指南

0条评论

添加评论

浏览统计数据:

过去 24 小时: 0

过去 7 天: 0

过去 30 天: 3

总计 505