跳转到主内容

当前版本的文档还未经巡查,您可以查看最新的已查核版本

你所需要的

  1. , 后盖玻璃移除: 步骤 1 中的图像 1,1
    • 在开始之前,请关闭手机。

    • 将加热的 iOpener 应用到手机的长边,以松开后玻璃下方的粘合剂。使用 iOpener加热至少两分钟。

    • 在拆卸过程中,你可能需要多次重新加热并重新施加 iOpener,以使粘合剂足够温暖以便切割。

    • 按照 iOpener 说明操作以避免过热。三星Galaxy S9的粘合剂非常强大。如果你无法使用iOpener打开设备,也可以使用吹风机,热风枪或热板。小心不要让手机过热 —— AMOLED显示屏和内置电池都容易受到热损坏。

  2. : 步骤 2 中的图像 1,1
    • 在以下步骤中,你将切割固定后盖的粘合剂。

    • 如图所示,后盖内侧的粘合剂是这样布置的。

    • 你将在所示区域中切割粘合剂:

    • 粘合剂厚的区域

    • 粘合剂薄的区域

    • 避免在此区域做撬动或滑动之类的操作,以保护指纹传感器柔性电缆。

  3. : 步骤 3 中的图像 1,3 : 步骤 3 中的图像 2,3 : 步骤 3 中的图像 3,3
    • 如果手机的后玻璃破裂,吸盘可能不会粘住。尝试用强力胶带将其提起,或将吸盘加到适当位置并使其固化,以便继续进行。

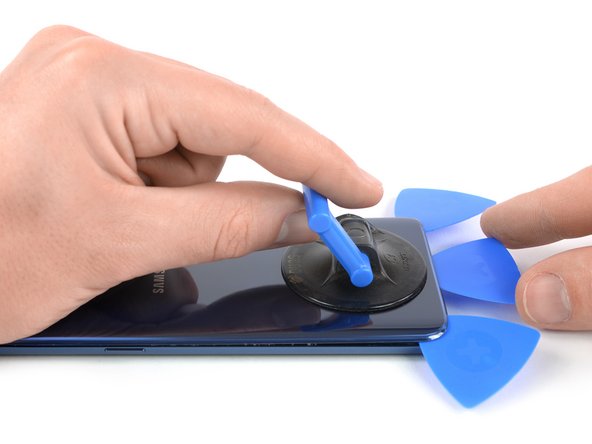
    • 将吸盘按到后盖上。

    • 用吸盘提起后盖的底边,打开后盖和框架之间的微小间隙。

    • 这可能需要很大的力,但你只需要用吸盘打开一个非常小的间隙即可插入工具。如果遇到问题,请加热以进一步软化粘合剂,然后再试一次。粘合剂冷却速度非常快,因此你可能需要反复加热。

    • 在你打开的间隙中插入一个三角撬片,然后将其滑动到右下角。

    • 插入第二个三角撬片并将其滑动到左下角。

    • 插入第三个三角撬片,以防止粘合剂在其余的拆卸过程中重新密封。

  4. : 步骤 4 中的图像 1,2 : 步骤 4 中的图像 2,2
    • 在仅插入三角撬片的尖端时,将其从左下角沿侧面滑动到顶部。

    • 将三角撬片绕顶角滑动并将其留在那里以防止粘合剂重新密封。

  5. : 步骤 5 中的图像 1,3 : 步骤 5 中的图像 2,3 : 步骤 5 中的图像 3,3
    • 将三角撬片从右下角沿侧面滑动到顶部。

    • 如果粘合剂难以切割,请加热。在移除过程中,后盖始终处于张紧状态,如果粘合剂没有足够软化,则可能会破裂。

    • 滑动拐角处的三角撬片,并切断手机顶部的剩余粘合剂。

    • 不要一下子打开手机。易碎的指纹传感器电缆仍然将后盖连接到主板。

  6. : 步骤 6 中的图像 1,2 : 步骤 6 中的图像 2,2
    • 小心抬起后玻璃侧面有音量按钮的位置。

    • 使用撬棒的边缘撬起并断开指纹传感器柔性电缆。

  7. : 步骤 7 中的图像 1,1
    • 取下后玻璃。

    • 重新组装时,请按照本指南更换粘合剂并重新安装后玻璃。

    • 如果你想要更换后玻璃,请按照本指南传送后部相机挡板,包括指纹。

  8. 这个步骤还没有翻译 帮忙翻译一下

    : 步骤 8 中的图像 1,1
    • Disconnect the battery by using a spudger to pry open the connection.

  9. 这个步骤还没有翻译 帮忙翻译一下

    : 步骤 9 中的图像 1,1
    • Remove one 3mm screw with a #000 Phillips screwdriver.

  10. 这个步骤还没有翻译 帮忙翻译一下

    : 步骤 10 中的图像 1,1
    • Disconnect 6 cables by prying apart the connections with a spudger.

  11. 这个步骤还没有翻译 帮忙翻译一下

    : 步骤 11 中的图像 1,2 : 步骤 11 中的图像 2,2
    • Take out the SIM card by using a SIM card remover or unbent paper clip to depress the release lever.

  12. 这个步骤还没有翻译 帮忙翻译一下

    : 步骤 12 中的图像 1,3 : 步骤 12 中的图像 2,3 : 步骤 12 中的图像 3,3
    • Remove the motherboard by prying it out with the spudger.

  13. 这个步骤还没有翻译 帮忙翻译一下

    : 步骤 13 中的图像 1,3 : 步骤 13 中的图像 2,3 : 步骤 13 中的图像 3,3
    • Remove the earpiece speaker by prying it off of the front display with the spudger.

终点

10等其他人完成本指南。

Jonne Vicario

于01/24/19注册

509 声望

创作了3篇指南

团队

Cal Poly, Team S1-G6, White Winter 2019 Cal Poly, Team S1-G6, White Winter 2019 的会员

CPSU-WHITE-W19S1G6

4 名成员

创作了29篇指南

3条评论

Replaced ear speaker but ended up being a software issue ☹️

Travis Brubaker - 回复

So do you have a software issue now, or did you not need to replace the earpiece speaker? Asking so I can help troubleshoot if necessary.

Ani Svadjian -

Hey, I just replaced the earpiece speaker as well and it does not work in phone calls, however, it does work to play music. I’m not sure what the issue could be here besides software related issues, however, I will try to reset the phone and let you guys know if that fixes it. If anyone has any ideas, I’m all ears.

DJ Dankman - 回复

添加评论

浏览统计数据:

过去 24 小时: 15

过去 7 天: 60

过去 30 天: 287

总计 27,221