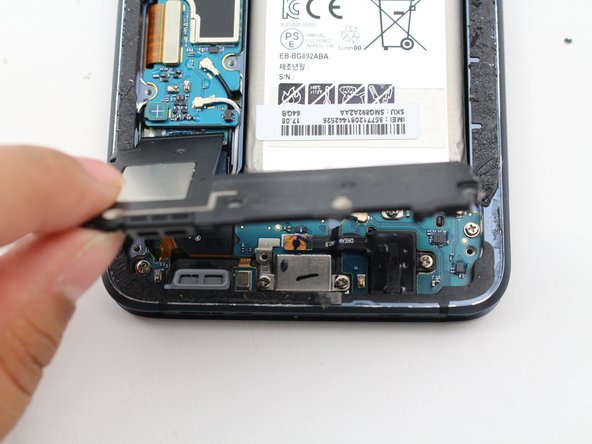
跳转到主内容

Samsung Galaxy S8 Active I/O Daughterboard Replacement

你所需要的

  1. Samsung Galaxy S8 Active I/O Daughterboard Replacement, SIM Tray/Card: 步骤 1 中的图像 1,2 Samsung Galaxy S8 Active I/O Daughterboard Replacement, SIM Tray/Card: 步骤 1 中的图像 2,2
    • Insert and gently push the SIM card ejector tool (or an unfolded paperclip) into the small hole on the left side of the top edge of the phone.

    • Press gently to eject the SIM tray.

    • Remove the SIM card tray from the device.

    • To reinsert the SIM card tray, orient the SIM card with the gold contacts facing up and the notch to the bottom right. Reinsert the SIM card by pressing the card gently into the SIM tray slot.

  2. Samsung Galaxy S8 Active I/O Daughterboard Replacement, NFC Antenna and Charging Coil Assembly: 步骤 2 中的图像 1,3 Samsung Galaxy S8 Active I/O Daughterboard Replacement, NFC Antenna and Charging Coil Assembly: 步骤 2 中的图像 2,3 Samsung Galaxy S8 Active I/O Daughterboard Replacement, NFC Antenna and Charging Coil Assembly: 步骤 2 中的图像 3,3
    • Removing the back cover of the S8 Active will compromise its waterproof seals. Have replacement adhesive on hand before you proceed, or be sure to avoid exposure to liquid if you do not replace the adhesive when you reassemble the device.

    • Remove four black 3mm screws from the outside edges of the device that hold the rubber bumpers in place using the TR6 Torx Security Screwdriver.

    • Take off the rubber bumpers from the top and bottom edges of the device.

  3. Samsung Galaxy S8 Active I/O Daughterboard Replacement: 步骤 3 中的图像 1,1
    • Use a heat gun to lightly heat the edges of the back to soften the adhesive that connects the back cover to the rest of the frame.

    • An iFixit iOpener, hair dryer, or hot plate can also be used to heat the edges.

    • Using a heat gun, hair dryer, or hot plate will make the metal frame rather hot to the touch, so handle it with care.

    • Be careful not to overheat the device –the OLED display, battery and other internal parts can be damaged by excessive heat. Approximately one minute should be enough to soften the adhesive.

  4. Samsung Galaxy S8 Active I/O Daughterboard Replacement: 步骤 4 中的图像 1,3 Samsung Galaxy S8 Active I/O Daughterboard Replacement: 步骤 4 中的图像 2,3 Samsung Galaxy S8 Active I/O Daughterboard Replacement: 步骤 4 中的图像 3,3
    • Insert the Jimmy tool under the edge of the back cover.

    • Because of the texture of the back cover, a suction handle does not provide any grip to help lift the back cover.

    • Once the Jimmy tool is under the edge of the cover, insert an opening pick into the seam to prevent the seam from closing if the Jimmy tool slips or is accidentally removed.

    • Cut slowly around the top section of the device and be careful to avoid damaging the cables for the fingerprint sensor and camera. Avoid prying too far into the top of the device to protect the fingerprint sensor.

    • Slide the Jimmy tool down the sides of the device, separating the adhesive.

  5. Samsung Galaxy S8 Active I/O Daughterboard Replacement: 步骤 5 中的图像 1,1
    • Use the opening pick to slice through any remaining adhesive.

    • If you have replacement adhesive strips, remove any remaining adhesive from the device frame using the Jimmy tool.

    • Open the back cover slightly to the point that you can see the fingerprint sensor flex cable connector.

    • The fingerprint sensor cable connects towards the top of the phone near the front-facing camera. To avoid tearing the cable, pull the back cover off gently.

  6. Samsung Galaxy S8 Active I/O Daughterboard Replacement: 步骤 6 中的图像 1,2 Samsung Galaxy S8 Active I/O Daughterboard Replacement: 步骤 6 中的图像 2,2
    • Slowly flip the cover over and set it down on top of the rest of the device.

    • Disconnect the fingerprint flex cable using the flat end of a spudger.

    • Remove the back cover.

    • To reconnect the fingerprint sensor cable during reassembly, angle the back cover until the flex cable lines up over its socket. Use the flat end of a spudger to snap the cable in place by gently pressing straight down.

  7. Samsung Galaxy S8 Active I/O Daughterboard Replacement: 步骤 7 中的图像 1,3 Samsung Galaxy S8 Active I/O Daughterboard Replacement: 步骤 7 中的图像 2,3 Samsung Galaxy S8 Active I/O Daughterboard Replacement: 步骤 7 中的图像 3,3
    • Remove eleven 3.5 mm screws using a Phillips #00 Screwdriver.

    • Remove two 2mm screws using a Phillips #00 Screwdriver.

  8. Samsung Galaxy S8 Active I/O Daughterboard Replacement: 步骤 8 中的图像 1,2 Samsung Galaxy S8 Active I/O Daughterboard Replacement: 步骤 8 中的图像 2,2
    • Remove the NFC antenna and charging coil assembly using the flat end of a spudger.

  9. Samsung Galaxy S8 Active I/O Daughterboard Replacement, Loudspeaker Assembly: 步骤 9 中的图像 1,3 Samsung Galaxy S8 Active I/O Daughterboard Replacement, Loudspeaker Assembly: 步骤 9 中的图像 2,3 Samsung Galaxy S8 Active I/O Daughterboard Replacement, Loudspeaker Assembly: 步骤 9 中的图像 3,3
    • Remove the loudspeaker assembly using the flat end of a spudger.

  10. Samsung Galaxy S8 Active I/O Daughterboard Replacement, Headphone Jack: 步骤 10 中的图像 1,3 Samsung Galaxy S8 Active I/O Daughterboard Replacement, Headphone Jack: 步骤 10 中的图像 2,3 Samsung Galaxy S8 Active I/O Daughterboard Replacement, Headphone Jack: 步骤 10 中的图像 3,3
    • Remove one 3.5 mm screw using a Phillips #00 screwdriver.

  11. Samsung Galaxy S8 Active I/O Daughterboard Replacement: 步骤 11 中的图像 1,2 Samsung Galaxy S8 Active I/O Daughterboard Replacement: 步骤 11 中的图像 2,2
    • Disconnect the headphone jack flex cable using the flat end of a spudger.

  12. Samsung Galaxy S8 Active I/O Daughterboard Replacement: 步骤 12 中的图像 1,1
    • Insert the Phillips #00 Screwdriver into the headphone jack located on the bottom edge of the device.

    • Gently push the screwdriver upwards, ejecting the headphone jack.

  13. Samsung Galaxy S8 Active I/O Daughterboard Replacement, Motherboard: 步骤 13 中的图像 1,3 Samsung Galaxy S8 Active I/O Daughterboard Replacement, Motherboard: 步骤 13 中的图像 2,3 Samsung Galaxy S8 Active I/O Daughterboard Replacement, Motherboard: 步骤 13 中的图像 3,3
    • Disconnect the battery flex cable using the flat end of a spudger.

  14. Samsung Galaxy S8 Active I/O Daughterboard Replacement: 步骤 14 中的图像 1,2 Samsung Galaxy S8 Active I/O Daughterboard Replacement: 步骤 14 中的图像 2,2
    • Remove one 3.5 mm screw using a Phillips #00 Screwdriver.

  15. Samsung Galaxy S8 Active I/O Daughterboard Replacement: 步骤 15 中的图像 1,2 Samsung Galaxy S8 Active I/O Daughterboard Replacement: 步骤 15 中的图像 2,2
    • Disconnect the Volume Up, Volume Down, and Bixby button flex cable using the flat end of a spudger.

  16. Samsung Galaxy S8 Active I/O Daughterboard Replacement: 步骤 16 中的图像 1,2 Samsung Galaxy S8 Active I/O Daughterboard Replacement: 步骤 16 中的图像 2,2
    • Disconnect the display flex cable using the flat end of a spudger.

  17. Samsung Galaxy S8 Active I/O Daughterboard Replacement: 步骤 17 中的图像 1,2 Samsung Galaxy S8 Active I/O Daughterboard Replacement: 步骤 17 中的图像 2,2
    • Disconnect the charging port flex cable using the flat end of a spudger.

  18. Samsung Galaxy S8 Active I/O Daughterboard Replacement: 步骤 18 中的图像 1,3 Samsung Galaxy S8 Active I/O Daughterboard Replacement: 步骤 18 中的图像 2,3 Samsung Galaxy S8 Active I/O Daughterboard Replacement: 步骤 18 中的图像 3,3
    • Disconnect the black and white antenna cables using the flat end of a spudger.

  19. Samsung Galaxy S8 Active I/O Daughterboard Replacement: 步骤 19 中的图像 1,2 Samsung Galaxy S8 Active I/O Daughterboard Replacement: 步骤 19 中的图像 2,2
    • The motherboard rests on top of the daughterboard, and there is a flex cable connecting them. Disconnect the flex cable that connects the motherboard to the daughterboard using the flat end of a spudger.

  20. Samsung Galaxy S8 Active I/O Daughterboard Replacement: 步骤 20 中的图像 1,2 Samsung Galaxy S8 Active I/O Daughterboard Replacement: 步骤 20 中的图像 2,2
    • Position the flat end of a spudger at the top edge of the motherboard.

    • Carefully pry up and remove the motherboard.

  21. Samsung Galaxy S8 Active I/O Daughterboard Replacement, I/O Daughterboard: 步骤 21 中的图像 1,3 Samsung Galaxy S8 Active I/O Daughterboard Replacement, I/O Daughterboard: 步骤 21 中的图像 2,3 Samsung Galaxy S8 Active I/O Daughterboard Replacement, I/O Daughterboard: 步骤 21 中的图像 3,3
    • Remove five 3.5 mm screws using a Philips #00 screwdriver.

  22. Samsung Galaxy S8 Active I/O Daughterboard Replacement: 步骤 22 中的图像 1,3 Samsung Galaxy S8 Active I/O Daughterboard Replacement: 步骤 22 中的图像 2,3 Samsung Galaxy S8 Active I/O Daughterboard Replacement: 步骤 22 中的图像 3,3
    • Disconnect the black and white cellular antennas using the flat end of a spudger.

  23. Samsung Galaxy S8 Active I/O Daughterboard Replacement: 步骤 23 中的图像 1,1
    • Detach the flex cable that connects the charging port to the motherboard using the flat end of a spudger.

    • The flex cable is lightly glued to the device's frame with a small bit of adhesive.

  24. Samsung Galaxy S8 Active I/O Daughterboard Replacement: 步骤 24 中的图像 1,1
    • Starting from the middle of the I/O daughterboard, carefully lift the daughterboard up using the flat end of a spudger.

    • Remove the I/O daughterboard.

结论

To reassemble your device, follow these instructions in reverse order.

4等其他人完成本指南。

Sarah

于01/24/19注册

413 声望

创作了2篇指南

团队

Cal Poly, Team S2-G1, White Winter 2019 Cal Poly, Team S2-G1, White Winter 2019 的会员

CPSU-WHITE-W19S2G1

3 名成员

创作了11篇指南

一条评论

Thanks for writing this guide! It let me fix my phone successfully :)

Here are a few tips for anyone else trying to follow this guide:

- The screw sizes (3.5mm vs 2mm) are off. All the earlier screws are 3.5mm, and all the later ones are 2mm

- It’s a bit risky, buy you may need to gently use something sharp to cut away the back cover. I very carefully used an exacto knife, only cutting in a few millimeters to get it started. Then I switched to a putty knife.

- Connect the motherboard and the IO daughterboard before inserting them back into the phone.

- The black and white antenna cables must be placed very particularly to allow the loudspeaker to fit. Route them through the small notch in the motherboard, which you must do before putting the motherboard back in.

- Make sure the loudspeaker assembly, NFC and charging coil are flush with the back cover when you insert them. This requires aligning the tabs at the edges underneath the adhesive. This is important if you want the back cover to fit properly.

Benjamin Hannel - 回复

添加评论

浏览统计数据:

过去 24 小时: 0

过去 7 天: 1

过去 30 天: 28

总计 3,166