简介
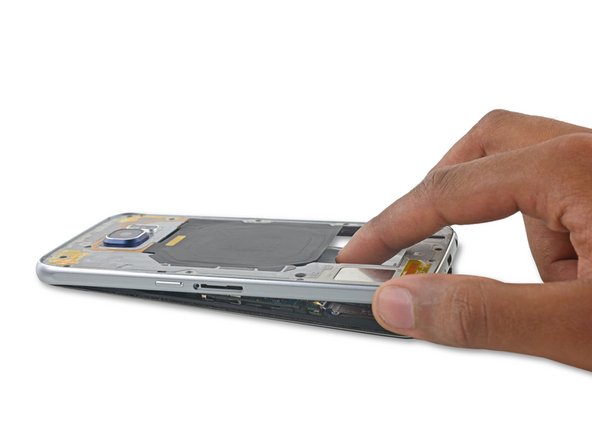
参考本指南更换三星盖乐世S6的中框组件。中框组件包含了感应线圈,电源键和音量键,摄像头镜片以及扬声器。
本指南涉及到拆卸后部玻璃面板。拆卸后部玻璃面板需要去除将其固定到位的粘合剂。参考 本指南以重新安装后部玻璃面板。
你所需要的
-
-
-
在锅或平底锅里装满足够的水来完全淹没iOpener。
-
把水加热到沸腾。关火。
-
将iOpener放入热水中2-3分钟。确保iOpener完全浸入水中。
-
用钳子从热水中提取加热的iOpener。
-
用毛巾彻底擦干iOpener。
-
你的iOpener已准备好使用!如果你需要重新加热iOpener,请将水加热到沸点,关火,并将iOpener放入水中2-3分钟。
-
-
-
将iOpener放置在手机后盖上2分钟左右,以软化后盖的上的胶水。
-
你可能需要使用 iOpener 多次以达到足够的温度。 请按照 iOpener 的说明操作以避免过度加热。
-
移动iOpener以加热后壳的剩余部分,同样大约需要两分钟
-
参照以下介绍的相反步骤重新安装你的设备。若要重新组装后部玻璃面板,参考重新安装后部玻璃面板粘合剂指南。
参照以下介绍的相反步骤重新安装你的设备。若要重新组装后部玻璃面板,参考重新安装后部玻璃面板粘合剂指南。
17等其他人完成本指南。
由衷感谢以下译者:
85%
这些译者帮助我们修补全世界! 您也想加入吗?
开始翻译 ›
6条评论
Step 18
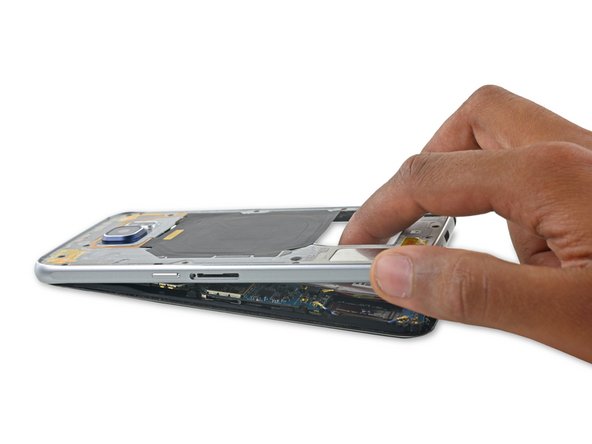
Is it really that "simple" to separate the midframe from the front of the phone? In most videos (even the one on ifixit) a suction cup is used (after warming the front) with some prying tools.
So, does Step 18 really work?
It appears that the front is hold together by only 4 adhesives in the corners. Are this damaged during the front removal process? (is there a replacement kit?)
Just another question, I damaged the heart sensor plastic cover, is it possible to buy just that part or do I need to buy a complete midframe?
Can this step be exactly with a simple push as stated? Other sources required focusing heat on the 4 corners and run through with a pick....?
Secondly, how can one avoid damaging the lamination under the glass while removing it or trying to get the first foothold with the pick. Most guides I have seen appear to skip this step.
I have seen one phone parts site (EtradeSupply) list all different variants of the mid housing (G920F, G920V, G920R etc). But another site (WitRigs) has just one, as if they aren't specific.
Does anyone know? Because i'm in Australia and can't find G920i variant.
Also, has anyone simply swapped over the antennas, and crimped them onto the new housing?
Ok Guys I am definitely !#^&@@ off right now.... but to the point.
Please Edit to this guide --> @Step 18:
First of all: Heat the for corners with your iOpener to lose the adhesive which sits in the corners.
Be very very gentle when you push down on the battery and try to put a little pressure onto or maybe into the headphone jack when you first encounter that the display gets lose, because the headphone-jack fits very well in the frame and holds on a little corner.
Only go around the whole display with a spudger when the adhesive is really warm to lose it when it doesn't come out as easy as you thought. Because otherwise you may face that the display to display-glass laminate gets damaged. That just happened to me at the upper display side... so to get a perfect new looking phone I have to replace that as well....EXPENSIVE :(
Hope this may help you guys.
but ... nevertheless ... thank you guys from IFixit for your continous effort to help people repairing there stuff - heads up :-)
Hi Jakob, thanks for your input! When writing this guide we used a device that had been previously disassembled, so our experience may have been different from yours. Just to be clear: you have an issue with step 18 because the adhesive between the midframe and front assembly is very strong and simply pushing the battery is not adequate? Are there other steps that need to be adjusted?
And, as a general note, you can edit this guide yourself! When you hover your cursor over any particular step, an "Edit" button will appear. Alternatively, you can scroll to the top of the page and click the "Edit" tab up there.


