当前版本的文档还未经巡查,您可以查看最新的已查核版本。
你所需要的
-
-
用iOpener,吹风机或热风枪加热手机的正面(侧面,顶部,底部)60秒,以软化玻璃边缘周围的粘合剂。
Heat the phone in the microwave??? I really hope you meant to say heat the iopener tool in the microwave.
-
-
-
一旦打开足够大的间隙,请在玻璃和手机框架的其余部分之间的底部插入塑料工具。
-
将塑料开口工具在屏幕周围滑动,轻轻地将显示器从身体上撬开
My phone had a substantial amount of adhesive between the copper area on the back of the display assembly (see pic in step 10) and the frame (see pic in step 13). There was no way to have known that as I started to remove the glass, but this made it difficult to lift the glass up and eventually led to the glass cracking as I tried to work the plastic opening tool up along the side of the phone (about in the spot shown in the second picture of this step). In hindsight, I think it would have been extremely difficult to remove the front glass undamaged without first starting to separatie that adhesive from the frame, but I’m not sure what would have been the best way to do that. My guess is I would have needed to slide a tool with a thinner/sharper edge upward from the bottom while pulling on the suction cup to start separating the back of the display assembly from the frame, and worked on both that and the edges of the glass at the same time.
-
-
-
-
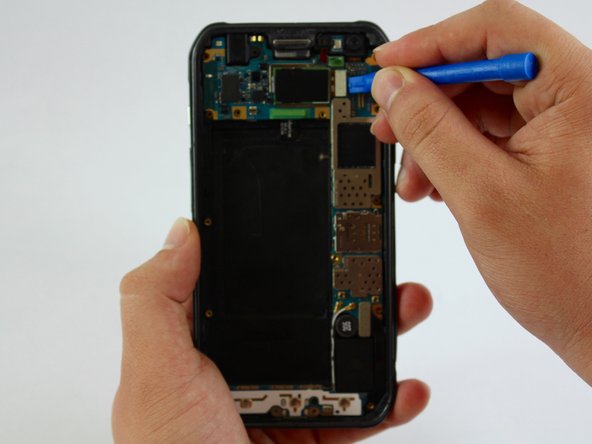
用塑料工具断开屏幕连接。
If possible, disconnect the battery BEFORE you undo the screen connector. The battery flex is on the left, just under the LCD cable assembly.
-
-
-
拆下显示屏组件(LCD和数字转换器)。
All that copper/tin foil, whatever it is, stayed glued to the case and tore off the screen. I hope it isn’t important. What is it for anyways?
Good Question. Mine ripped a little bit 2.
Probably heat displacement, you’ll find them on the back of most Samsung OEM LCD assemblies & high quality replacements. It’s probably not a big deal if you tear it, after all where’s the heat supposed to go from there? Pat yourself on the back for getting the LCD & glass up in one piece, don’t be surprised if nobody else shares your enthusiasm.
-
-
-
使用尺寸为PH000的十字头螺丝刀从框架上拆下十六个4mm螺丝。
PH00 size screwdriver fit the screw heads better on my phone.
Missing intermediate step: the screw just above the battery holds a little plastic cover that hides the battery connector. Take the cover out and carefully disconnect the battery using the tweezers.
-
-
-
在框架的侧面插入塑料开口工具并拉出电池。
The battery was glued quite well on mine, I had to slowly go around the whole edge about 3 times. Exercise care at this operation, especially if the old battery is swollen.
-


另外一个人完成了本指南。
团队

USF Tampa, Team 1-5, Sullivan Spring 2017 USF Tampa, Team 1-5, Sullivan Spring 2017 的会员
USFT-SULLIVAN-S17S1G5
3 名成员
创作了25篇指南
一条评论
I replaced the S6 Active’s old battery, and never touched the camera (that I know of) but now the camera does not work. I get ‘Camera Failure' error statement. Clearing Cache did not fix it.
Is the camera connection easy to accidently disconnect? Or to test? Don’t want to take my S6 Active apart again unnecessarily.