跳转到主内容

此翻译可能不反映源指南的最新更新。 帮助更新翻译查看源指南

三星 盖乐世 S4 USB 板更换

你所需要的

  1. 三星 盖乐世 S4 USB 板更换, 后壳: 步骤 1 中的图像 1,2 三星 盖乐世 S4 USB 板更换, 后壳: 步骤 1 中的图像 2,2
    • 使用撬棒或指甲来从后置摄像头靠近电源键位置撬起后壳。

  2. 三星 盖乐世 S4 USB 板更换: 步骤 2 中的图像 1,3 三星 盖乐世 S4 USB 板更换: 步骤 2 中的图像 2,3 三星 盖乐世 S4 USB 板更换: 步骤 2 中的图像 3,3
    • 将后壳与手机上的卡扣分离,移除手机后壳。

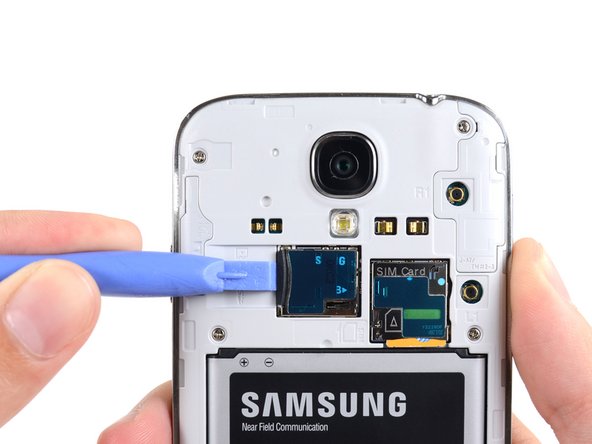
  3. 三星 盖乐世 S4 USB 板更换, MicroSD 卡: 步骤 3 中的图像 1,3 三星 盖乐世 S4 USB 板更换, MicroSD 卡: 步骤 3 中的图像 2,3 三星 盖乐世 S4 USB 板更换, MicroSD 卡: 步骤 3 中的图像 3,3
    • 使用撬棒扁平的一端或者您的指甲,来轻轻按动microSD卡压入进卡槽中,直到听到卡塔一声。

    • 在听到咔塔一声后松开卡,卡将会从卡槽中弹出。

    • 移除卡片。

    • 要重新装入卡,将其插入卡槽,直至卡入到位。

  4. 三星 盖乐世 S4 USB 板更换, 电池: 步骤 4 中的图像 1,3 三星 盖乐世 S4 USB 板更换, 电池: 步骤 4 中的图像 2,3 三星 盖乐世 S4 USB 板更换, 电池: 步骤 4 中的图像 3,3
    • 使用塑料撬棒或者手指甲来从电池仓槽口处向上提起电池。

    • 将电池从您的手机中移出。

  5. 三星 盖乐世 S4 USB 板更换, SIM卡: 步骤 5 中的图像 1,3 三星 盖乐世 S4 USB 板更换, SIM卡: 步骤 5 中的图像 2,3 三星 盖乐世 S4 USB 板更换, SIM卡: 步骤 5 中的图像 3,3
    • 使用塑料开启工具(或者你的手指)来把SIM卡向卡槽反向轻微挤压,直到你听到了声响。

    • 听到声响后,停止挤压SIM卡,它会自动弹出卡槽。

    • 移除SIM卡。

    • 在重新安装的过程中,将卡推入卡槽直到你听到声响。

  6. 三星 盖乐世 S4 USB 板更换, 中框: 步骤 6 中的图像 1,1
    • 拆下九个用来固定中框和屏幕的4 mm 菲利普斯# 00螺钉。

  7. 三星 盖乐世 S4 USB 板更换: 步骤 7 中的图像 1,2 三星 盖乐世 S4 USB 板更换: 步骤 7 中的图像 2,2
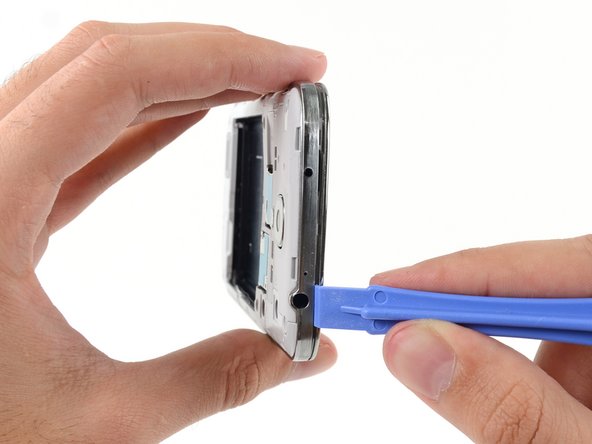
    • 中框是由几个塑料卡子后面的中框镀铬挡板固定在显示组件上的。接下来的步骤将指导你分离中框与屏幕组件的连接。

    • 从手机的音量按钮开始,在显示玻璃的铬边框和较大的镀铬边框之间插入塑料开口工具。寻找两者之间的缝隙。

    • 沿着切口滑动开孔工具,将塑料卡子分开。

    • 轻轻地撬开,只够将塑料卡子在中框挡板就可以打开。

  8. 三星 盖乐世 S4 USB 板更换: 步骤 8 中的图像 1,2 三星 盖乐世 S4 USB 板更换: 步骤 8 中的图像 2,2
    • 继续撬开手机边缘。

    • 滑动你的开启工具沿着设备的底部中框和显示器之间的缝。

  9. 三星 盖乐世 S4 USB 板更换: 步骤 9 中的图像 1,2 三星 盖乐世 S4 USB 板更换: 步骤 9 中的图像 2,2
    • 再次,撬到电源按钮的一边。

    • 沿缝滑动开启工具。

  10. 三星 盖乐世 S4 USB 板更换: 步骤 10 中的图像 1,2 三星 盖乐世 S4 USB 板更换: 步骤 10 中的图像 2,2
    • 继续滑动开启工具在手机的顶部,最后市中框离开显示组件。

    • 检查一遍周围,确定所有边缘都已被撬棒打开。

  11. 三星 盖乐世 S4 USB 板更换: 步骤 11 中的图像 1,3 三星 盖乐世 S4 USB 板更换: 步骤 11 中的图像 2,3 三星 盖乐世 S4 USB 板更换: 步骤 11 中的图像 3,3
    • 从剩余零件中去处中框。

  12. 三星 盖乐世 S4 USB 板更换, USB  板: 步骤 12 中的图像 1,1
    • 使用撬棒扁平一端来断开主板上连接到USB板的连接插头。

  13. 三星 盖乐世 S4 USB 板更换: 步骤 13 中的图像 1,2 三星 盖乐世 S4 USB 板更换: 步骤 13 中的图像 2,2
    • 小心地在USB插口和USB插口支架之间插入撬棒的尖端,以将支架的一侧从其支柱上撬开。

  14. 三星 盖乐世 S4 USB 板更换: 步骤 14 中的图像 1,1
    • 移走从USB插口上移走USB插口支架。

    • 支架稍微有弹性,并且在重新组装时应装回两个支柱上的位置。

  15. 三星 盖乐世 S4 USB 板更换: 步骤 15 中的图像 1,2 三星 盖乐世 S4 USB 板更换: 步骤 15 中的图像 2,2
    • 从USB板电缆上拔下软按钮电缆。

    • 从USB板上断开天线线缆的插头。

    • 根据运营商,您有可能还有额外的天线线缆。 如果您现在可以找到,使用撬棒来将其从USB板上断开。

  16. 三星 盖乐世 S4 USB 板更换: 步骤 16 中的图像 1,3 三星 盖乐世 S4 USB 板更换: 步骤 16 中的图像 2,3 三星 盖乐世 S4 USB 板更换: 步骤 16 中的图像 3,3
    • USB板通过一些粘合剂与显示组件相固定。

    • 根据运营商,USB板的被面上可能还有额外的天线。请小心撬动 ,如果遇到阻力请停止。

    • 小心地在USB板下方插入撬棒扁平的一端,来松开将其固定的粘合剂。

    • 慢慢操作,不要弯折了电路板。

  17. 三星 盖乐世 S4 USB 板更换: 步骤 17 中的图像 1,1
    • 从显示组件上移走USB板。

结论

要重新组装您的设备,请按照本指南的相反顺序进行操作。

206等其他人完成本指南。

由衷感谢以下译者:

en zh

83%

Leon赵国鑫正在帮助我们修复这个世界! 您也想加入吗?
开始翻译 ›

Sam Goldheart

于10/18/12注册

465,656 声望

创作了538篇指南

团队

iFixit iFixit 的会员

Staff

135 名成员

创作了16,734篇指南

24条评论

I found this guide excellent and it is very easy to do. I didnt have the plastic opening tool but I do have a long thumbnail. It worked very well.

Too bad the replacement board I got has a defective soft button connector. I had to disassemble the phone 3 times. I thought I did It wrong the 1st time. Opened the phone a 2nd time to check.... closed the phone... nada.... USB changer works but no soft keys... put my old board back in to check the soft buttons and they work. Sent an email to the company that I bought the board from... still no answer after 24hrs. If I still have no answer by the end of the week I will post which company sold me the defect board so no one else gets burned from them. I will then try to unsolder the USB from the new board to replace the USB on my old one.

Bryan - 回复

This guide needs an update as it does not include the 4G antenna on the left side of the device that is under the USB cable and hooks up at the bottom left on the USB board up to just beside the USB connector above the battery. Pictures 12, 15, & 16 will need updated to show this cable.

rnbhays - 回复

To follow rnbhays' comment about the antenna connector on the left, it is specifically for i545 Verizon models.

I strongly suggest people to disconnect both left and right cables from the USB board prior to removing it. While doing so, my tool slipped and I accidentally broke the left cable. Thankfully I was able to crimp the connector back on the cable with tweezers and a magnifying glass 'til I get another cable ordered.

Alex - 回复

It also applies to the Sprint version as well. I have an LTE cable on the left side, and had to be very careful purchasing a replacement part to make sure it was the right one.

anonymous 1189 -

After replacement my microphone element isn't working. Possible reasons?

matthew young - 回复

添加评论

浏览统计数据:

过去 24 小时: 2

过去 7 天: 12

过去 30 天: 45

总计 320,293