跳转到主内容

当前版本的文档还未经巡查,您可以查看最新的已查核版本

你所需要的

  1. 这个步骤还没有翻译 帮忙翻译一下

    : 步骤 1 中的图像 1,2 : 步骤 1 中的图像 2,2
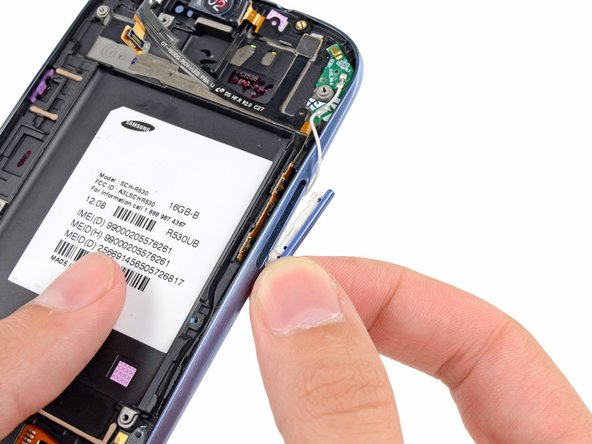
    • The following four steps can be accomplished without a plastic opening tool. However, it's recommended to use a tool to best avoid breaking any clips along the perimeter of the rear case.

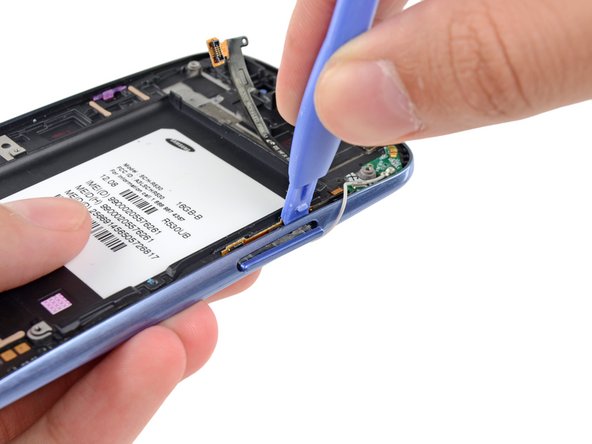
    • Insert a plastic opening tool or fingernail into the notch in the gap between the rear case and the rest of the phone, located at the top of the device.

    • Gently twist the opening tool to disconnect the clips securing the top of the rear case.

  2. 这个步骤还没有翻译 帮忙翻译一下

    : 步骤 2 中的图像 1,2 : 步骤 2 中的图像 2,2
    • Slide the plastic opening tool left along the top edge and repeat the twisting motion to widen the gap between the rear case and the phone.

  3. 这个步骤还没有翻译 帮忙翻译一下

    : 步骤 3 中的图像 1,2 : 步骤 3 中的图像 2,2
    • Continue to move the plastic opening tool around the perimeter of the top left corner, gently prying up along the rear case.

  4. 这个步骤还没有翻译 帮忙翻译一下

    : 步骤 4 中的图像 1,2 : 步骤 4 中的图像 2,2
    • Pry along the top right side, and continue prying down the right side of the rear case.

  5. 这个步骤还没有翻译 帮忙翻译一下

    : 步骤 5 中的图像 1,2 : 步骤 5 中的图像 2,2
    • Lift up and remove the rear case from the phone.

    • You may need to peel the case up to separate it from any clips still holding it to the bottom of the phone.

  6. , 电池: 步骤 6 中的图像 1,2 , 电池: 步骤 6 中的图像 2,2
    • 这一步没有撬棒也可以完成。

    • 将撬棒进入电池与手机之间的小缺口。

    • 将电池从凹槽中取出。

  7. : 步骤 7 中的图像 1,2 : 步骤 7 中的图像 2,2
    • 移除电池。

  8. 这个步骤还没有翻译 帮忙翻译一下

    : 步骤 8 中的图像 1,3 : 步骤 8 中的图像 2,3 : 步骤 8 中的图像 3,3
    • Using your fingernail, push the SIM card slightly deeper into its slot, until you hear a click.

    • After the click, release the card and it will pop out of its slot.

    • For reassembly, push the SIM card into the slot until it clicks in place.

  9. 这个步骤还没有翻译 帮忙翻译一下

    : 步骤 9 中的图像 1,3 : 步骤 9 中的图像 2,3 : 步骤 9 中的图像 3,3
    • Use your thumb to slide enough of the SIM card out of its slot to grab ahold of it.

    • Grasp and remove the SIM card away from the phone.

  10. 这个步骤还没有翻译 帮忙翻译一下

    : 步骤 10 中的图像 1,3 : 步骤 10 中的图像 2,3 : 步骤 10 中的图像 3,3
    • Using your fingernail, push the microSD card slightly deeper into its slot, until you hear a click.

    • After the click, release the card and it will pop out of its slot.

    • For reassembly, push the microSD card into the slot until it clicks in place.

  11. 这个步骤还没有翻译 帮忙翻译一下

    : 步骤 11 中的图像 1,2 : 步骤 11 中的图像 2,2
    • Use your thumb to slide the microSD card out of the slot.

    • Remove the microSD card from the phone.

  12. 这个步骤还没有翻译 帮忙翻译一下

    : 步骤 12 中的图像 1,1
    • Remove the ten 4.0 mm Phillips screws securing the midframe to the front panel assembly.

  13. 这个步骤还没有翻译 帮忙翻译一下

    : 步骤 13 中的图像 1,2 : 步骤 13 中的图像 2,2
    • Grasp the left side of the plastic midframe with your thumb and forefinger and lift it away from the phone.

    • The midframe lightly snaps in place, and can be removed with very little force.

  14. 这个步骤还没有翻译 帮忙翻译一下

    : 步骤 14 中的图像 1,2 : 步骤 14 中的图像 2,2
    • Use a plastic opening tool to pry the rear-facing camera connector up from its socket on the motherboard.

    • Make sure you are prying on the connector and not the socket, or you may damage the motherboard.

  15. 这个步骤还没有翻译 帮忙翻译一下

    : 步骤 15 中的图像 1,2 : 步骤 15 中的图像 2,2
    • Insert a plastic opening tool outboard of the speaker portion of the headphone jack/speaker assembly.

    • Gently pry the headphone jack/speaker assembly up from the front assembly.

  16. 这个步骤还没有翻译 帮忙翻译一下

    : 步骤 16 中的图像 1,1
    • Lift the headphone jack/speaker assembly out of the Galaxy S III.

  17. 这个步骤还没有翻译 帮忙翻译一下

    : 步骤 17 中的图像 1,1
    • Use a plastic opening tool to pry the front-facing camera connector from its socket on the motherboard.

    • Do not try to remove the front-facing camera just yet. Its cable is still routed beneath the motherboard assembly to the ambient light sensor.

  18. 这个步骤还没有翻译 帮忙翻译一下

    : 步骤 18 中的图像 1,2 : 步骤 18 中的图像 2,2
    • Disconnect the digitizer cable by gently prying its connector up from its socket on the motherboard.

  19. 这个步骤还没有翻译 帮忙翻译一下

    : 步骤 19 中的图像 1,2 : 步骤 19 中的图像 2,2
    • Disconnect the display data cable from the motherboard.

  20. 这个步骤还没有翻译 帮忙翻译一下

    : 步骤 20 中的图像 1,3 : 步骤 20 中的图像 2,3 : 步骤 20 中的图像 3,3
    • Pry the Wi-Fi antenna cable connector up from its socket on the motherboard.

    • Gently move the cable out of the way of the motherboard.

  21. 这个步骤还没有翻译 帮忙翻译一下

    : 步骤 21 中的图像 1,1
    • Remove the single 3.0 mm Phillips screw securing the motherboard to the front panel assembly.

  22. 这个步骤还没有翻译 帮忙翻译一下

    : 步骤 22 中的图像 1,2 : 步骤 22 中的图像 2,2
    • Carefully lift the bottom of the motherboard assembly away from the front panel assembly.

    • Remove the motherboard assembly from the front panel assembly, minding any cables that may snag on it.

  23. 这个步骤还没有翻译 帮忙翻译一下

    : 步骤 23 中的图像 1,1
    • Remove the single 2.0 mm Phillips screw securing the front-facing camera bracket to the front panel.

  24. 这个步骤还没有翻译 帮忙翻译一下

    : 步骤 24 中的图像 1,2 : 步骤 24 中的图像 2,2
    在这个步骤中使用的工具:
    Tweezers
    $4.99
    购买
    • Use a pair of tweezers to lift the front-facing camera/ambient light sensor/rear microphone assembly out from its socket in the front panel assembly.

  25. 这个步骤还没有翻译 帮忙翻译一下

    : 步骤 25 中的图像 1,2 : 步骤 25 中的图像 2,2
    • Peel the antenna cable up from its channel in the front panel assembly.

    • Do not completely remove the antenna cable, it is still connected to the antenna board.

  26. 这个步骤还没有翻译 帮忙翻译一下

    : 步骤 26 中的图像 1,2 : 步骤 26 中的图像 2,2
    • Wedge the tip of a spudger underneath the earpiece speaker and pry the earpiece speaker out of its recess in the front panel assembly.

  27. 这个步骤还没有翻译 帮忙翻译一下

    : 步骤 27 中的图像 1,1
    • Use the flat edge of a spudger to peel the top portion of the earpiece/volume buttons/ambient light sensor ribbon cable from the front panel assembly.

  28. 这个步骤还没有翻译 帮忙翻译一下

    : 步骤 28 中的图像 1,2 : 步骤 28 中的图像 2,2
    • Carefully wedge the flat edge of a spudger underneath the ambient light sensor.

    • Continue peeling the earpiece/volume buttons/ambient light sensor ribbon cable up off the front panel assembly.

  29. 这个步骤还没有翻译 帮忙翻译一下

    : 步骤 29 中的图像 1,2 : 步骤 29 中的图像 2,2
    • Insert the flat edge of a spudger underneath the earpiece/volume buttons/ambient light sensor ribbon cable connector.

    • Gently run the spudger across to continue peeling the the earpiece/volume buttons/ambient light sensor ribbon cable from the front panel assembly.

  30. 这个步骤还没有翻译 帮忙翻译一下

    : 步骤 30 中的图像 1,3 : 步骤 30 中的图像 2,3 : 步骤 30 中的图像 3,3
    • Insert a plastic opening tool in between the the buttons ribbon cable and the volume button.

    • Push the volume out of its recess in the front panel assembly.

    • Lift and remove the volume button out of the phone.

  31. 这个步骤还没有翻译 帮忙翻译一下

    : 步骤 31 中的图像 1,2 : 步骤 31 中的图像 2,2
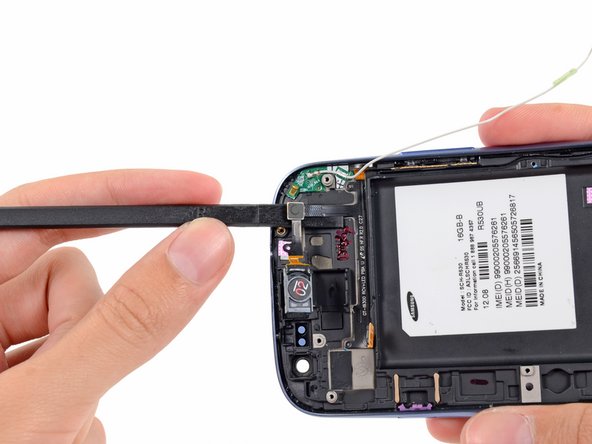
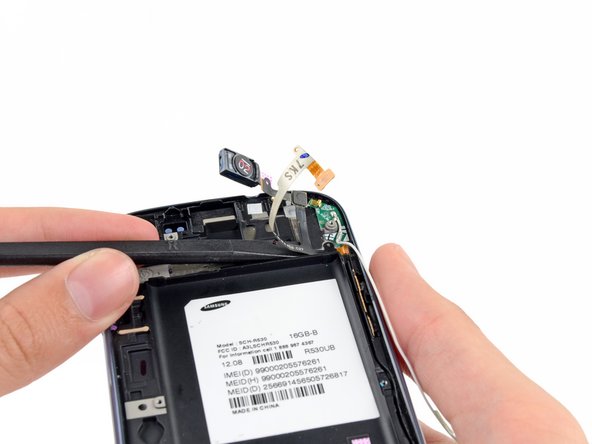
    • Wedge the flat edge of a plastic opening tool in between the the earpiece/buttons/ambient light sensor ribbon cable and run it down to loosen the adhesive securing the ribbon cable.

  32. 这个步骤还没有翻译 帮忙翻译一下

    : 步骤 32 中的图像 1,1
    • Grasp and remove the earpiece/buttons/ambient light sensor ribbon cable out of the phone.

  33. 这个步骤还没有翻译 帮忙翻译一下

    : 步骤 33 中的图像 1,3 : 步骤 33 中的图像 2,3 : 步骤 33 中的图像 3,3
    • Use a metal spudger to carefully peel the antenna board off the front panel assembly.

    • Lift and remove the antenna board out of the phone.

  34. 这个步骤还没有翻译 帮忙翻译一下

    : 步骤 34 中的图像 1,3 : 步骤 34 中的图像 2,3 : 步骤 34 中的图像 3,3
    • Push the power button out of its recess in the front panel assembly.

    • Remove the power button from the front panel assembly.

  35. 这个步骤还没有翻译 帮忙翻译一下

    : 步骤 35 中的图像 1,2 : 步骤 35 中的图像 2,2
    • Use the tip of a spudger to pry the vibrator out of its recess in the front panel assembly.

  36. 这个步骤还没有翻译 帮忙翻译一下

    : 步骤 36 中的图像 1,2 : 步骤 36 中的图像 2,2
    • Use the tip of a spudger to peel the vibrator assembly off the front panel assembly.

  37. 这个步骤还没有翻译 帮忙翻译一下

    : 步骤 37 中的图像 1,1
    • Lift and remove the vibrator out of the front panel assembly.

  38. 这个步骤还没有翻译 帮忙翻译一下

    : 步骤 38 中的图像 1,1
    • Front panel assembly remains.

    • If you are replacing the front panel assembly with a new one, don't forget to transfer all the parts you removed to your new front panel assembly.

终点

212等其他人完成本指南。

14条评论

Hi,

I wonder if this is guide to actually replace broken digitizer - if we have full Digitizer/LCD assembly?

Thanks

Akki S - 回复

I've just watched the video and... that was pure pleasure to watch repairer. She's professional and beautiful!

paczor - 回复

Thanks. This is the second time I've used this guide.

William Geisweit - 回复

And how Ill install thenew screen ?

Lea Efremov - 回复

Brilliant Step-By-Step guide. My phone needed new digitizer as just a black screen was showing when turned on, must have happened from a drop. I bought the digitizer screen combo from ebay and used this guide to dress across the components. Worked first time! There are a couple of other spongy or supportive rubber pieces around certain components that were in the original phone so I transferred those also, I guess they are there just to ensure tight connections etc. Absolute lifesaver!

James Lainchbury - 回复

添加评论

浏览统计数据:

过去 24 小时: 1

过去 7 天: 5

过去 30 天: 33

总计 271,464