跳转到主内容

Samsung Galaxy Note 8.0 屏幕总成更换

你所需要的

  1. Samsung Galaxy Note 8.0 屏幕总成更换, 内部更换: 步骤 1 中的图像 1,1
    • 取出S-Pen。

    • 取出SD存储卡。

  2. Samsung Galaxy Note 8.0 屏幕总成更换: 步骤 2 中的图像 1,1
    • 使用塑料撬棒,从S-Pen所在的一角插入后盖。

  3. Samsung Galaxy Note 8.0 屏幕总成更换: 步骤 3 中的图像 1,1
    • 使用塑料撬棒,从S-Pen所在的一角翘起后盖,并沿四周移动一圈。

    • 每隔2cm就会有一个塑料卡扣,当打开后盖时你应该听到卡扣脱落的声音

  4. Samsung Galaxy Note 8.0 屏幕总成更换, 电池: 步骤 4 中的图像 1,2 Samsung Galaxy Note 8.0 屏幕总成更换, 电池: 步骤 4 中的图像 2,2
    • 移除八个用于固定电池的 3 毫米螺丝。

  5. Samsung Galaxy Note 8.0 屏幕总成更换: 步骤 5 中的图像 1,1
    • 从左上角抬起电池。

  6. Samsung Galaxy Note 8.0 屏幕总成更换: 步骤 6 中的图像 1,1
    • 轻轻地移除右下角的白色排线。这条排线通过红蓝各两条线连接着电池。

    • 千万不要猛然拉动排线。如果它不容易被移除,请用塑料拨片在缝隙滑动来将排线移除。

  7. Samsung Galaxy Note 8.0 屏幕总成更换, 屏幕数字转换器和液晶显示屏: 步骤 7 中的图像 1,2 Samsung Galaxy Note 8.0 屏幕总成更换, 屏幕数字转换器和液晶显示屏: 步骤 7 中的图像 2,2
    • 轻轻的推开数字转换器的连接器的褐色部分

    • 轻轻的把连接器的橙色部分移出

  8. Samsung Galaxy Note 8.0 屏幕总成更换: 步骤 8 中的图像 1,2 Samsung Galaxy Note 8.0 屏幕总成更换: 步骤 8 中的图像 2,2
    • 小心的推开液晶屏连接器的黑色部分

  9. Samsung Galaxy Note 8.0 屏幕总成更换: 步骤 9 中的图像 1,1
    • 反转你的平板使其屏幕向上。准备好你的热风枪或者电吹风到中档热。

    • 让热风枪或者电吹风围着屏幕四周的白边,请让一个边加热三十秒后再移动到其他边

    • 您将重复加热如一个圆形的图案,分别左侧,顶部和右侧。 重复3次,每边花费30秒。

    • 你可以使用iOpener来代替热风枪

  10. Samsung Galaxy Note 8.0 屏幕总成更换: 步骤 10 中的图像 1,1
    • 把塑料开启工具插进银色中框和屏幕总成中间的缝隙,从平板的顶部开始。

  11. Samsung Galaxy Note 8.0 屏幕总成更换: 步骤 11 中的图像 1,1
    • 这十分重要当你需要分开另外三边。在平板的电源键的另一侧有一个卡扣,如果这一方先被分开,可能会造成损坏。

    • 向设备有音量键合电源键的一方向下滑动你的开启工具。然后接着滑滑动主页键的一边直到这一边被完全分离

  12. Samsung Galaxy Note 8.0 屏幕总成更换: 步骤 12 中的图像 1,1
    • 滑动你的开启工具直到这一边的胶水被完全分离

  13. Samsung Galaxy Note 8.0 屏幕总成更换: 步骤 13 中的图像 1,3 Samsung Galaxy Note 8.0 屏幕总成更换: 步骤 13 中的图像 2,3 Samsung Galaxy Note 8.0 屏幕总成更换: 步骤 13 中的图像 3,3
    • 反转你的平板然后小心地从电源按钮边上压出液晶屏幕面板,轻轻的推到把电池的开口

    • 断开主板与连接屏幕总成的色带

  14. Samsung Galaxy Note 8.0 屏幕总成更换: 步骤 14 中的图像 1,1
    • 当从电源键侧面插入你的撬开工具时,避免撬断屏幕电线,从顶端往下 7 cm。

    • 把平板电脑翻过来,通过滑动塑料开启撬片,完全移除 LCD 和屏幕组件。

    • 如果你自己更换屏幕,继续下一步。如果你只是更换屏幕的数字转换器,按逆序操作来完成以下步骤。

  15. Samsung Galaxy Note 8.0 屏幕总成更换: 步骤 15 中的图像 1,1
    • 把屏幕从LCD 分离,你需要加热黏胶。

    • 拿住热风枪,跳到中档,离屏幕大概 6 英尺,从左到右,从上到下地晃动。

    • 持续 5 分钟。

  16. Samsung Galaxy Note 8.0 屏幕总成更换: 步骤 16 中的图像 1,1
    • 使用你不再需要的一个塑料卡片。

    • 这个会被黏胶覆盖。

    • 在屏幕和数字转换器之间滑入这个卡片,滑向角落。

结论

为了重装你的设备,请跟随相反的步骤

47等其他人完成本指南。

由衷感谢以下译者:

en zh

100%

这些译者帮助我们修补全世界! 您也想加入吗?
开始翻译 ›

James Laubaugh

于09/23/14注册

3,065 声望

撰写一个指南

团队

USF Tampa, Team 12-2, Blackwell Fall 2014 USF Tampa, Team 12-2, Blackwell Fall 2014 的会员

USFT-BLACKWELL-F14S12G2

4 名成员

创作了16篇指南

20条评论

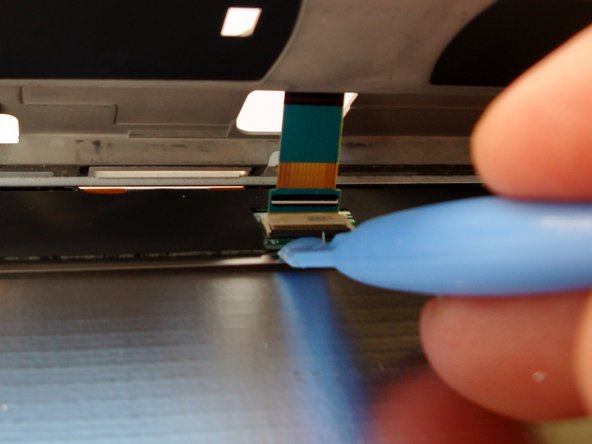
For steps 15 and 16, removing just the glass digitizer from the lcd, does this step happen after you completely remove the lcd from the tablet? It is hard to tell because it looks like the silver from the tablet is present but it takes place in the instructions after the lcd should already be removed and no silver should be present. Any help on this would be appreciated. I have one where the digitizer screen is broken but the lcd has no damage at all.

Zachary Warner - 回复

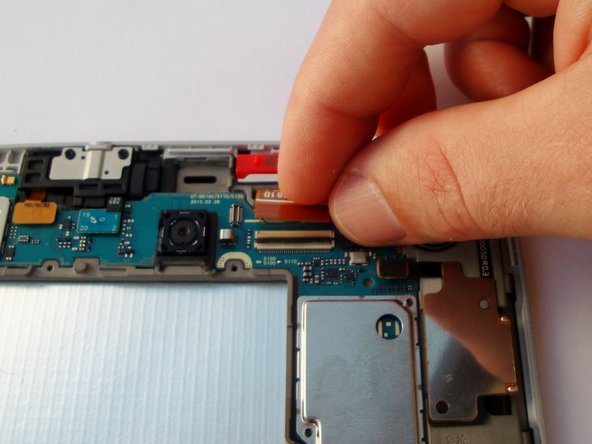
No you dont need to remove the lcd you hav to unplug the toch connector n heat the glass like in the steps

sulaiman criss - 回复

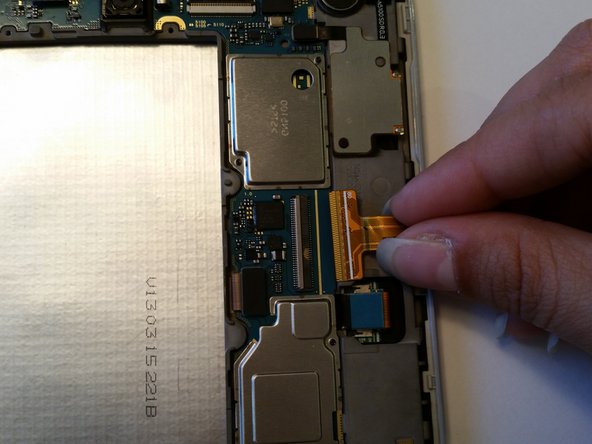
For step 13, I ripped this motherboard connector trying to get the new lcd in. Anyone have any idea what I have actually damaged? And where I could find out how to fix it?

Henok Yared - 回复

yes replacements are on ebay

Pantalla Flex Cable LCD Conector Display Screen Ribbon Samsung Galaxy Note 8.0.

haydn.nelms -

My Samsung note 8 model N5110 has a broken screen glass. It still work very good. Question ..must I changed the digitaliser and screen . Please advice.

thanks in advance

9y4ajc - 回复

添加评论

浏览统计数据:

过去 24 小时: 1

过去 7 天: 8

过去 30 天: 32

总计 63,044