跳转到主内容

Samsung Galaxy Book Pro 15" Screen Replacement

你所需要的

  1. Samsung Galaxy Book Pro 15" Screen Replacement, Remove the rubber feet: 步骤 1 中的图像 1,3 Samsung Galaxy Book Pro 15" Screen Replacement, Remove the rubber feet: 步骤 1 中的图像 2,3 Samsung Galaxy Book Pro 15" Screen Replacement, Remove the rubber feet: 步骤 1 中的图像 3,3
    • Before you begin, power down your laptop and unplug it.

    • There are two kinds of rubber feet along the top and bottom of the rear case. Keep track of their position as you remove them.

    • Insert an opening pick between the rubber foot and the rear case.

    • Pry up with the opening pick to release the clips securing the foot.

    • Remove the foot.

    • Repeat this procedure for the three remaining feet.

    • During reassembly, press the feet into their correct slot to reinsert them. Mismatched feet won't fit correctly.

  2. Samsung Galaxy Book Pro 15" Screen Replacement, Unfasten the rear case: 步骤 2 中的图像 1,2 Samsung Galaxy Book Pro 15" Screen Replacement, Unfasten the rear case: 步骤 2 中的图像 2,2
    • Use a Phillips screwdriver to remove the four 4.5 mm-long screws securing the rear case.

    • If you're reassembling with the Samsung Self-Repair kit, be sure to replace the screws with new ones labeled #3313.

  3. Samsung Galaxy Book Pro 15" Screen Replacement, Insert an opening pick: 步骤 3 中的图像 1,3 Samsung Galaxy Book Pro 15" Screen Replacement, Insert an opening pick: 步骤 3 中的图像 2,3 Samsung Galaxy Book Pro 15" Screen Replacement, Insert an opening pick: 步骤 3 中的图像 3,3
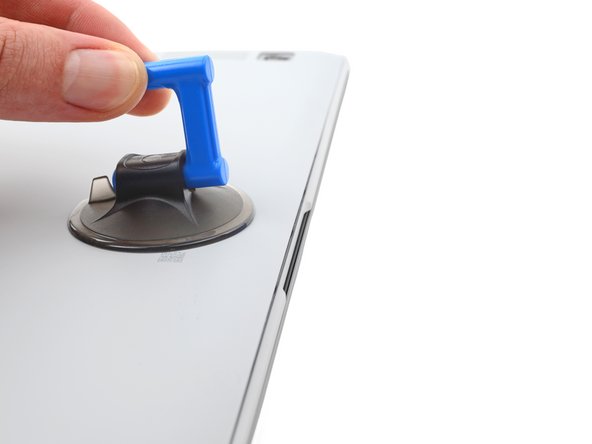
    • Apply a suction cup to the rear case, as close to the center of the bottom edge as possible.

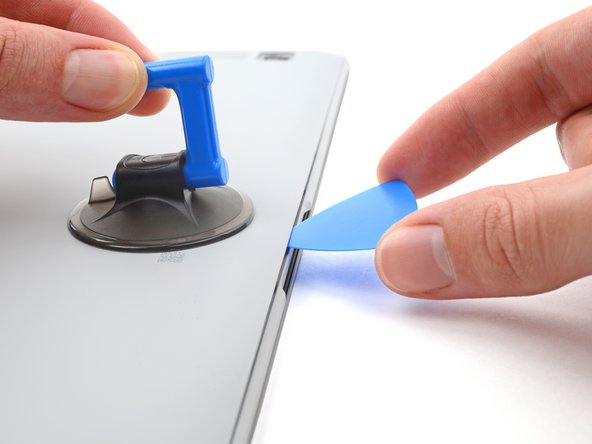
    • Pull up on the suction cup with strong, steady force to create a gap between the rear case and the frame.

    • Insert an opening pick into the gap.

  4. Samsung Galaxy Book Pro 15" Screen Replacement, Release the clips: 步骤 4 中的图像 1,3 Samsung Galaxy Book Pro 15" Screen Replacement, Release the clips: 步骤 4 中的图像 2,3 Samsung Galaxy Book Pro 15" Screen Replacement, Release the clips: 步骤 4 中的图像 3,3
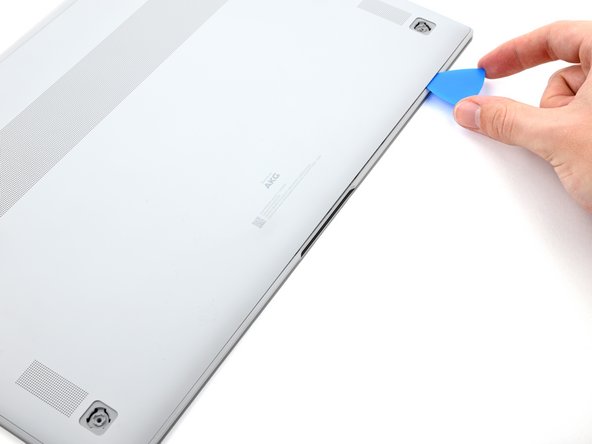
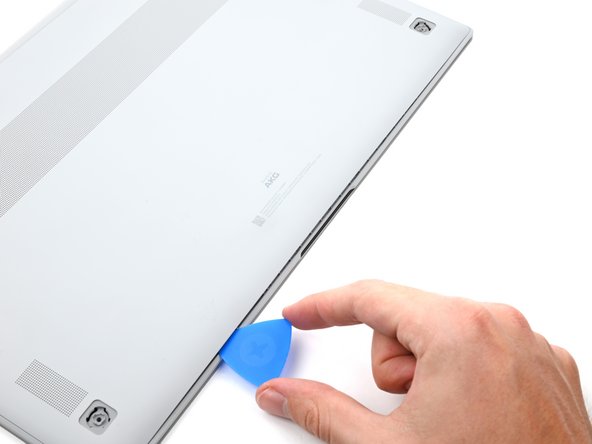
    • Slide the pick along the bottom edge of the rear case to release its plastic clips.

    • Repeat this process for the left and right edges, but stop before reaching the top edge.

  5. Samsung Galaxy Book Pro 15" Screen Replacement, Remove the rear case: 步骤 5 中的图像 1,3 Samsung Galaxy Book Pro 15" Screen Replacement, Remove the rear case: 步骤 5 中的图像 2,3 Samsung Galaxy Book Pro 15" Screen Replacement, Remove the rear case: 步骤 5 中的图像 3,3
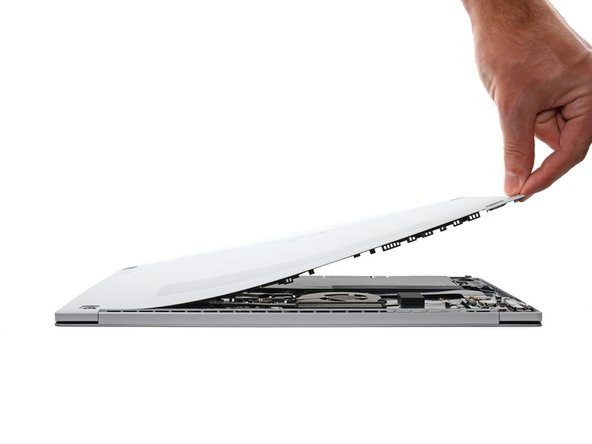
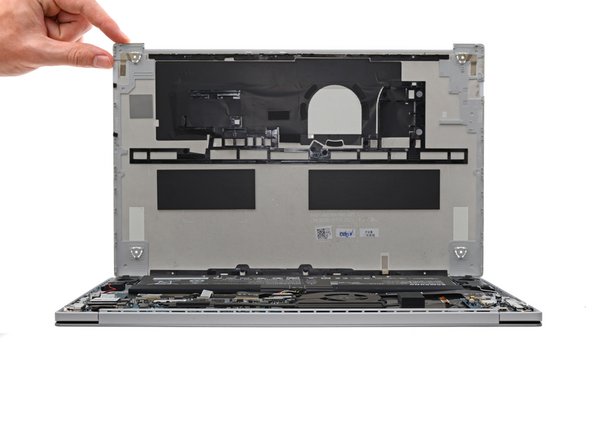
    • The top edge of the rear case is lightly adhered to the frame.

    • Pull the top of the rear case away from the frame to separate the adhesive and release the remaining clips.

    • If you're having trouble separating the adhesive, use an iOpener, hair dryer, or heat gun to soften it.

    • Remove the rear case.

    • During reassembly, perform the following:

    • If you're using a using a genuine Samsung replacement rear case, be sure to peel off any adhesive liners from the rear case before securing the top edge's clips.

    • If you're reusing your rear case, you can use some pre-cut adhesive to re-adhere the top edge if your existing adhesive is no longer sticky.

    • This is a good point to power on your laptop and test all functions before sealing it up. Be sure to power your laptop back down completely before you continue working.

  6. Samsung Galaxy Book Pro 15" Screen Replacement, Disconnect the battery: 步骤 6 中的图像 1,2 Samsung Galaxy Book Pro 15" Screen Replacement, Disconnect the battery: 步骤 6 中的图像 2,2
    • Insert a spudger between the frame and the bottom of the battery cable connector.

    • Pry up and disconnect the battery cable connector.

  7. Samsung Galaxy Book Pro 15" Screen Replacement, Disconnect the display: 步骤 7 中的图像 1,2 Samsung Galaxy Book Pro 15" Screen Replacement, Disconnect the display: 步骤 7 中的图像 2,2
  8. Samsung Galaxy Book Pro 15" Screen Replacement: 步骤 8 中的图像 1,2 Samsung Galaxy Book Pro 15" Screen Replacement: 步骤 8 中的图像 2,2
    • Disconnect the display cable by sliding it out from its socket on the motherboard.

  9. Samsung Galaxy Book Pro 15" Screen Replacement, Disconnect the antenna: 步骤 9 中的图像 1,3 Samsung Galaxy Book Pro 15" Screen Replacement, Disconnect the antenna: 步骤 9 中的图像 2,3 Samsung Galaxy Book Pro 15" Screen Replacement, Disconnect the antenna: 步骤 9 中的图像 3,3
    • Use the tip of a spudger to pry up and disconnect the two WLAN antenna cables.

    • Pry under the bottom of the cable's metal head and not the cable itself.

    • During reassembly, these can be tricky to reconnect. One at a time, hold each connector in place over its socket and press down with the flat end of a spudger. The connector should snap into place.

  10. Samsung Galaxy Book Pro 15" Screen Replacement, Unclip the antenna cables: 步骤 10 中的图像 1,3 Samsung Galaxy Book Pro 15" Screen Replacement, Unclip the antenna cables: 步骤 10 中的图像 2,3 Samsung Galaxy Book Pro 15" Screen Replacement, Unclip the antenna cables: 步骤 10 中的图像 3,3
    • Use a spudger to pry up and unclip the antenna cables from their clips on the daughterboard.

  11. Samsung Galaxy Book Pro 15" Screen Replacement, Unfasten some of the hinge screws: 步骤 11 中的图像 1,2 Samsung Galaxy Book Pro 15" Screen Replacement, Unfasten some of the hinge screws: 步骤 11 中的图像 2,2
    • Use a Phillips screwdriver to remove one 4.5 mm-long screw securing each screen hinge (two screws total).

    • Each hinge has a second screw, which you should leave in place for now.

    • If you're reassembling with the Samsung Self-Repair kit, be sure to replace the screws with new ones labeled #1650.

  12. Samsung Galaxy Book Pro 15" Screen Replacement: 步骤 12 中的图像 1,1
    • Fully open the screen and stand your laptop up on one side.

  13. Samsung Galaxy Book Pro 15" Screen Replacement, Unfasten the remaining screws: 步骤 13 中的图像 1,3 Samsung Galaxy Book Pro 15" Screen Replacement, Unfasten the remaining screws: 步骤 13 中的图像 2,3 Samsung Galaxy Book Pro 15" Screen Replacement, Unfasten the remaining screws: 步骤 13 中的图像 3,3
    • Use a Phillips screwdriver to remove the two remaining 4.5 mm screws (one from each hinge).

    • Remove the topmost screw last, using one hand to steady both halves of the laptop to make sure they don't separate and fall over unexpectedly.

    • If you're reassembling with the Samsung Self-Repair kit, be sure to replace the screws with new ones labeled #1650.

  14. Samsung Galaxy Book Pro 15" Screen Replacement, Remove the screen: 步骤 14 中的图像 1,3 Samsung Galaxy Book Pro 15" Screen Replacement, Remove the screen: 步骤 14 中的图像 2,3 Samsung Galaxy Book Pro 15" Screen Replacement, Remove the screen: 步骤 14 中的图像 3,3
    • Keep a firm grip on both the screen and frame of the laptop. Either half can fall unexpectedly during this step.

    • Push both halves of the laptop together so that the hinges can be lifted clear of their recesses in the frame.

    • Push the frame of the laptop away from you while pulling the screen toward you to separate it.

  15. Samsung Galaxy Book Pro 15" Screen Replacement: 步骤 15 中的图像 1,1
    • Remove the screen.

    • During reassembly, first install the hinge screws without tightening them fully. Then adjust the screen until it's correctly centered and aligned on each side. Finally, tighten the screws.

结论

To reassemble your device, follow the instructions in reverse order and perform the opposite actions, e.g., "reattach" instead of "removing." Skip steps that use heating and prying, and pay close attention to the 📌 bullets as you work through the steps.

Take your e-waste to an R2 or e-Stewards certified recycler.

Repair didn’t go as planned? Check out our Answers community for troubleshooting help.

2等其他人完成本指南。

Alex Diaz-Kokaisl

于01/16/22注册

124,510 声望

创作了581篇指南

团队

iFixit iFixit 的会员

Staff

135 名成员

创作了17,288篇指南

一条评论

Will this screen work on the galaxy book 2 pro? Are they the same screens?

saad abdullah - 回复

添加评论

浏览统计数据:

过去 24 小时: 24

过去 7 天: 78

过去 30 天: 277

总计 4,540