跳转到主内容

此翻译可能不反映源指南的最新更新。 帮助更新翻译查看源指南

三星 Galaxy A50 屏幕更换

你所需要的

  1. 三星 Galaxy A50 屏幕更换, 三星 Galaxy A50 SIM 托盘更换: 步骤 1 中的图像 1,3 三星 Galaxy A50 屏幕更换, 三星 Galaxy A50 SIM 托盘更换: 步骤 1 中的图像 2,3 三星 Galaxy A50 屏幕更换, 三星 Galaxy A50 SIM 托盘更换: 步骤 1 中的图像 3,3
    • 将SIM卡弹出工具,SIM卡弹出位或拉直的曲别针插入手机左侧SIM托盘上的孔中。

    • 用力按以弹出托盘,

    • 然后取出SIM卡托盘。

    • 确保将它们正确放置在纸盘中。

  2. 三星 Galaxy A50 屏幕更换, 后盖: 步骤 2 中的图像 1,1
    • 首先关闭手机。

    • 加热 iOpener 并将其涂在后盖上以软化粘合剂。

    • 三星Galaxy A50的粘合剂非常牢固。如果你无法使用 iOpener 打开设备,也可以使用吹风机,热风枪或加热板。注意不要使手机过热-AMOLED显示屏和内置电池都容易受到热损坏。

  3. 三星 Galaxy A50 屏幕更换: 步骤 3 中的图像 1,3 三星 Galaxy A50 屏幕更换: 步骤 3 中的图像 2,3 三星 Galaxy A50 屏幕更换: 步骤 3 中的图像 3,3
    • 在手机底部靠近USB-C端口的位置插入一个三角撬片。

    • 如果你的开口撬片无法在后盖和中框之间移动,则可以使用吸力手柄或牢固的胶带拉起后盖以留出缝隙。

    • 将打开挡片滑动到左下角。

  4. 三星 Galaxy A50 屏幕更换: 步骤 4 中的图像 1,2 三星 Galaxy A50 屏幕更换: 步骤 4 中的图像 2,2
    • 插入第二个三角撬片,并将其从底部滑至左上角以切割胶粘剂。

    • 如果遇到问题,请施加更多热量以进一步软化粘合剂。请按照iOpener说明进行操作,以免过热。

    • 将三角撬片留在原处,以防止粘合剂重新密封。

  5. 三星 Galaxy A50 屏幕更换: 步骤 5 中的图像 1,3 三星 Galaxy A50 屏幕更换: 步骤 5 中的图像 2,3 三星 Galaxy A50 屏幕更换: 步骤 5 中的图像 3,3
    • 在封底的左上角下方插入第三个三角撬片。

    • 沿手机顶部边缘滑动三角撬片。

    • 将三角撬片留在右上角,以防止胶粘剂重新密封。

  6. 三星 Galaxy A50 屏幕更换: 步骤 6 中的图像 1,3 三星 Galaxy A50 屏幕更换: 步骤 6 中的图像 2,3 三星 Galaxy A50 屏幕更换: 步骤 6 中的图像 3,3
    • 在封底的右上角下方插入第四个三角撬片。

    • 沿手机侧面将三角撬片的尖端滑动到右下角以切割胶粘剂。

    • 将三角撬片留在右下角,以防止胶粘剂重新密封。

  7. 三星 Galaxy A50 屏幕更换: 步骤 7 中的图像 1,1
    • 卸下后盖。

    • 安装后盖后,请在电话上持续施加稳定的压力几分钟,以帮助胶粘剂形成良好的粘合——一堆厚重的书本效果很好。

  8. 三星 Galaxy A50 屏幕更换, 中框: 步骤 8 中的图像 1,1
    • 卸下13颗 Phillips#00号螺丝(4毫米长)。

  9. 三星 Galaxy A50 屏幕更换: 步骤 9 中的图像 1,3 三星 Galaxy A50 屏幕更换: 步骤 9 中的图像 2,3 三星 Galaxy A50 屏幕更换: 步骤 9 中的图像 3,3
    • 在显示器和手机底部USB-C端口上方的中框之间插入一个三角撬片,

    • 沿底部边缘滑动三角撬片以松开夹子。

  10. 三星 Galaxy A50 屏幕更换: 步骤 10 中的图像 1,3 三星 Galaxy A50 屏幕更换: 步骤 10 中的图像 2,3 三星 Galaxy A50 屏幕更换: 步骤 10 中的图像 3,3
    • 继续沿手机的左边缘滑动三角撬片以松开夹扣。

  11. 三星 Galaxy A50 屏幕更换: 步骤 11 中的图像 1,2 三星 Galaxy A50 屏幕更换: 步骤 11 中的图像 2,2
    • 沿顶部边缘滑动三角撬片。

  12. 三星 Galaxy A50 屏幕更换: 步骤 12 中的图像 1,3 三星 Galaxy A50 屏幕更换: 步骤 12 中的图像 2,3 三星 Galaxy A50 屏幕更换: 步骤 12 中的图像 3,3
    • 沿右边缘向右下角滑动你的三角撬片。

  13. 三星 Galaxy A50 屏幕更换: 步骤 13 中的图像 1,2 三星 Galaxy A50 屏幕更换: 步骤 13 中的图像 2,2
    • 确保松开固定中框的所有夹子。

    • 将中框与手机分开。

  14. 三星 Galaxy A50 屏幕更换, 断开电池: 步骤 14 中的图像 1,2 三星 Galaxy A50 屏幕更换, 断开电池: 步骤 14 中的图像 2,2
    • 使用撬棒通过将接口笔直从其插槽中撬起来断开电池连接。

  15. 三星 Galaxy A50 屏幕更换, 前置摄像头: 步骤 15 中的图像 1,2 三星 Galaxy A50 屏幕更换, 前置摄像头: 步骤 15 中的图像 2,2
    • 使用撬棒从前插座向上撬起接口,以断开前摄像头的连接。

  16. 三星 Galaxy A50 屏幕更换: 步骤 16 中的图像 1,2 三星 Galaxy A50 屏幕更换: 步骤 16 中的图像 2,2
    • 用镊子小心地取下相机。

  17. 三星 Galaxy A50 屏幕更换, 屏幕: 步骤 17 中的图像 1,3 三星 Galaxy A50 屏幕更换, 屏幕: 步骤 17 中的图像 2,3 三星 Galaxy A50 屏幕更换, 屏幕: 步骤 17 中的图像 3,3
    • 使用撬棒的平端撬起并断开连接,并从子板上显示柔性电缆。

    • 小心地弯曲两条电缆。

  18. 三星 Galaxy A50 屏幕更换: 步骤 18 中的图像 1,2 三星 Galaxy A50 屏幕更换: 步骤 18 中的图像 2,2
    • 使用撬棒的尖端松开子板上方的显示屏连接器。

  19. 三星 Galaxy A50 屏幕更换: 步骤 19 中的图像 1,2 三星 Galaxy A50 屏幕更换: 步骤 19 中的图像 2,2
    • 加热 iOpener 并将其涂在显示屏上至少两分钟,以软化下面的粘合剂。

    • 将吸柄放在显示屏右边缘附近,并用稳定的稳定力拉动30秒钟以松开胶粘剂。

    • 如果手机屏幕破裂,则吸柄可能不会粘住。尝试用牢固的胶带将其提起,或将吸盘手柄粘在适当的位置并使其固化,以便继续进行操作。

  20. 三星 Galaxy A50 屏幕更换: 步骤 20 中的图像 1,2 三星 Galaxy A50 屏幕更换: 步骤 20 中的图像 2,2
    • 将加热的 iOpener 重新应用到显示器上约一分钟。

    • 向上拉起吸盘,然后在显示器和框架之间的间隙中插入一个三角撬片。

    • 只能插入三角撬片约2毫米。

  21. 三星 Galaxy A50 屏幕更换: 步骤 21 中的图像 1,3 三星 Galaxy A50 屏幕更换: 步骤 21 中的图像 2,3 三星 Galaxy A50 屏幕更换: 步骤 21 中的图像 3,3
    • 将打开的三角撬片向下滑动到右下角。

    • 留在那里,以防止胶粘剂重新密封。

  22. 三星 Galaxy A50 屏幕更换: 步骤 22 中的图像 1,3 三星 Galaxy A50 屏幕更换: 步骤 22 中的图像 2,3 三星 Galaxy A50 屏幕更换: 步骤 22 中的图像 3,3
    • 插入第二个三角撬片并将其滑动到手机的右上角以切割胶粘剂。

    • 将三角撬片留在原处,以防止胶粘剂重新密封。

  23. 三星 Galaxy A50 屏幕更换: 步骤 23 中的图像 1,3 三星 Galaxy A50 屏幕更换: 步骤 23 中的图像 2,3 三星 Galaxy A50 屏幕更换: 步骤 23 中的图像 3,3
    • 插入第三个三角撬片并将其滑动到左上角。

    • 将撬片留在原处,以防止粘合剂重新密封。

    • 如果切割变得太困难,请重新加热并重新应用 iOpener。

  24. 三星 Galaxy A50 屏幕更换: 步骤 24 中的图像 1,3 三星 Galaxy A50 屏幕更换: 步骤 24 中的图像 2,3 三星 Galaxy A50 屏幕更换: 步骤 24 中的图像 3,3
    • 在左上角插入第四个空位。

    • 将三角撬片向上滑动至左下角以切割胶粘剂。留在那里,以防止胶粘剂重新密封。

  25. 三星 Galaxy A50 屏幕更换: 步骤 25 中的图像 1,2 三星 Galaxy A50 屏幕更换: 步骤 25 中的图像 2,2
    • 插入第五个三角撬片并将其沿着手机的底部边缘滑动,以切割剩余的粘合剂。

    • 只能插入三角撬片约2毫米,以免损坏组件。

  26. 三星 Galaxy A50 屏幕更换: 步骤 26 中的图像 1,2 三星 Galaxy A50 屏幕更换: 步骤 26 中的图像 2,2
    • 将加热的 iOpener 应用于显示器,以软化屏幕下方的粘合剂。

    • 等待时,请注意放置在屏幕背面的矩形粘合剂。

  27. 三星 Galaxy A50 屏幕更换: 步骤 27 中的图像 1,3 三星 Galaxy A50 屏幕更换: 步骤 27 中的图像 2,3 三星 Galaxy A50 屏幕更换: 步骤 27 中的图像 3,3
    • 将塑料卡插入松动的手机左边缘。

    • 将塑料卡按入并前后滑动,直到切掉全部粘合剂为止。

    • 一旦确定切穿粘合剂,请从角落移开四个三角撬片。

  28. 三星 Galaxy A50 屏幕更换: 步骤 28 中的图像 1,3 三星 Galaxy A50 屏幕更换: 步骤 28 中的图像 2,3 三星 Galaxy A50 屏幕更换: 步骤 28 中的图像 3,3
    • 从手机的顶部边缘提起屏幕。

    • 小心地将显示屏电缆穿过框架。

    • 移开屏幕。

结论

如果可能,在安装新的粘合剂和重新密封之前,请打开设备并测试维修情况。

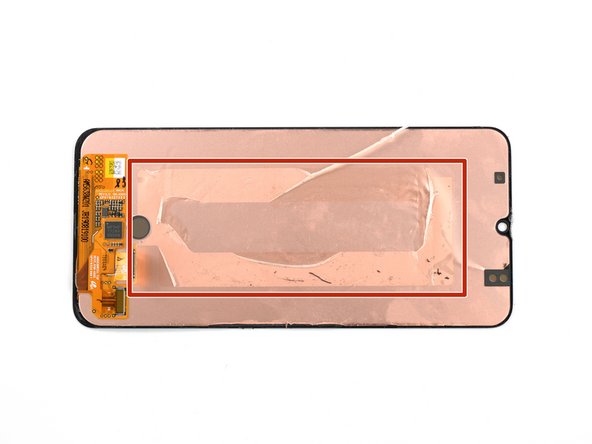
固定新屏幕的最佳方法是在屏幕背面粘贴一张定制的双面胶带。

要重新组装设备,请按逆序进行操作。用异丙醇(> 90%)清洁相关区域后,如有必要,请应用新的粘合剂。

将你的电子垃圾带到R2或e-Stewards认证回收商。维修没有按计划进行吗?尝试一些基本故障排除后的故障排除,或向我们的社区寻求帮助。

70等其他人完成本指南。

由衷感谢以下译者:

en zh

81%

Yuting Zhao正在帮助我们修复这个世界! 您也想加入吗?
开始翻译 ›

Adriana Zwink

于12/18/19注册

48,256 声望

创作了167篇指南

团队

iFixit iFixit 的会员

Staff

135 名成员

创作了16,817篇指南

24条评论

considering it is embedded within the display assembly, any chance that the fingerprint sensor is affected by replacing the screen?

Steve B - 回复

Hi Steve, the fingerprint sensor is not embedded within the display as you can see here. The sensor is fixed under the frame and can be seen through the hole in the frame.

Adriana Zwink -

Hey, I followed this procedure to replace my screen and now, whenever I am charging my phone it keeps on rebooting itself every 3-5 seconds, or even when it’s not charging and is just idle. I tried to open it up and realign everything however it didn’t help and kept rebooting. So I am not quite sure what I did wrong and was wondering if you have ever experienced that, and what to do about it.

Nishtha Sharma - 回复

sounds like you may have damaged the battery in some way, try replacing the battery!

Braydon Vanvelzor -

A good instruction, but if you change the screen without a midframe, it will not work.

Kaig - 回复

添加评论

浏览统计数据:

过去 24 小时: 31

过去 7 天: 253

过去 30 天: 1,234

总计 88,520